 Login
Login

Sales Progression
Expert Agent gives you several Sales Progression tools including the new Visual Sales and Chain Progression features, added in the Expert Agent Touch Release. We'll look at this first and introduce all of the other sales progression tools as we go along
The Chain Grid
Offers can be managed individually but are far better managed as chains. A chain can be one transaction or several. It can include offers that you are dealing with and offers being dealt with by other agents.
To work with your Chains, you first need to set up chain elements in your offer records - see Setting up Visual Sales & Chain Progression.
Once you've got your chains set up, you manage them from the Chains Grid option under Offers:

The Chain Grid form below is displayed:
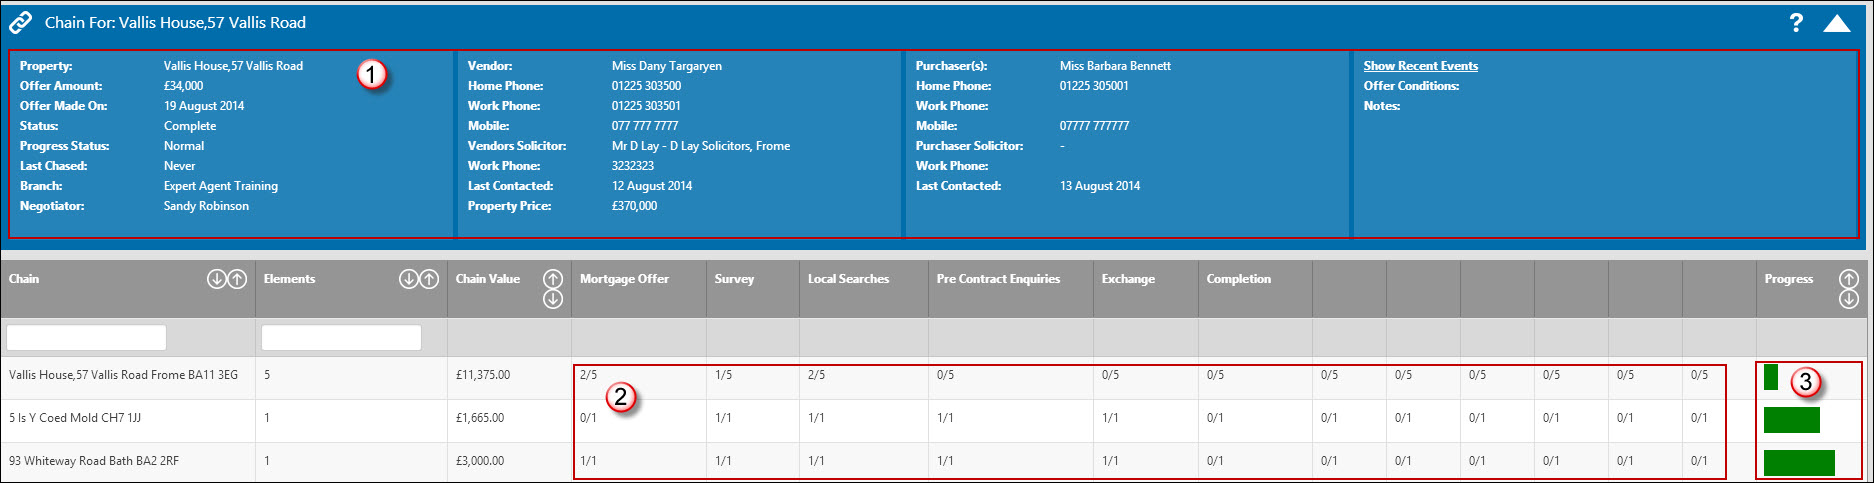
This works much like all other grids. You can sort or filter on the column headers. However, there's no right click and you can't change the order of the columns. As a result, if you don't use all of the user configurable dates, you'll get blank columns showing over to the right. That's nothing to worry about.
- The Tooltip gives you basic information on each chain.
- The grid beneath gives you all the information you need:
Elements: No of elements in the chain
Chain Value: Your commission - it totals all of the fees from elements that are tied into your offers (ignoring elements where other agents are involved)
Key Dates: Mortgage Offer, Survey etc are shown as simple numbers. So, 2/5 in the mortgage Offer column means that 2 of the 5 elements have had a mortgage offer.
Bar Graph: at the far right, there's a bar graph showing progress. This depends on the weighting you've given each element in Configure - see Offers Configuration
Sort the columns any way you want - most valuable chain, chain name etc.
Click into a chain to see the Visual Sales and Chain Progression form as below:

You can now click any element to see the key dates. Click the pencil icon to change stored information. Elements with a green or brown banner belong to your business so the click through goes to the appropriate offer record. Elements with a blue banner are external - clicking them opens the chain details form.
In both cases, make sure you update the target and actual dates. If a target date "slips" - ie the target date has been and gone yet you've not recorded that the event in question (survey, mortgage offer etc) has happened, the status bar down the left hand side will turn Orange - "possible problem" or red - "problem". To fix this, change the target or actual dates.
Other Sales Progression Tools
The other tools look at offers in isolation rather than chains. They are:
- Last Contact in the Offer Form
Whenever you speak to a client, purchaser, lawyer etc open the offer form, right click and do Last Contact - this presents the Last Contact form in the usual way and lets you add a note and set a task for yourself - see Tasks & Messages
- Offer QuickLinks in the Right Hand Tool Bar

- Use the arrow to activate the right hand tool bar.
- Click the 'Edit' option to choose your quick links. There are lots of offer related ones - some shown below. In all cases they open a grid. You can make your own grid selections and save them as your own quick links - see Right Tool Bar (Quick Links). There are a separate set of Quick Links in the Offers Dashboard.
- Standard Letters and Emails
Send these from the offer form - we supply a set of Sales Memos, Offer Accept letters etc that you can adapt.
Setting up Visual Sales & Chain Progression
Visual Sales & Chain Progression (VSCP) was introduced into Expert Agent Touch in September 2014.
We've moved a lot of the chase up functionality from the offers form to the separate Chain Details form. Existing offers won't automatically be added to the Visual Sales and Chain Progression system, though - you'll need to add them in the same way that you would with a new offer.
Add your offer to VSCP
Adding an offer to VSCP is straightforward.
Open the offer - click the Chain Details button lurking in the top right hand corner of the offer's Tooltip. However, only do this if you want to create a new Chain - if the offer in question relates to an existing chain, open the existing offer and add a new element tied into this offer
This opens the offer's 'Chain Details' form with the initial chain element in place.
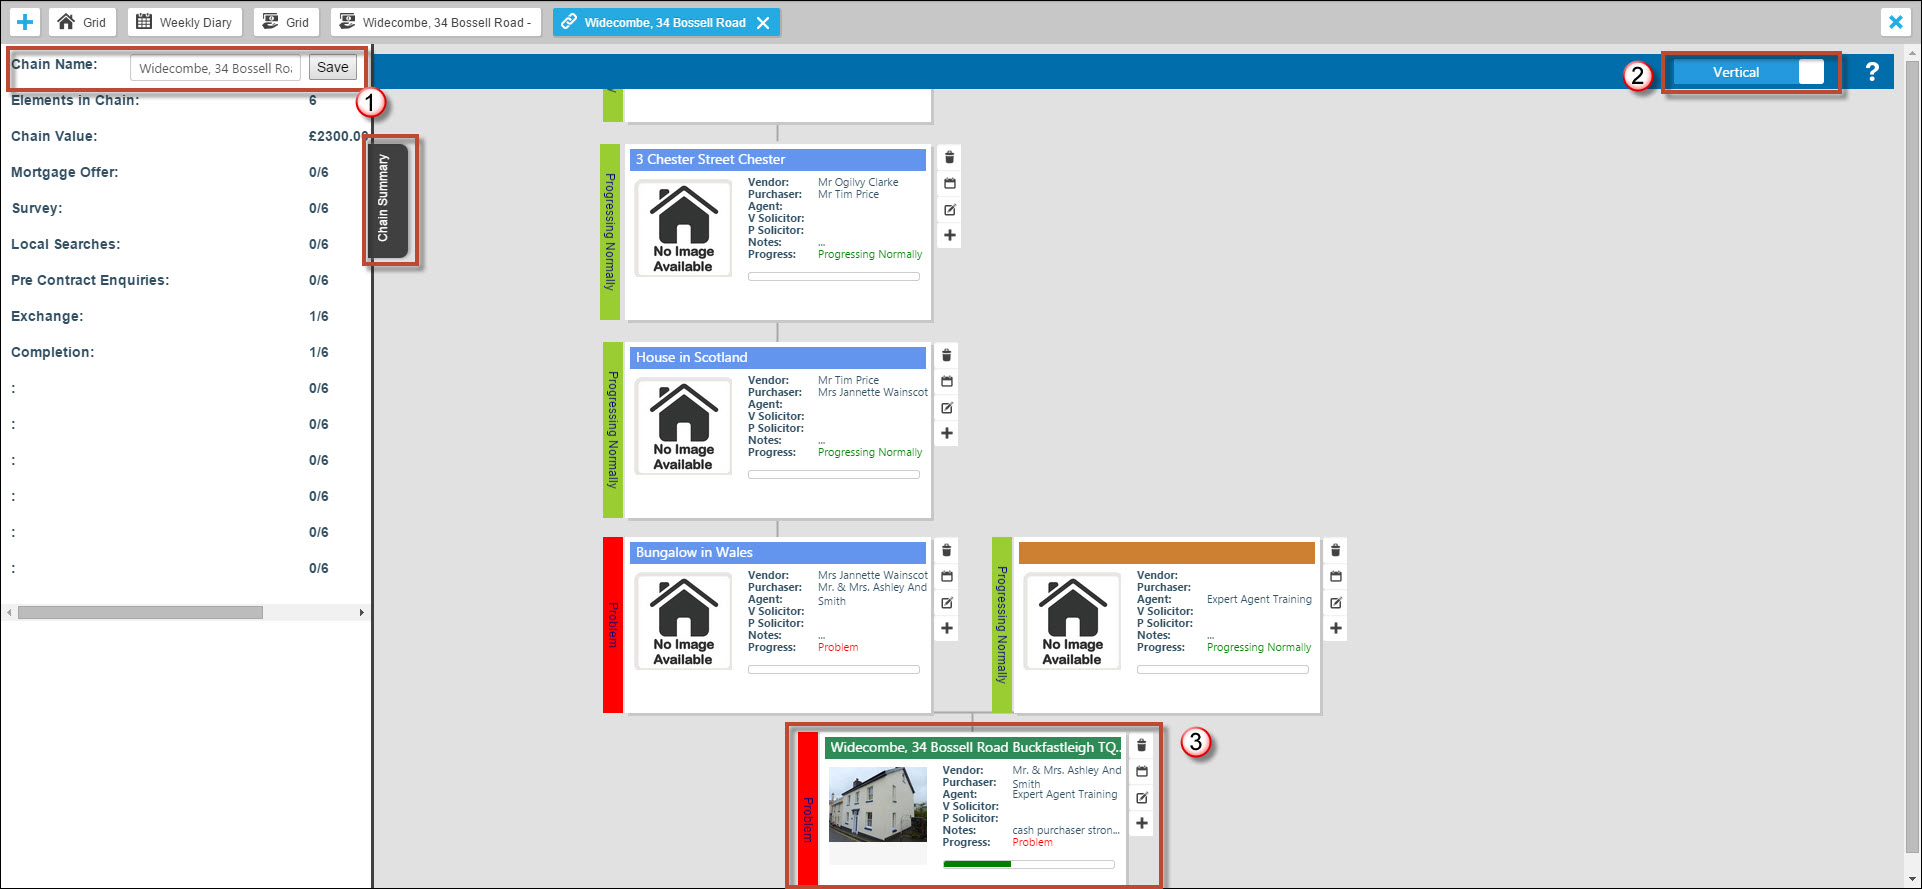
- The example above shows the chain summary panel open - just click it to slide it in and out as required. It shows, in a very easy to follow format, the commission value in YOUR transactions in the chain, then the progress against all the key stages. The first 6 stages (Mortgage Offer to Completion) are fixed but you can add your own in Configure - see Offers Configuration. You also can rename the Chain from here, Expert Agent picks up the name of the first property relevant to you in the Chain and names it, if you wish to change it however, you can from here.
- The Chain Details form will show chain elements vertically or horizontally. The button (2) top right changes this over.
Add other chain elements to your chain
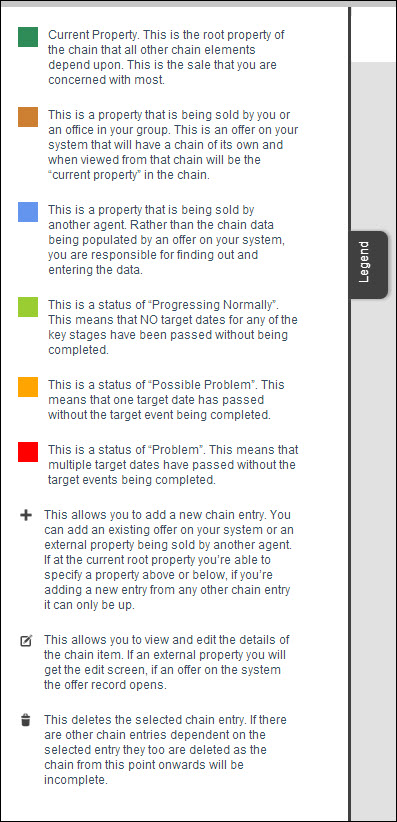
The green chain element shown (3) in the example above is the offer you are working on. Each element is colour coded - there's another pull out panel on the left of the form that explains the colour coding as below:
You now need to add as many other chain elements as you can.
Chain elements can be either
"Internal" - offers on your property stock such that the vendor and purchaser are known or
"External" - the offer in question is being dealt with by another agent and you have very little, some or all of the necessary information.
You've already got one chain element - the green one.
Each element has "tools" down the right hand side.

- Click the '+' button to add another element
This prompts as follows:

If the element you want to add is the vendor of the property in the chain element currently highlighted, choose Yes. If not, choose No. If you choose "yes", the new chain entry will have the vendor of the previous element set at the purchaser of the new one.
In this case, Miss Targaryen, the vendor of Vallis House, is the purchaser of another property so we choose "Yes".
The Add/Edit Chain Entry form is displayed. This has 5 page tabs - property, vendor, purchaser, dates, notes.
There are 2 version of this form, depending on whether you want to add a chain element that relates to an existing offer on your own system or whether the element you want to add is "external" - where the purchase is from another agent
If the Chain Element relates to an offer YOU are dealing with:
Make sure that the offer you want to link to is already on the system.
Set the Add/Edit Chain entry form up as below:

- Choose 'UP'.
- Choose 'Offer on System'. However, the offer has to exist already. So, in this case as Miss Targaryen, the vendor of Vallis House, has already offered on another property, we can hook this new element up to that chain.
- Just type basic search information into the text box and choose [Search]
- The results show in a mini grid - choose the required Offer.
- Click the save icon.
The offer details will show in a small box in the left hand side of the form as below:

Don't worry that this preview doesn't show Vendor or Purchaser details - they have been added and you will see them later.
You'll now need to set up the other page tabs on this form.
OR
If the Chain Element DOESN'T relate to an offer YOU are dealing with:
So, in other words, if your vendor is buying from another agent.

- Add a new chain element, choose 'UP' and choose 'External'.
- Enter the property postcode and choose it. If you don't know the full address, "Bungalow in Bournemouth" is fine - you just need something to identify the chain element.
- Choose or add the agent in question - you'll see the standard EA pick list - recent estate agent records will show and you can search or add a new one.
Once you've got the property details in (regardless of whether they relate to an Offer on the System or an External offer:
Go through the remaining page tabs of the 'Add/Edit Chain' form as below:
Vendor Tab:

Purchaser Tab:
If you choose "Yes" when prompted at the "Do you want to create a new chain element using the vendors details?", the purchaser details will get filled in from the element below.

There's a postcode search for the Purchaser address (1) and a button to add/Change the solicitor (2)
Dates Tab
These inherit the dates set up in the previous element. They don't update automatically after that.

Notes Tab

We've given you all the dates from the offer form for completeness but imagine you'll just use the private summary and the 'Summary for Lawyers and Other Agents'.
When you've finished, clicked the save button bottom right and the new chain element will be displayed as below:

If you hover your mouse over the edit or date buttons you will see more information.
Click the chain element itself and it will rotate to show the key dates.
Editing a Chain Element
Click the pencil button to the right of the element (above the +). If the element is connected to an Offer, the offer record will open and you can update the information in the offer form. If the element relates to an external offer, clicking edit will open the same form you used to add the chain element.
Accepting an Offer
To Accept an offer, right click in the offer form.

This displays the form below:

Tick whether you’d like your property status to be changed to Sold STC, then check whether you still want the property to be marketed on websites, portals and via matching.
Finally, decide whether you want the applicant to be made inactive so as to prevent matching against anything else.
The property's Sold STC date will be updated and the offer's accepted date will change.
The Accept Offer action has an associated Event Template Trigger - it can create automatic letters - see Event Template Triggers
If you have configured Expert Agent's For Sale Board functionality to pop up when an offer is accepted, you'll be able to instruct your contractor to carry out the appropriate board movement - see Managing and checking Board movements
Confirming your Offer
Expert Agent's offer form has a "Statutory Confirmation" option.
The purpose of this option is to placate Hampshire Trading Standards who, nearly 10 years ago, told us that EA might be contributing to the negligence of agents around the production of the statutory "end of day" letter required on offers.
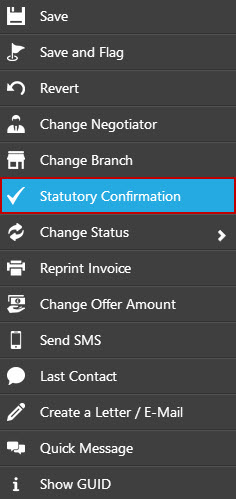
Use this to update the offer status to Confirmed and add an Event to the property and applicant history.
This has an associated event template trigger so can be programmed to produce a standard letter automatically. - see Event Template Triggers
If you use this option, the offer status is changed from Pending to Confirmed.
Track your Confirmed offers using Quick Links in the right hand tool menu - there are quick links for "Pending / Confirmed Offers" and separate ones for "Pending Offers"
Mark as Complete
To mark an offer as completed, right click and select Change Status>Mark as Complete as below:

You may have already marked your applicant as inactive earlier in the process however in case you didn’t and would like to at this time, you are presented with the option.
Choose ‘Yes’ or ‘No’ and the window will close, changing the offer status to complete.
The property and offer status will be changed to 'Completed'.
'Complete Offer' will fire the corresponding Event Template Trigger - see Event Template Triggers - or right click in the offer to generate a set of letters or emails manually as required.
If you need to reprint your invoice, there's an option in the property right-click menu.
To mark your invoice as paid, open the property form and right click - you'll find a 'Mark as Paid' option.
Tel: 01225 303500 | Email: account.managers@webskyltd.com
Terms of Business | Cookie Policy | Privacy Policy | ZPG Modern Slavery Statement
Designed by the Expert Agent Design Department
