 Login
Login


How can I create a statement for just one of my landlord's properties?
If you need to create a statement for just one of your landlord's properties rather than their entire portfolio you will need to exclude them from your normal statement run via the payments to make report and instead produce the statement from their landlord record itself.
From the landlord record, you get the option to filter the statement by property ahead of clicking the 'create statement' button to enable you to produce a statement for just the properties you require.
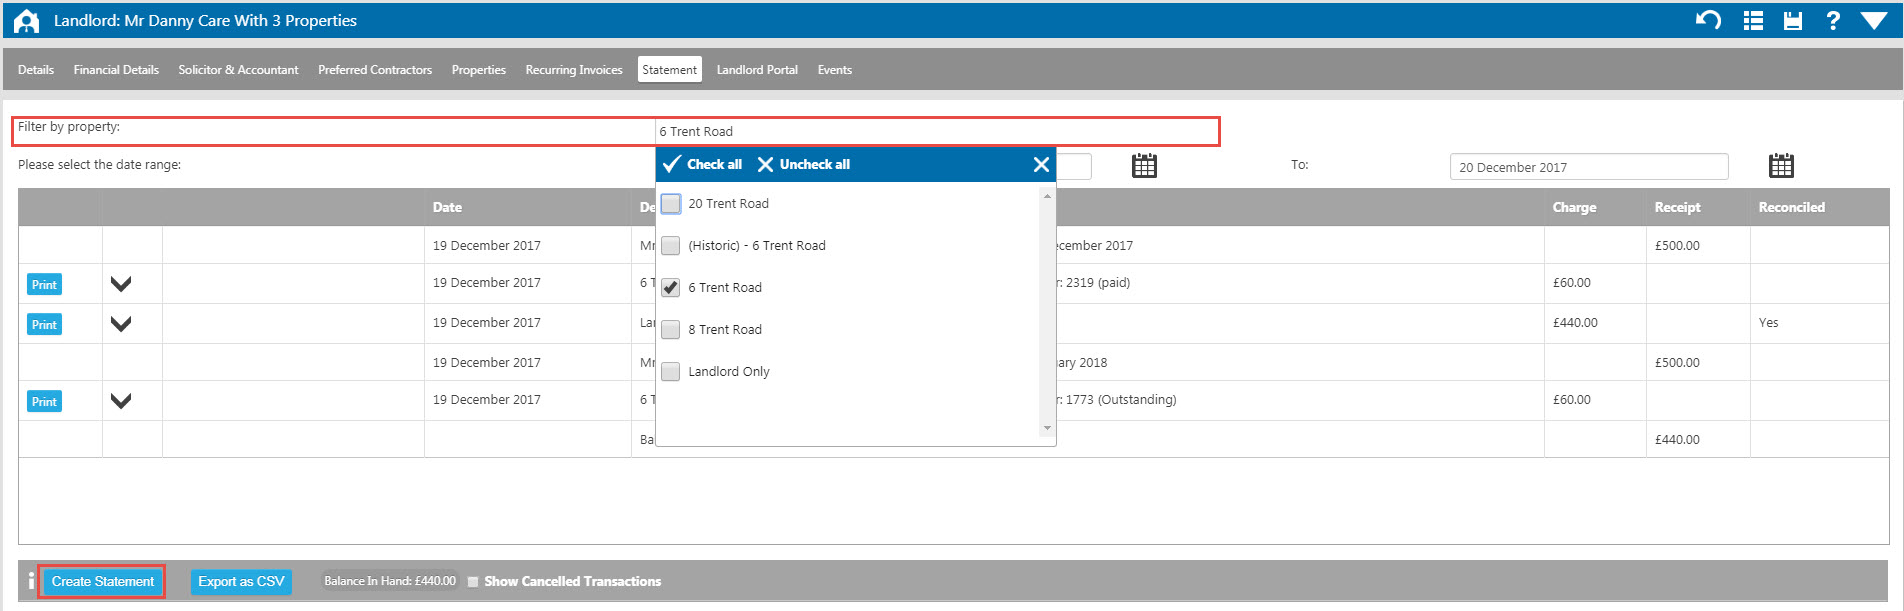
For more information on producing a statement from the landlord statement tab please see Statements from a Landlord Record.
Statements Vs Remittance
You have the option to produce for your Landlords and your Contractors either statements or Remittance Advice depending on your preference. We recommend that you decide which route you are wanting to go down before you start paying your clients through Expert Agent and get your templates setup in advance.
Remittance Advice
A Remittance Advice is receipt for the payment. Its a very basic document that will show your Landlord or Contractor what they have been paid and which transactions have been included in the payment. For your Landlords, they will see any rents that you have paid them followed by any sales and purchase invoices you have deducted. There will also be a note of any funds you have retained on account and any tax deducted for any non-resident Landlords. For your Contractors, they will see any invoices you have made payment to them for followed by any commissions you have deducted (for your Contractors who are subject to commission).
There are default Remittance Advice templates in the Expert Agent Default Letters for Landlords and a separate one for your Contractors. The format of the Remittance is hard-coded and cannot be changed but you can clone them across into your 'Our Letters' and add any headers or footers in to personalise them.
You can email or print your Remittance Advice from either the payments to make report in bulk for the payments you have made or from the client record itself. Please see the page Remittance Advice for further information on producing your remittance.
Statements
A Statement is a statement of account for either the Landlord or the Contractor. It will show any transactions that have been posted on account within the specified period. For your Landlords, they will see any income received, any sales and/or purchase invoices deducted and any payments made (along with any tax deducted for non-resident Landlords) to them within the date/transaction range that you have specified when running the Statement. For your Contractors, they will see any purchase invoices you have posted on their behalf along with any payments you have made to them and any commissions that have been deducted. Both Contractors and Landlords will also see any relevant balances brought into the period or carried forward into the next period whether this be retained funds, outstanding invoices or unpaid funds. Anything that has been posted will show on the Statement, not just transactions that specifically relate to the payment that has been made as with a Remittance Advice.
There are multiple Statement templates to chose from for your landlords, the template you chose will determine the way your transactions are laid out but the same as above with your Remittance will apply; the format of the Remittance is hard-coded but you can clone them across into your 'Our Letters' and add any headers or footers to in to personalise them. Please see the page Landlord Statement Examples for further information on this. For your Contractors there is one Statement template available.
You can email or print your Statements from the payments to make report, Landlord/Contractor grid or from the client record itself, please see the page Landlord Statements for further information.
How do I create an HTML Header?
Why should I create an HTML Header?
By creating an HTML header, and using it in the way it was designed, you are saving yourself and your team a lot of time and hassle. Especially if you ever decide to re-brand or simple change your logo.
What is wrong with uploading the header into the email?
The issue with the way the majority of agents add the header and logo is that if it ever needs to be changed, you will need to go throguh all your current templates, and any you create in the future, and manually change the logo and other details. This can be quite a job when you have a few hundred templates.
So how should I be doing it?
By following the instructions below, you will be able to add the same header with a quick three clicks. It will also mean that if you ever need to change anything in the header, you only need to change one template, and it will update across all of your templates that the header is attached to.
1. Go To Tools -> Configuration -> Output Configuration -> Templates
2. Click the + symbol at the bottom to create a new template
3. Select the template format of HTML (1), name your template clearly (2) and change the type to General (3).

4. Click Next, then on the next screen, click "Edit Content"
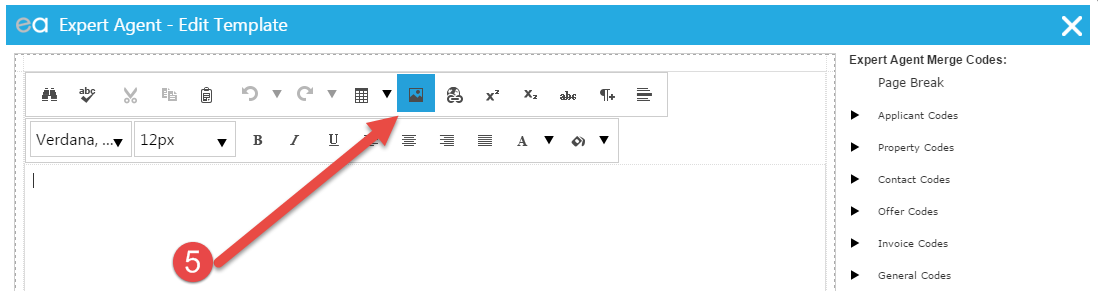
5. Then click the Image Manager icon as indicated below:
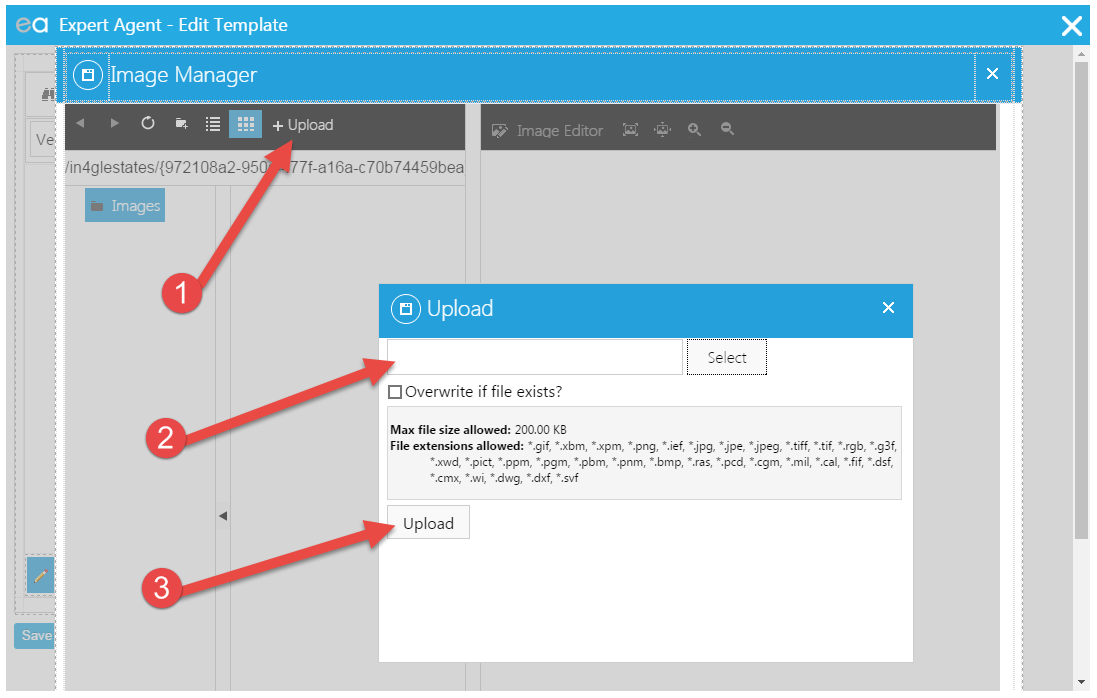
6. Then click the Upload option (1), select your logo from your computer (2), then click the upload button (3) to upload the image to Expert Agent.
7. If you are only adding a logo to your header, please skip to section 9 of this guide.
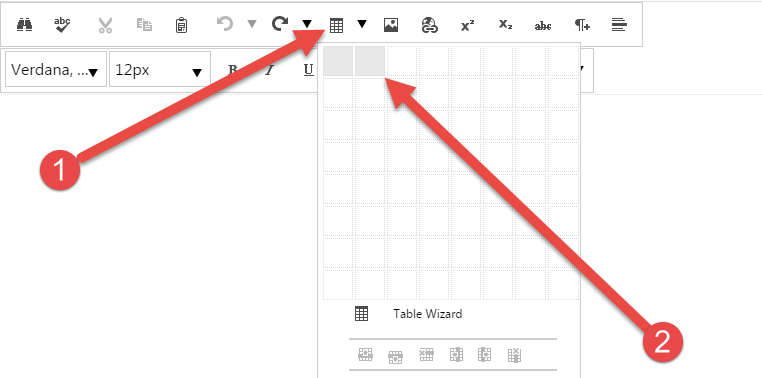
Once your logo has been uploaded into the system, close the image manager using the X at the top right, or the cancel button at the bottom left. You then need to add a table by clicking on the table icon (1) and in this instance we are using two cells (2) in the table so we have room for the logo and one for the company details. You can use as many as you need.
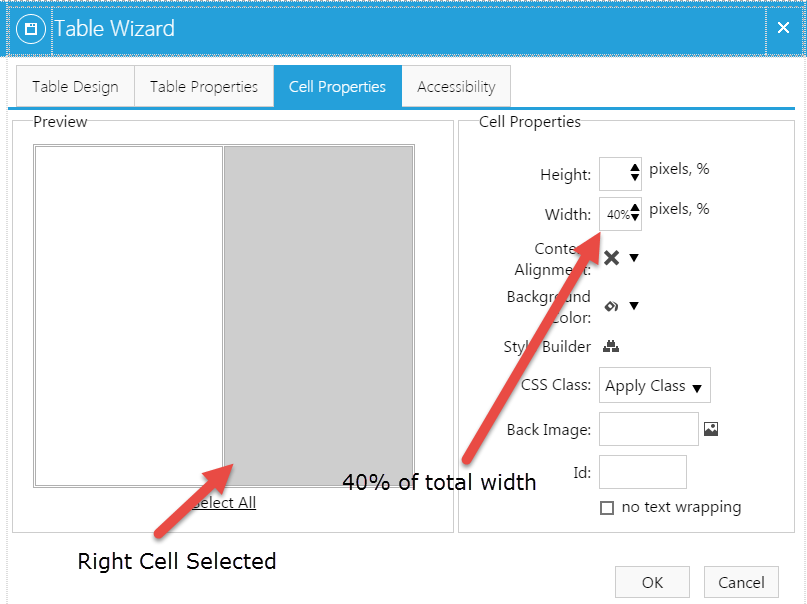
8. Drag your table to the correct approximate size you want. It will automatically split the table equally. If you don't want it to be equal, right click in the table and select "Cell Properties". From this screen, you can select which cell you want to control, and enter what percentage of the total width you want each cell to be. Remember to add the percentage sign, all cells must equal 100% when added together. This can be adjusted at a later time.

9. Once you have okayed back to the template, click inside the table where you want your logo to show, and click on the image manager icon from before. Then select your logo (1) and click Insert (2).


10. If you are only using a logo, please skip to section 11
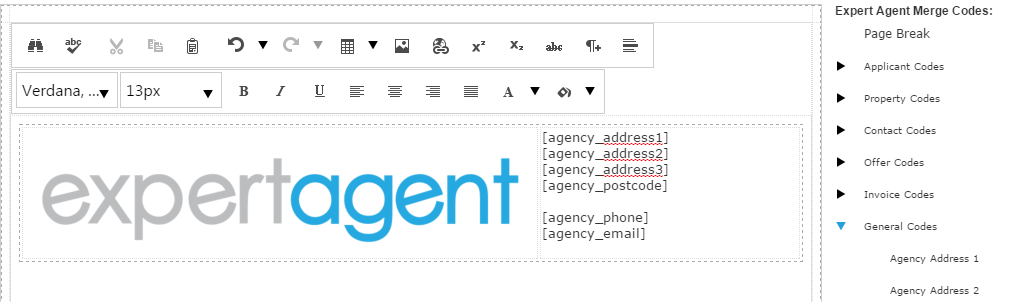
Your logo should have loaded into the side of the table you previously selected. You may need to grab a corner/side of it and resize it so that it's the correct dimensions. Once you have the logo in the right position, click into the next table for you address and add the merge codes for the information you want to be displayed.

11. You now have the basic header template that you can come back and make adjustments to at a later date. Click save and close, and then click the save icon, so you are looking at the "Edit Templates" screen.
12. The following step can be repeated to add your new header to any HTML/Email templates. The most productive way is to inform your colleagues of the method, so that whenever they use a template, they make sure they have added the header to it. Which means you don't have to do them all at once.
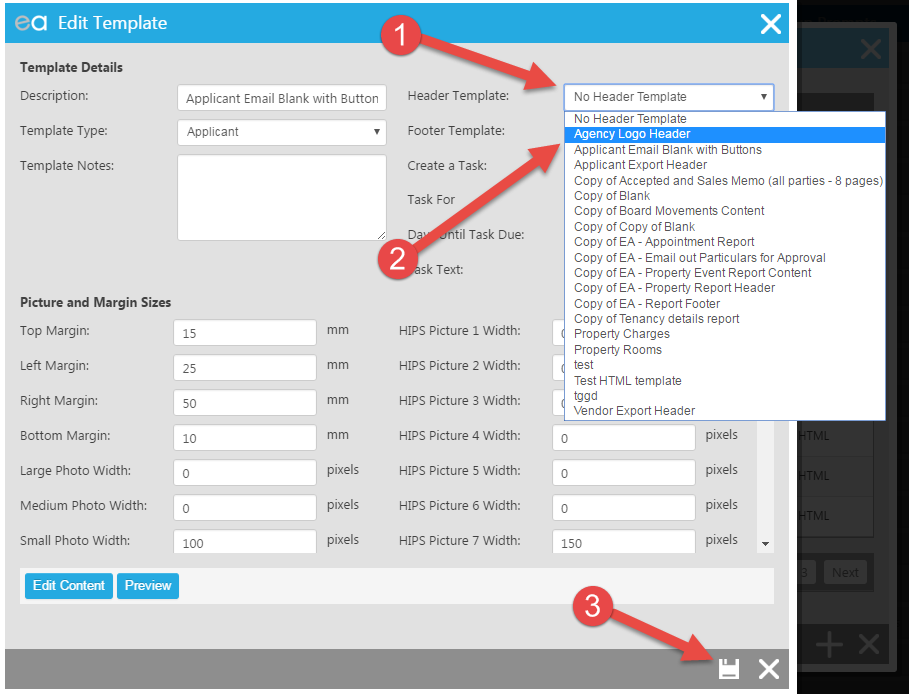
13. Select an HTML template, and click the "edit" button in the left column. You will then see a couple of dropdowns in the top right of the window. Use the drop down "header" field (1) to select your new header (2). This can also be done for footers in the same way you have done for a header. Once you have selected it, you can click the preview button to see how it will look, or just the save button (3).
This exact same method can be used to create footers as well. By using this method, if you ever need to make changes, all you need to do it edit you header template, and it will change on every email it is attached to.
How do I save a CSV file on a Mac?
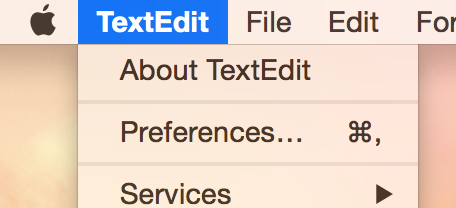
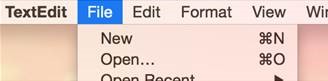
1. Open TextEdit on your Mac
2. Highlight TextEdit in the Menu Bar and open "Preferences"
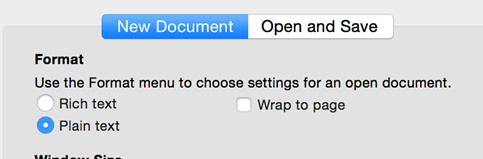
3. Make sure the New Document tab is selected. Change the button so that "Plain Text" is selected
4. Open a new document in TextEdit
5. If the above actions are correct this should open a new window with no options to style the text as below:
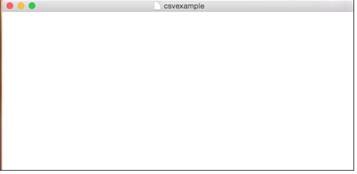
6. Add your data into the document and save.

7. Find the document you have just saved -> Right Click -> Get Info
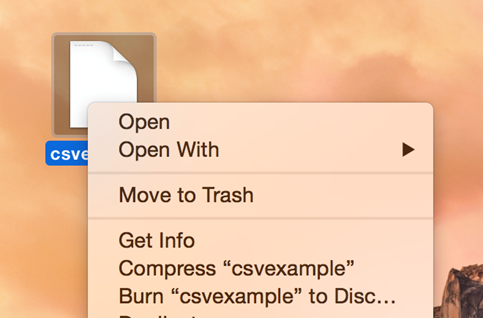
8. Open the Name & Extension drop down menu. Change the .txt to .csv
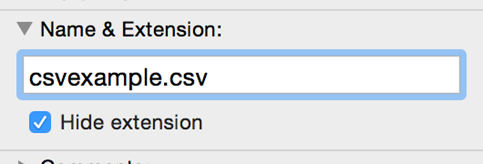
9. Then click use .csv

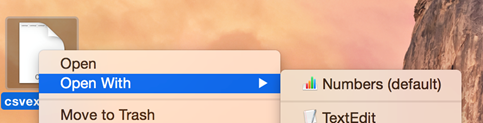
10. This will change the document to a CSV file which you can then open with Numbers.
Tel: 01225 303500 | Email: account.managers@webskyltd.com
Terms of Business | Cookie Policy | Privacy Policy | ZPG Modern Slavery Statement
Designed by the Expert Agent Design Department
