Adding applicants into EA
This involves the very simple process of adding an applicant record into Expert Agent. You will always be presented with a wizard with various tabs when adding any new record into the system. This simply ensures you are prompted to ask all the relevant questions and Expert Agent will do the hard work of placing the information into the appropriate places in the Applicant form for you.
There are 6 ways to enter a new Applicant record into Expert Agent:
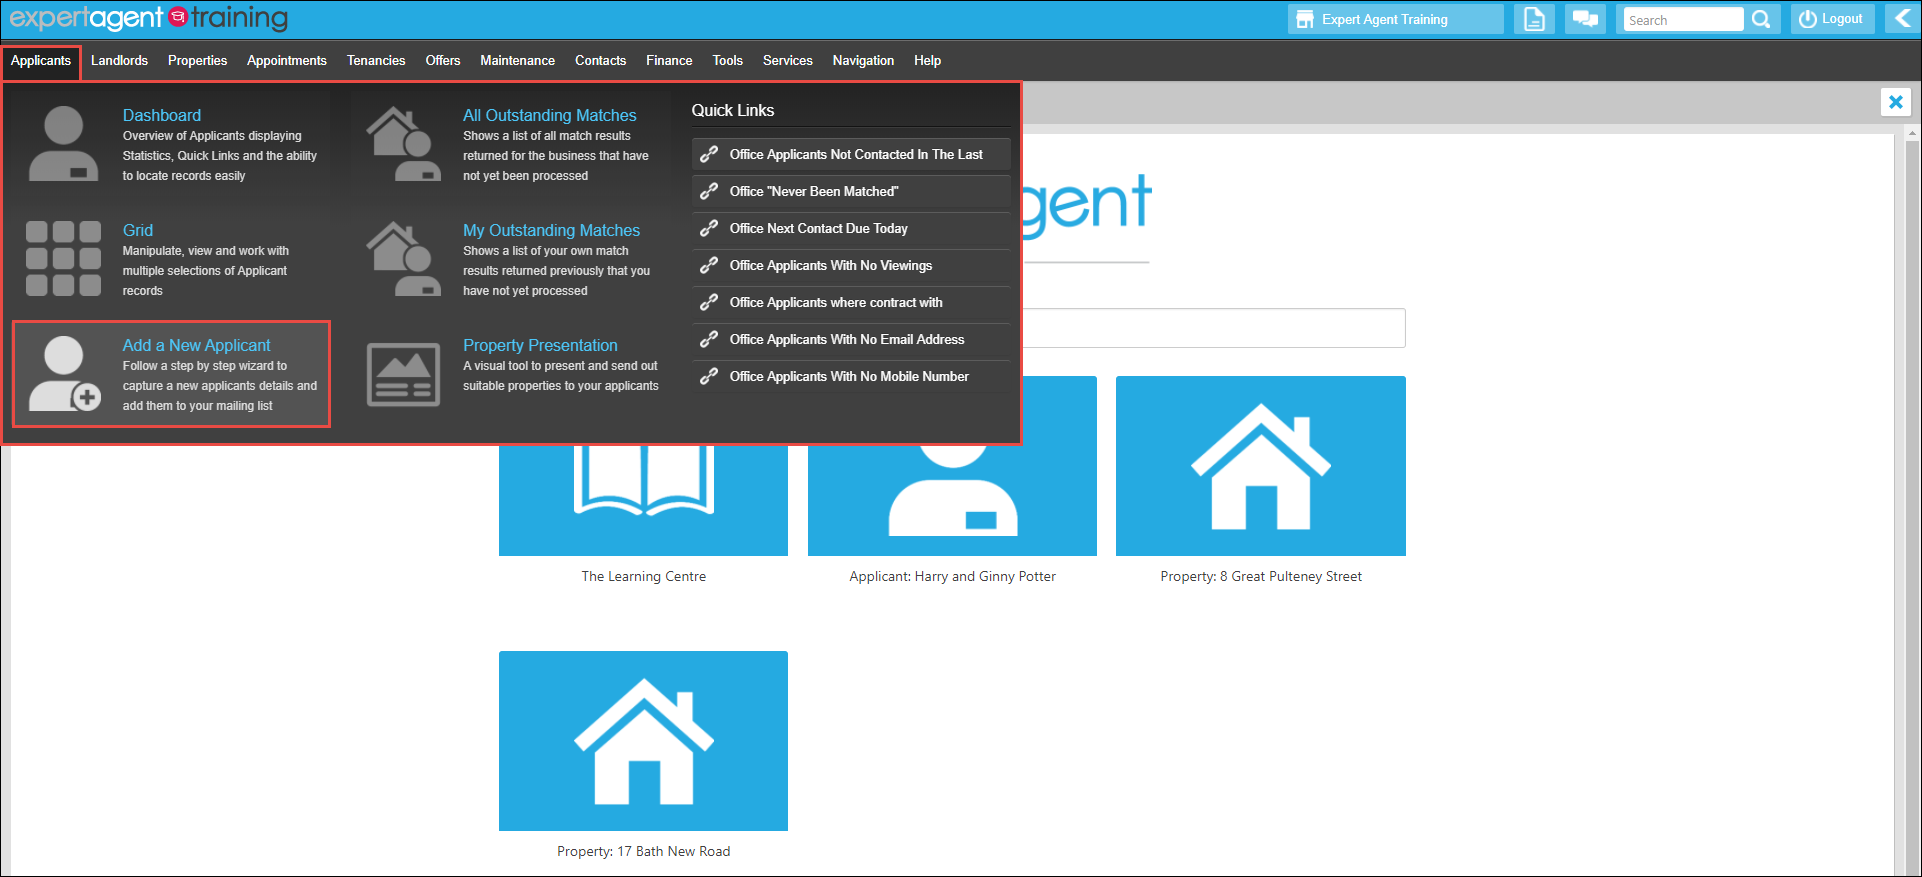
- From the Applicants drop down in the Top Menu.
- Selecting the “Add a New Applicant” link from the Applicant Dashboard.
- Selecting the “New Applicant” option from the Applicant Grid.
- Adding an Applicant from the Quick Search box from the Top Menu.
- Creating an Applicant from a property record via the right click menu option.
- Creating an Applicant record from a diary appointment.
In this example we’re going to “Add a New Applicant” from the Applicants dropdown in the Top Menu. In all instances you will be presented with the “Add New Applicant” form.
The wizard is there to ensure you are capturing all the applicants’ important information. Simply fill in the fields on each page of the applicant wizard.
Tab 1 – Name & Address
This page ensures you capture the correct contact details for your applicant.

- Ensure you are on the 'Details' tab.
- Use the TAB key to move quickly through the wizard. It adds in the capitals & the salutation as you go along. It’s really important to capture e-mail details & mobile numbers. E-mails are not only a quicker way of corresponding with your applicant but also save your business money. If you are going to be using the Expert Agent texting service it is imperative that you capture as many mobile numbers as possible. If you need to add a second applicant simply tick the 'Add Applicant 2' field and you will be presented with extra fields.
- Expert Agent has full postcode look-up. Just put the postcode in here – Pause – Pick the address from the list or enter the address manually if preferred.
- Click the Applicant Preferences button to select what your applicant is happy to be contacted about, and how you should contact them. NB if you click Next or Save, the Applicant Preferences window will open if you have not manually opened it already.
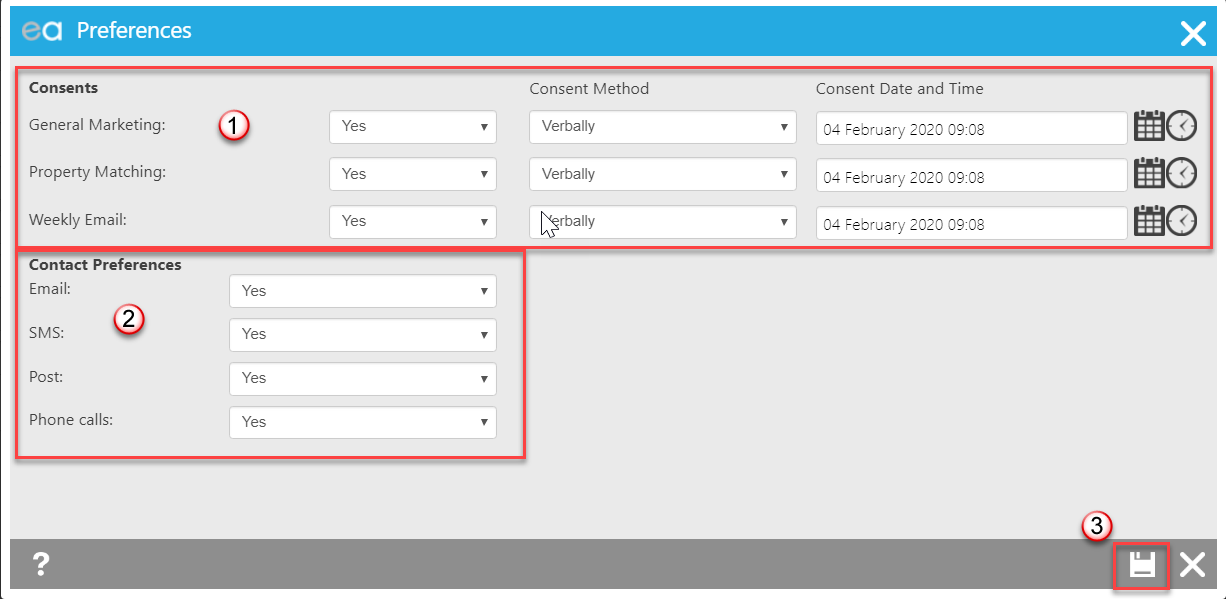
- Select the marketing options to which the Applicant consents, and the Method with which they gave you the Consent (Verbally or In Writing). If you select "I did not ask" from the drop down, you will not be asked to fill in a Method.
- Select how the Applicant is happy to be contacted. NB If you select "Yes" for a means of contact which you have not entered on the Applicant Record (e.g. you select Yes for Email, but have not entered an email address,) then when you Save this window you will see a pop up telling you that you have not entered a particular means of contact. The pop up will not prevent you saving, it is simply to draw your attention to the missing details.
- Click Save to return to the Add New Applicant wizard.
The Welcome E-Mail and Weekly E-Mails are system generated emails with links directing them to suitable properties. Please note: ensure that at least one contact method has been entered (address, email, home, mobile or work number) otherwise the record will not be allowed to save.
Tab 2 - Requirements
The information on the Requirements tab determines which properties will be matched to your applicant.
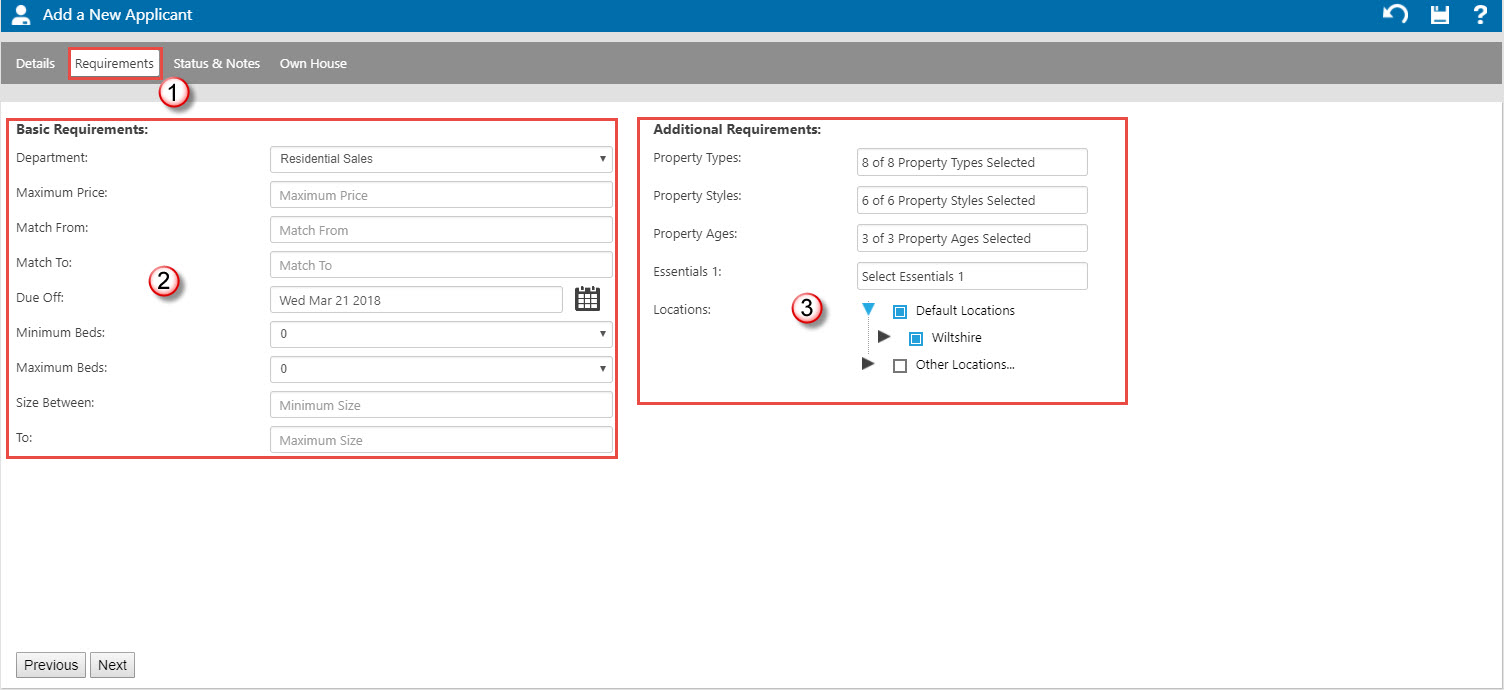
When selecting and deselecting match criteria, unticking the tick at the top level of the criteria you are working in will deselect all sub level ticks, so if you only have a couple of selections to make it will be quicker and easier to deselect them all and tick the relevant selections than unticking all but the required ones. Putting the tick back in the top level box will tick all the sub level criteria.
- Ensure you are on the 'Requirements' tab.
- The price range gets filled in when you tab from the maximum price – edit as required. For sales applicants, put the price in in full i.e. 350000. For lettings applicants, you’ll need to enter the amounts based on how you advertise your properties; either weekly or monthly rents, you can’t mix them up! Set when the applicant would be due off the mailing list and the minimum and maximum number of beds they require. If you've chosen to show Size in this department, you must fill in your applicant's desired size range so that it can be factored in for Matching.
- Click to expand types, styles etc. These are setup in Configuration and can be edited to suit your business needs. Be careful when using “Essentials” – this is matching criteria that is deemed essential in the matching process and your applicant could miss out on potential properties if used in incorrectly. Only use if it is absolutely essential that the property has certain criteria. Essentials 1 is recommended for Sales (i.e. Parking, Garaging, Outbuildings etc.) and Essentials 2 for Lettings (i.e. Suitable for Pets, Student etc.) There are 3 levels of areas – use “+” to expand them to select Regions, Districts and Locations in which your applicant is looking.
Tab 3 - Status & Notes
This page records the status of your applicant regarding their Own House, Mortgage Quotes and Enquiry Methods. These status boxes can be configured by your super user to suit your business in order to classify your applicant successfully.

- Ensure you are on the 'Status & Notes' tab.
- The status prompt labels and dropdown box content can be set up specifically for you by a superuser – there are 5 of them see the Applicant Status Prompts section of Configuration Chapter for more details. You can switch off the prompts that you don’t need. Once you become familiar with the content in the status boxes, move through them with the TAB key, they will turn blue when active. Then just hit the first letter of your choice – so to select “Potential Vendor” in the “Own House” status just hit “P” . Although it is important to capture all these details, do pay particular attention to the “Enquiry Source” option as this allows you to determine where most of your business is coming from, effectively allowing you to setup your next quarters budgeting for advertising.
- Use the 'Notes' section to enter any notes regarding your new applicant.
Tab 4 - Own House
This page is used to accommodate information on their current property which can be beneficial to record should you wish to persuade them for a valuation.

- Ensure you are on the 'Own House' tab. This tab designed is to capture as much information about their current property as possible.
- Fill in as required – the agreement expiry date comes up in the “Applicants where contract with other agent expires within 7 (or 31) days” quick link on your applicant dashboard – fantastic to start looking at getting them booked in for a valuation as soon as the agreement expires.
- This page will still show if you are adding a Lettings Applicant. Feel free to use this as some additional note or summary boxes or if this is of no interest to you.
- Save
Note: You are able to save your record at any point throughout this process by clicking the save option in the top right corner of the wizard.
Applicant Welcome E-Mail
The Welcome E-mail is a fantastic tool to use for your new applicants. As soon as they register with you they will receive a Welcome E-mail with a link to properties that match their requirements. A weekly e-mail will be sent in the same format (with different text) allowing them to view any new instructions you have taken on in the last week as well as any price changes that fit their criteria.
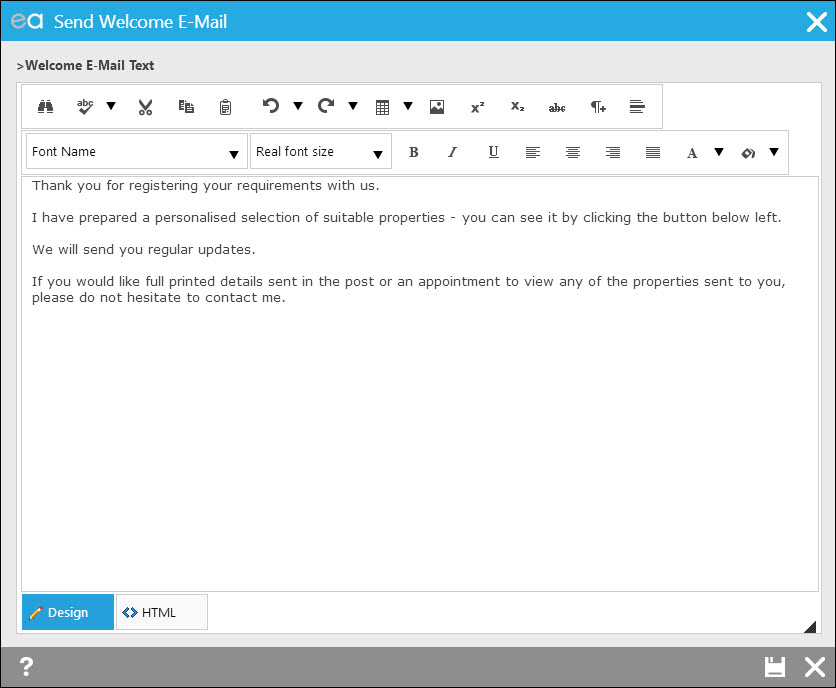
You are able to make any one off changes to the text by using the editing tools at the top of the e-mail.
As soon as you are happy with your Welcome E-mail hit the save option– this will create your new applicant form and send your Welcome E-mail.
You will then arrive at the Applicant Form.
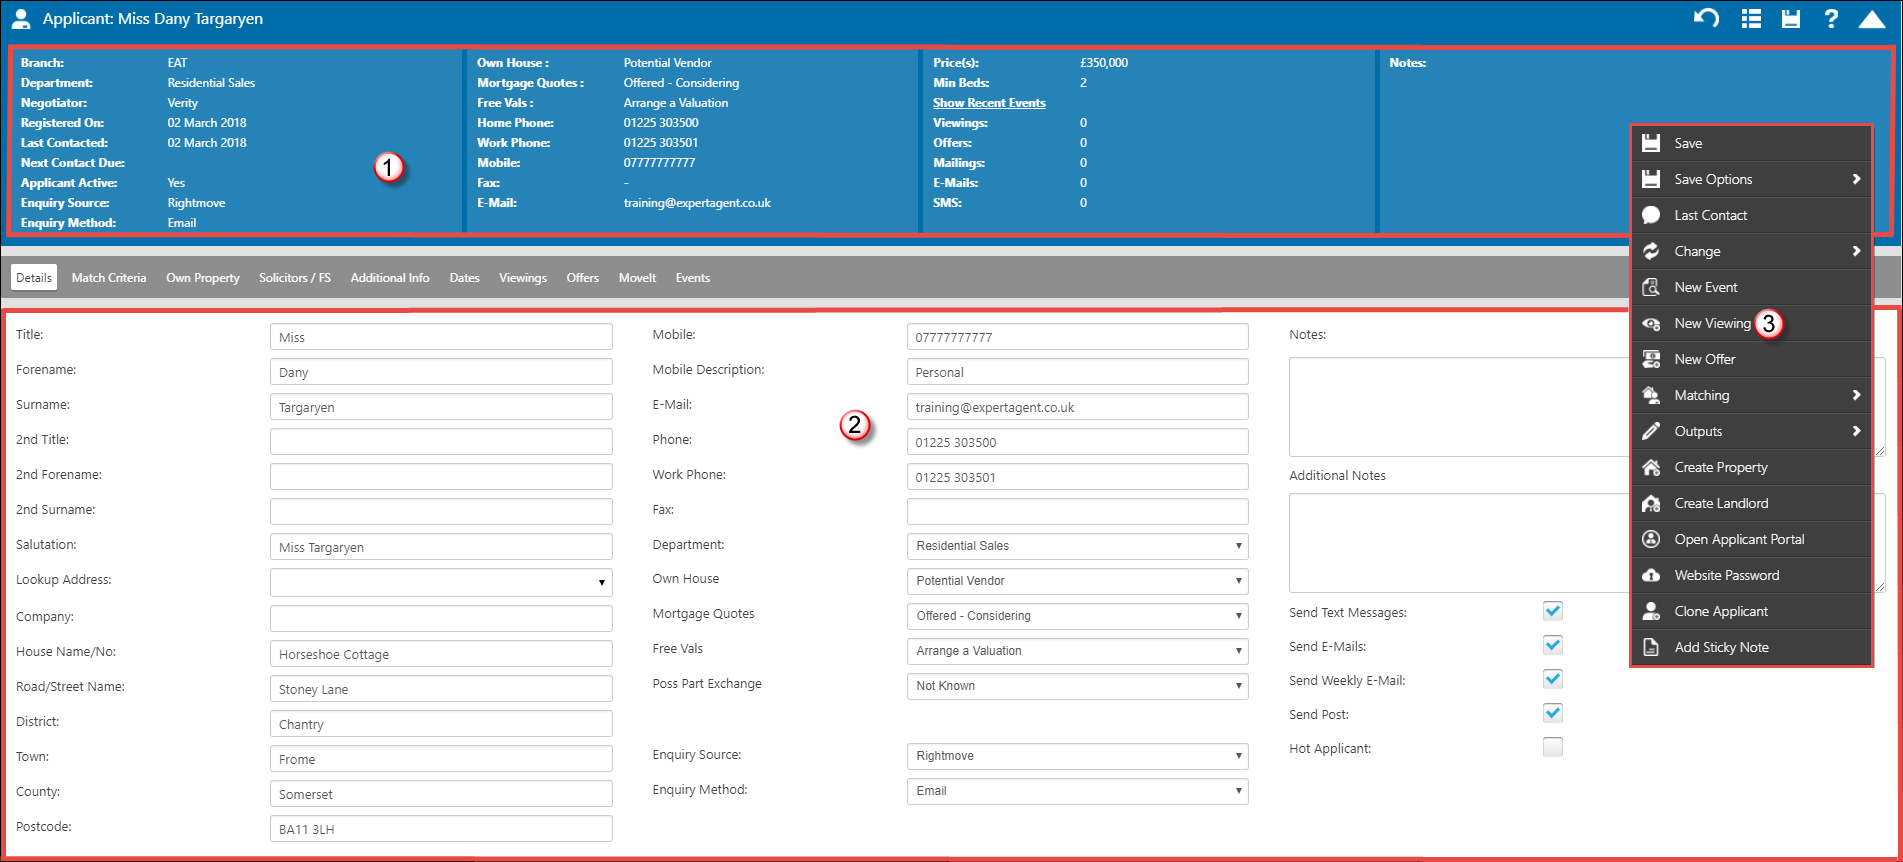
The Applicant Form has the same attributes as all other forms.
1. The Information Panel – Provides a snapshot of the records information.
2. The Tabs – Contains the Applicants important information.
3. The Action Menu – Contains the work flows available from the applicant form.
The Lettings Applicant form will have some additional tabs (References, Guarantors, tenancies etc.). These are covered in the Lettings Applicants section in the Learning Centre.

 Login
Login

