EA Powering Management
If you would like to change or work with any of the configuration settings you will need to ensure you have an Expert Agent login and super user status. This will allow you to change the configuration. To access the configuration please go to Tools in the Expert Agent top menu and select Configuration from the drop down.
The website configuration section contains all of the options available to you to make changes to the Expert Agent powering in your website. It is key to understand that when we refer to powering we mean the part of your website that contains the property information. It will most likely be in the form of an iframe and it will be the part of the website that changes when users make searches, so whilst the rest of your website stays static (your company branding etc) the iframe will refresh to show different data depending on the users search.
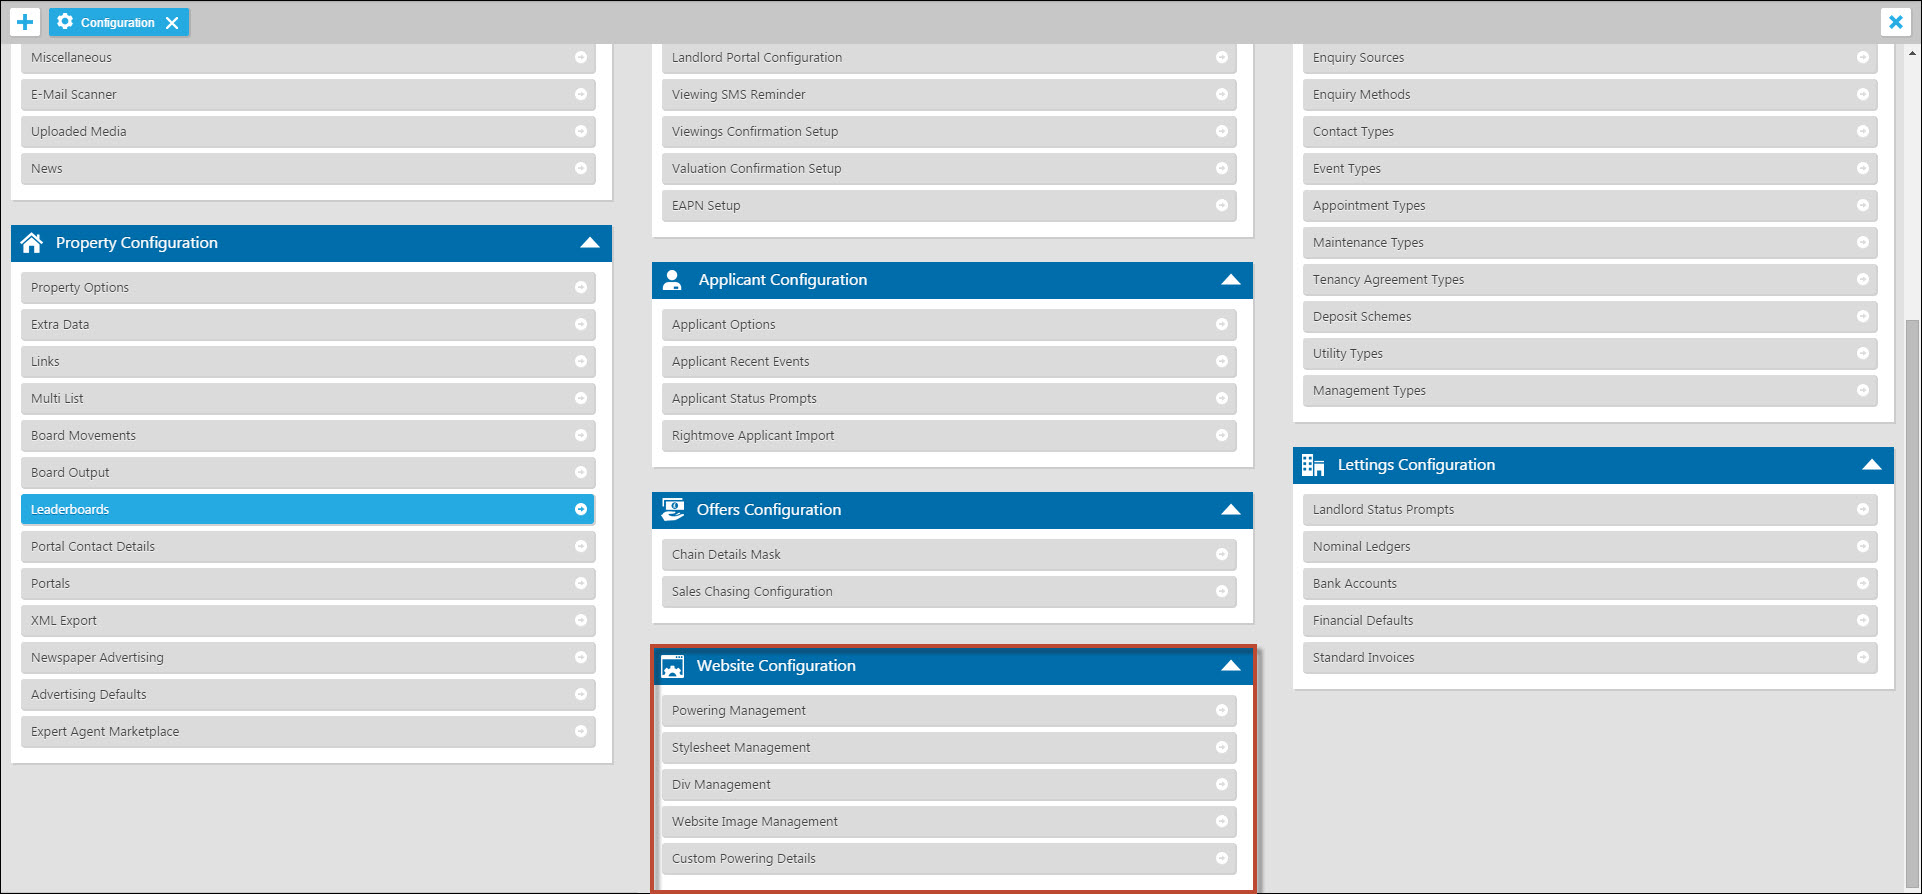
Powering Management is where the bulk of configuration changes can and will be made. At first glance the screen and content will look quite daunting but the various options and tick boxes are reasonably self explanatory and providing you read this through and understand what you’re reading there’s no reason you can’t edit the settings in this screen yourself.
We’ll take a look at each of the options and explain what they do and what bearing they have on the powering page we highlighted earlier.
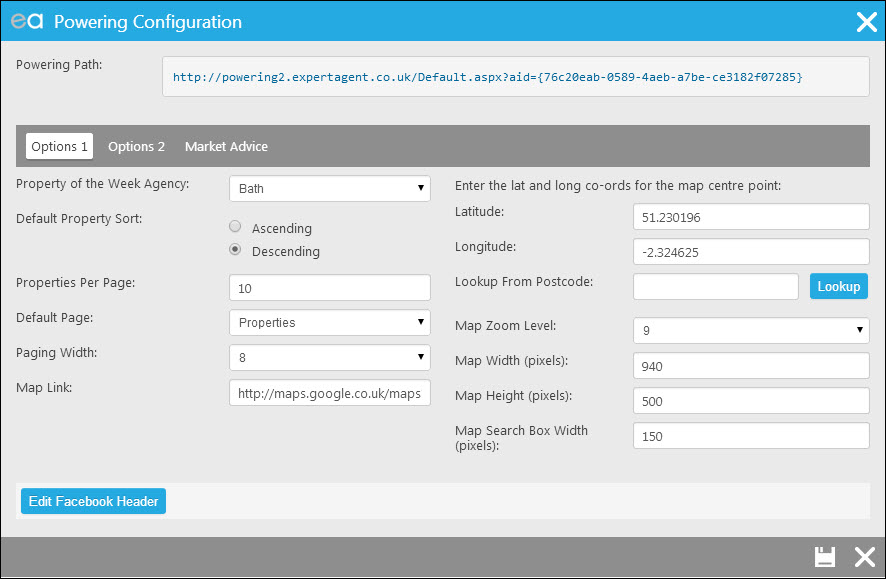
Powering Path
This is the powering path (URL) that needs to be inserted into your website to display the Expert Agent Powering. This URL cannot be edited and is simply there to show you your unique powering URL and give to your web designer to implement the powering.
Property of the Week Agency
The Property of the Week Agency (POW) is used for agents that have 2 or more branches and share the same website. This option allows you to control which of the offices property of the week is displayed on your website under the POW banner. There needs to be some communication between offices as to when the POW is changed and by whom as the name suggests it’s meant to be a weekly thing and not changed daily by offices intent on their property being the POW! Clicking the down arrow to the right of the branch name and selecting a new office is all you need to do to change the POW branch.
Default Property Sort
This option simply controls whether your properties are displayed in an ascending (low to high) or descending (high to low) price order when the property results are returned to the user. An important note to remember, the sorting of the properties is done on the Match and Portal Price NOT the Price Text that appears. If you have a property with a blank Match and Portal Price and an asking price of £1,000,000, the property would appear first in an ascending sort even if you have properties for sale for less than £1,000,000.
Properties Per Page
This option simply controls how many properties are displayed per page before the automatic scrolling takes over and forces the user to navigate through X number of pages. Try and get a balance that suits your property levels. If you’ve 150 marketed properties you don’t want to display3 per page and force user to scroll through 50 pages. Try and strike a happy balance and remember if property stock levels pick up or drop you can change this number as frequently as possible.
Default Page
When a user first opens your website you have the option of 3 pages you can display as the default first page they see. These are:
Search – displays the search form first as below:
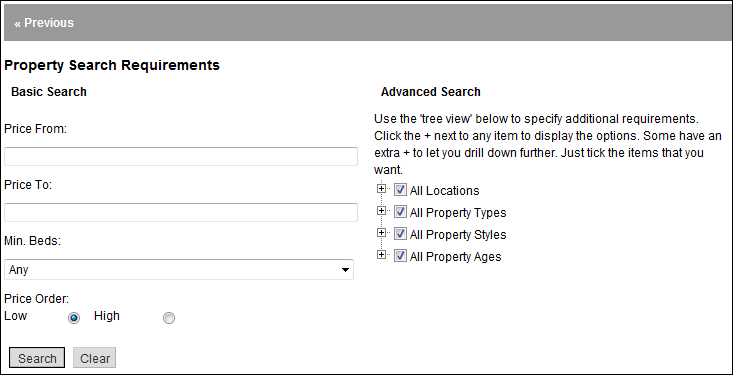
In this case, map search has been switched on as an option
Properties – displays the list of properties as below with a search button (can be turned off using Show Search Button top right)
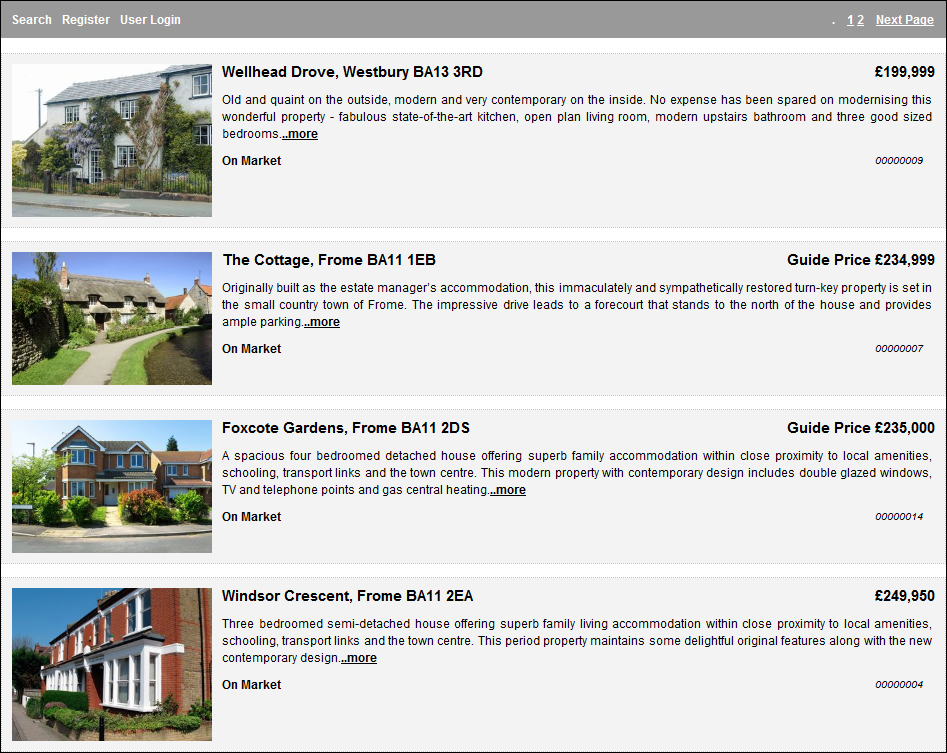
Map – Displays the map page (assuming you/your client has subscribed to our optional Interactive Map Search system)
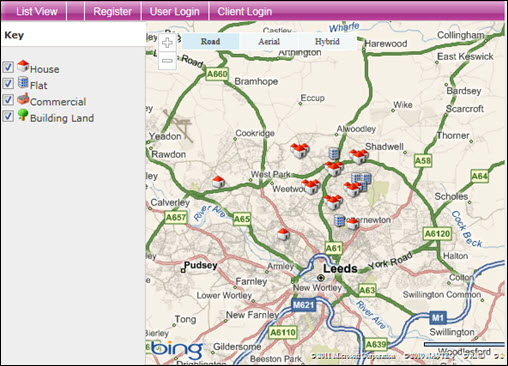
See the section on setting up Interactive Map Search for more information.
Paging Width
The paging width drop down selection box allows you to select from the options 6, 8, 10, and 12. What this does is controls how many pages a user can navigate through via the controls at the top and bottom of the page, so for example if you have 100 properties and set your properties per page to 10 per page then you’ll have 10 pages of 10 properties. If you set your page width to 6 then the user will be able select from pages 1 to 6, 3 to 9, 4 to 10 etc...
Map Link
The map link box enables you to specify which map you wish to use as your preferred choice of map provider for when users click on the map icon in a property to obtain the location. This can be Google Maps, Multi Map etc.
Edit Facebook Header
This option allows you to upload an image - often a company logo.
Mapping Options
If you have subscribed to the mapping service then the right hand side of the Powering Management screen will be of relevance to you, but if you have not subscribed then this section can be ignored.
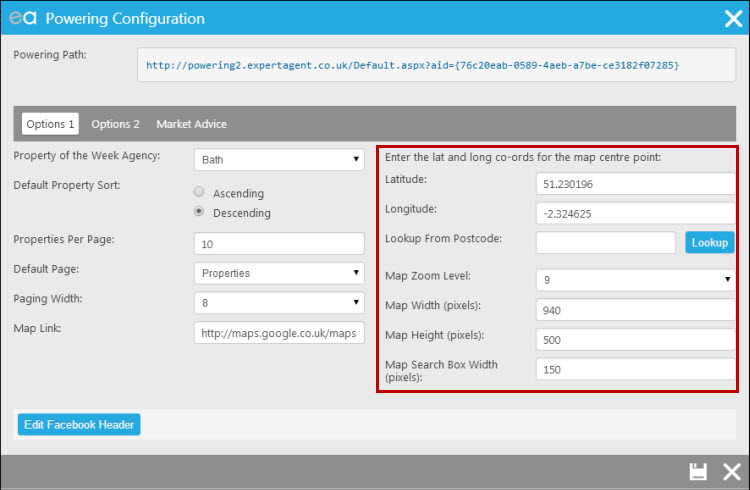
Latitude and Longitude
When the map appears it will default to a centre point on the map. Often this will be your office location, but not always the case. If you want to use your office as the centre point of the map, enter your postcode in the 'Lookup From Postcode' box, click lookup and the lat and long will be added for you. If you want to edit the centre point you can do so by editing the lat and long entries manually or by adding a different postcode and using the lookup feature again.
Map Zoom Level
This option allows you to set the area of map displayed on the page when the user clicks to view the map search results. This can be set from 1-15 with 1 being the lowest zoom, which shows a map of the world (not too handy for someone looking for property in London) and 15 being the highest which will show detail street level detail. As a general guide we would recommend 10 as the default zoom level.
Map Width (Pixels)
This option allows you to control the width of the map that will appear on your site. This is something that either we would do for you if we designed your website or your web designer if supplied by a 3rd party.
Map Height (Pixels)
This option allows you to control the height of the map that will appear on your site. This is something that either we would do for you if we designed your website or your web designer if supplied by a 3rd party.
Map Search Box Width (Pixels)
This option allows you to control the width of the map search box that will appear on your site. This is something that either we would do for you if we designed your website or your web designer if supplied by a 3rd party.
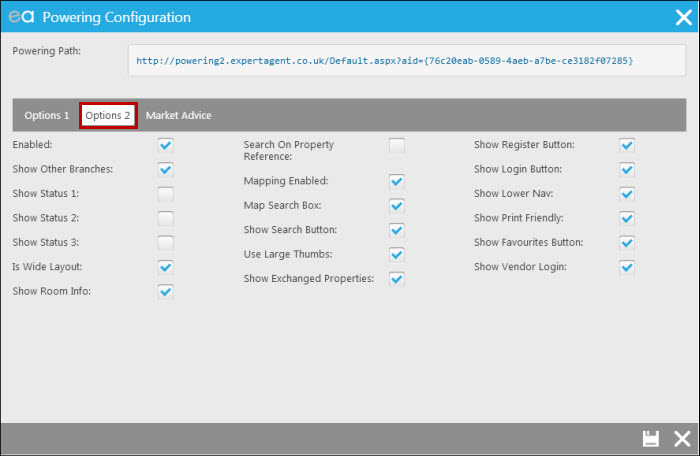
The next set of options are on the 'Options 2' tab of powering configuration:
Enabled
This tick box controls whether or not powering is enabled for your office. There are very few instances you would want to disable powering, but if for whatever reason you did, then this is where you would do so.
Show Other Branches
If part of a group with other offices using Expert Agent you can specify whether you want to show other branches properties. Depending on the way your website is designed it is likely you might want to keep everything separate so keeping this unticked will show just your offices property stock.
Show Status 1, 2, 3
These 3 statuses boxes control whether an applicant needs to specify their buying status and whatever statuses you’ve configured 1, 2 and 3 to be. You can show as few or as many as these as you want and when registering on your website the applicant will be prompted to give you details for all of the statuses you’ve specified.
Is Wide Layout
This option controls the icons on the property details page.
Search on Property Reference
This option allows you to allow users to search for properties by reference number. Ticking this box will display a Search by property reference field in your powering Property Search Requirements page.
Mapping Enabled
This option cannot be edited by you as it is the mapping service is a subscription based service so we need written confirmation from agents they want to take advantage of this feature. If mapping is something you have subscribed to then this box will be checked.
Map Search Box
This option can be ignored - we will be removing it in due course.
Show Search Button
This option allows you to control whether the search button appears along the user navigation bar along the top of the powering.
Show Register Button
This option allows you to control whether the register button appears along the user navigation bar along the top of the powering.
Show Login Button
This option allows you to control whether the user login button appears along the user navigation bar along the top of the powering.
Show Favourites Button
This option allows you to control whether the Favourites button appears along the user navigation bar along the top of the powering when in a property record. This allows users to add properties to their “favourites” and allow them easy access to properties of interest at a later date.
Show Vendor Login
This option allows you to control whether the vendor login button appears along the user navigation bar along the top of the powering.
The final tab is the Market Advice tab:
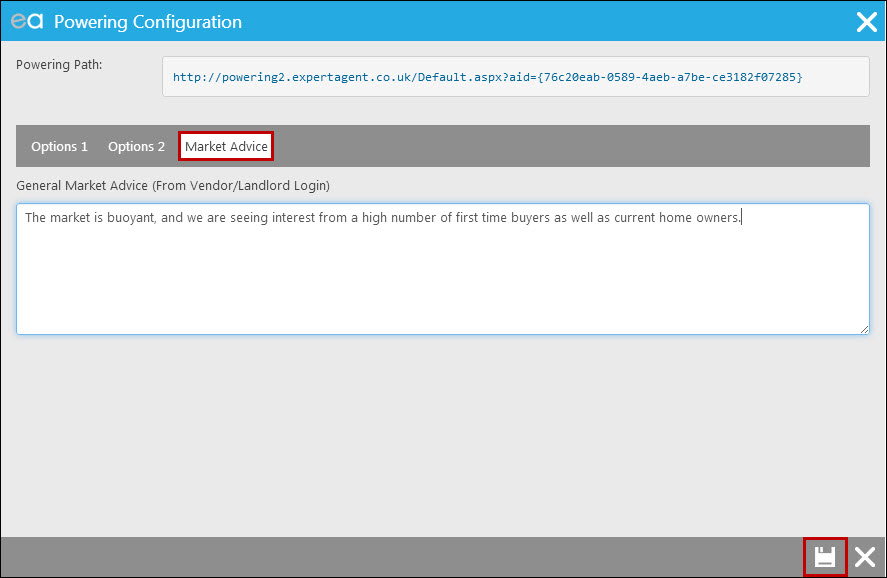
General Market Advice (From Vendor/Landlord Login)
This box allows you to enter text that a vendor or landlord would see when they login via the client login link (if you’ve chosen to enable this). The advice appears for all vendors and landlords with logins so remember it is NOT for particular individuals - so don’t enter any notes that are relevant to only one vendor or landlord.

 Login
Login

