Booking the appointment and fact finding
This chapter will cover booking the appraisal and the property fact finding.

1. Highlight the slot for the appointment by clicking and dragging with the mouse, right click and select ‘Valuation’ from the list of appointment types.
The standard appointment details form will open in a new tab:
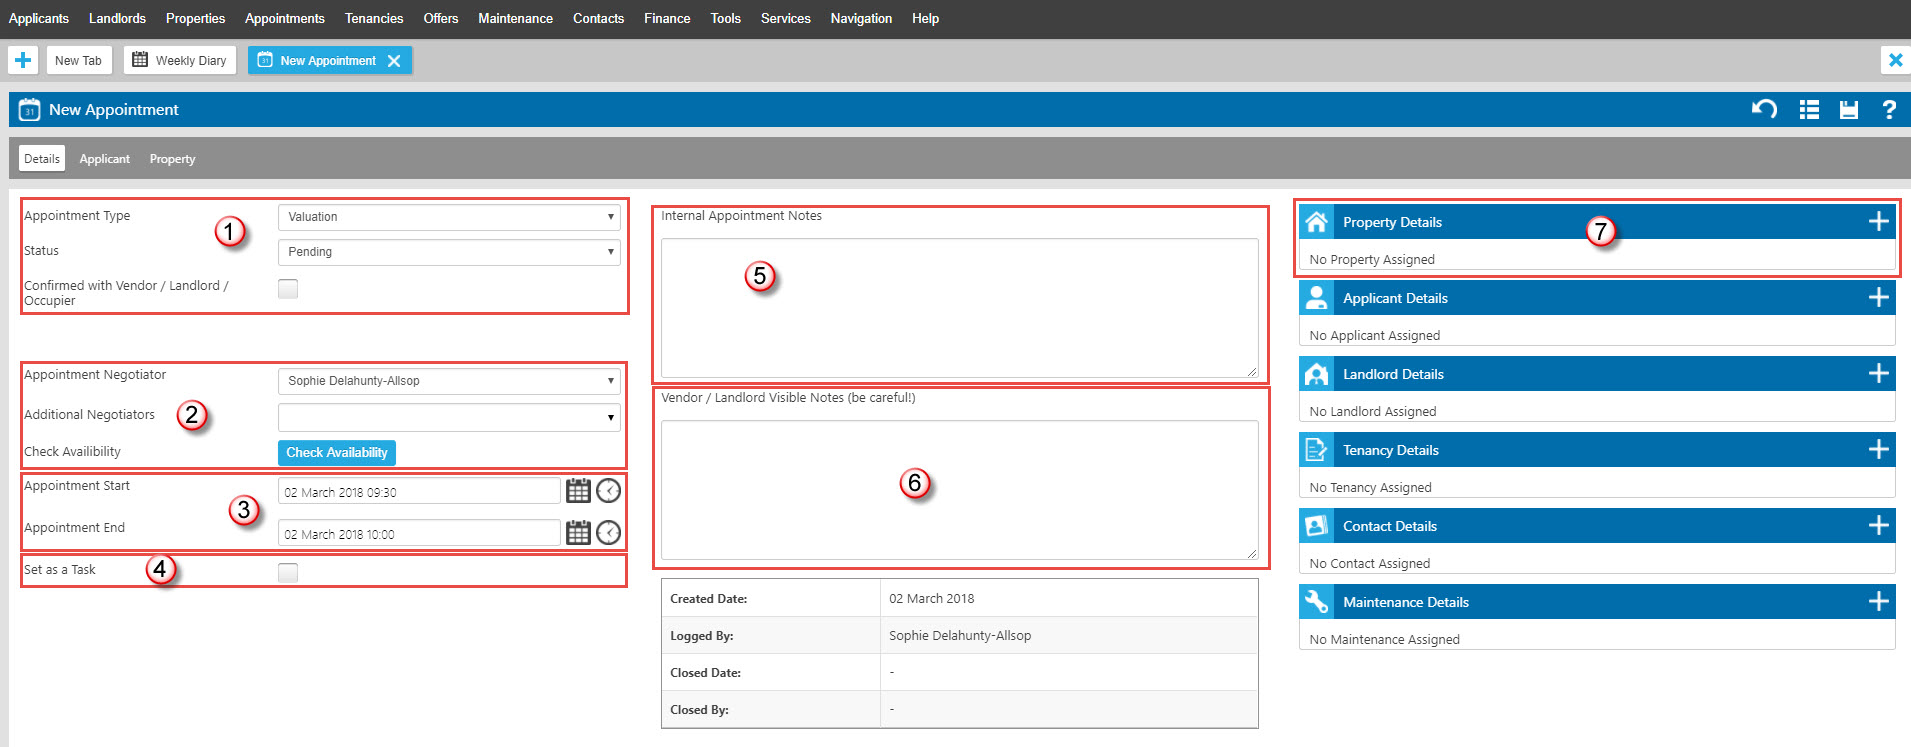
- The Appointment type is set to Valuation, and the Status is Pending. This is a pending appointment. You can confirm this by clicking into the drop down. Once a property has been attached, you can confirm by sending the standard confirmation email or SMS messages to the Vendor. Only confirm the appointment once you have added the property details in Step 7 (also please bear in mind, if you need to confirm this with an occupier to the property, the occupier's details will need to be entered on the property record before confirming the valuation from the appointment record).
- You can assign the Appointment Negotiator from here. And Additional Negotiators. You also have the option to check the Negotiators availability. This checks both the Appointment Neg, and the Additional Negs diary and will let you know if there is a conflicting appointment.
- Check the Appointment start and end date and times.
- You can also set a task, specifically if you are booking it in for someone else or the Additional Negotiator isnt in the office.
- You can add any internal appointment notes in this section for the Valuer, or just for your information if needed.
- You can add notes here which will be visible for your Vendor/Landlord. This may be via the Vendor/Landlord portal, or you can add this information to letters and email using the appropriate merge codes.
- To add the property record click the + from the property details.
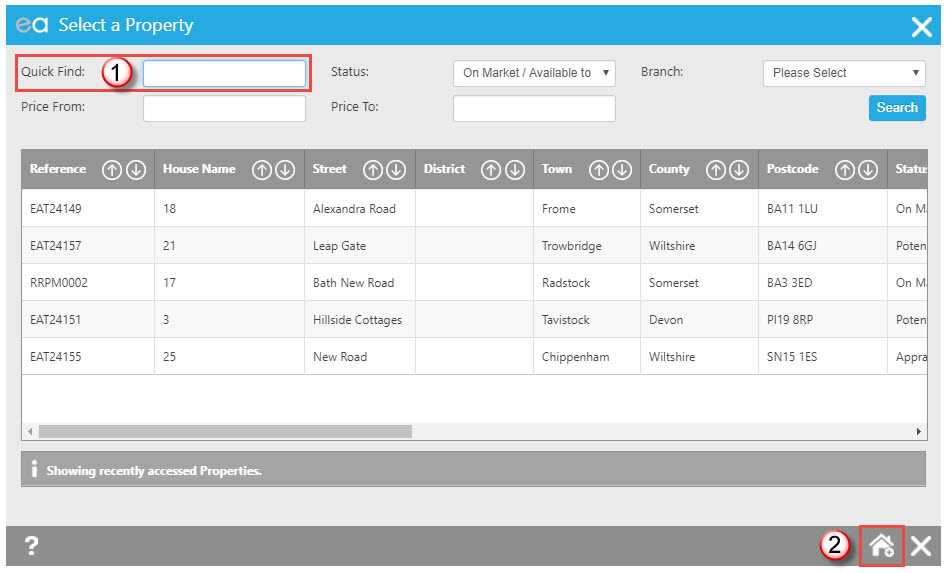
- If you already have the property in Expert Agent either select it from your recently navigated list or alternatively use the Quick Find box.
- To start adding your new property click the “New Property” button to take you to the “Add New Property” wizard.
It is worth noting at this point that there are 5 ways to enter a new property, so in addition to the method used there are 4 other ways:
1. From the Properties dropdown list on the Top Menu
Hover over Properties in the top menu and select ‘Add a New Property’ from the drop down.
2. From the Property Dashboard
Use the ‘Add a New Property’ link found in the Quick Links section.
3. From the main Property Grid
By right clicking and selecting the ‘New Property’ option.
4. From an Applicant Record
By right clicking and selecting the ‘Create Property’ option.
5. From the Diary
When booking an appointment (for example a valuation), click ‘Choose’ to assign the property, then use the ‘New Property’ button to add the property details.
In all instances the Add a Property wizard will be displayed and, with the exception of adding a property from the Applicant record, you will have to type in the property details. If you add a property from an Applicant record the Applicant details will automatically populate the property record for you.
The Property Details
This page is for capturing the basic property details and vendor contact details:
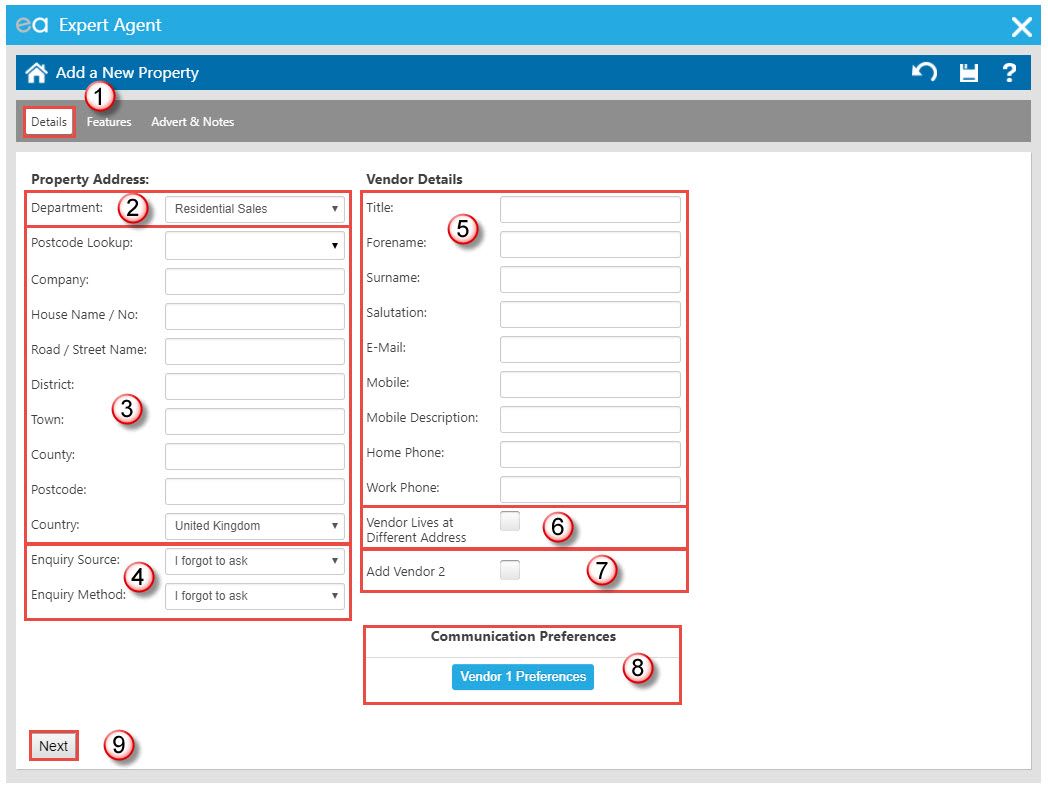
- You will be presented with the 'Details' tab for completion.
- Ensure you have selected the correct department. In this example we will add a residential sales property, however if you selected a different department e.g. lettings, then the wizard would change to accommodate this – on the right hand side of this page it would ask for the landlord’s details as opposed to the vendor’s.
- Expert Agent has a postcode lookup facility, enter the postcode into the white drop down box, a list of possible road names will appear, select the correct option from the drop down which populates the boxes below with the details, and all you need do is add the house name or number.
- It is important to capture the enquiry source and method as this allows you to determine where most of your business is coming from and how they are contacting you.
- Enter the Vendor/Landlord name and contact details.
- If the vendor (or landlord) lives at a different address, put a tick in the box and it will open another set of fields to capture the vendors address. There is another postcode look up to use if they have a different address.
- Tick the 'Add Vendor 2' box if you need to enter details for a second vendor (or landlord), for example in a divorce case or when handling a deceased estate or similar.
- Click to set your Vendor's Communication Preferences. If you have added a 2nd Vendor they will have a separate button for their Preferences. (If you've added a Lettings property, this button will say Landlord 1 Preferences) This button opens the pop up below. Even if you don't click the button, the pop up will appear when you click Next or Save in the Add New Property Wizard.
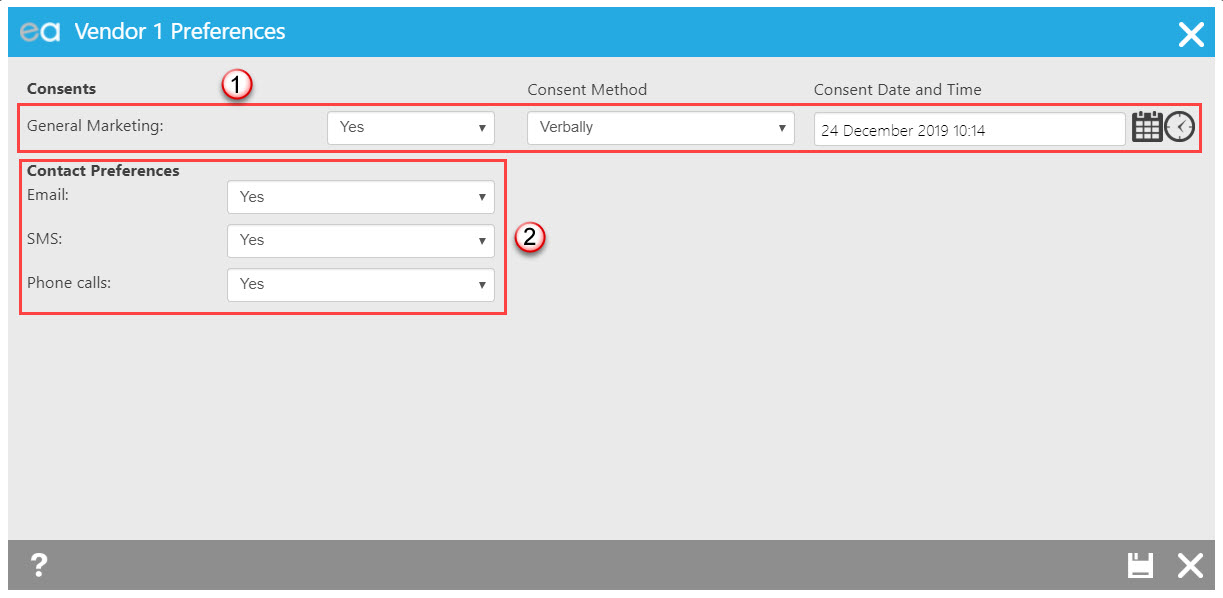
- Set your Vendor/Landlord's consent for General marketing, how they gave you their consent, and the date and time at which they gave it (these fields will automatically populate with the current date/time, but you can use the calendar and clock icons to backdate these if necessary).
- Choose how your Vendor is happy to be contacted.
Features - Classify the Property
The information entered here starts to determine how the property will be matched:
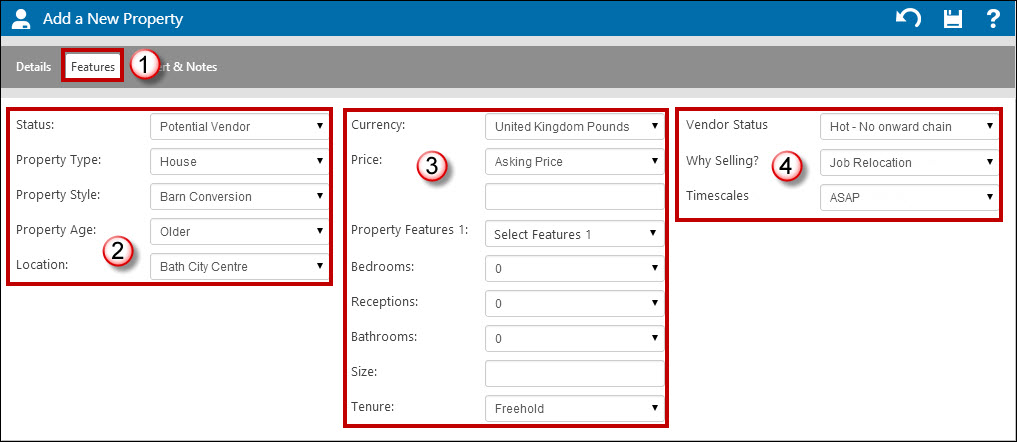
- Select the 'Features' tab.
- Capture as many details as possible on this screen for the Valuers with regards to the Status, Property Type, Style, Age, Location, etc.
- You may not be able to enter the price at this stage until after you do the Valuation. The Property Features directly relate to your Applicants essentials (match criteria deemed absolutely essential). Tick as many of these boxes as possible to ensure a higher match result. If you know any further details about the property at this stage you are able to enter them, otherwise leave them for completion post valuation.
- Extra Data options – These are examples of our Extra Data. This can be setup within your Property Configuration and can extend Expert Agents capabilities dramatically by adding up to an additional 50 configurable fields. A good example would be to add a field such as “Why is the Vendor selling?” or “Timescales”.
You could save the property at this stage. If you would like to add any notes or adverts to the property you will need to follow the next step.
Adverts & Notes
This page allows you to enter notes and adverts to use when marketing your property:
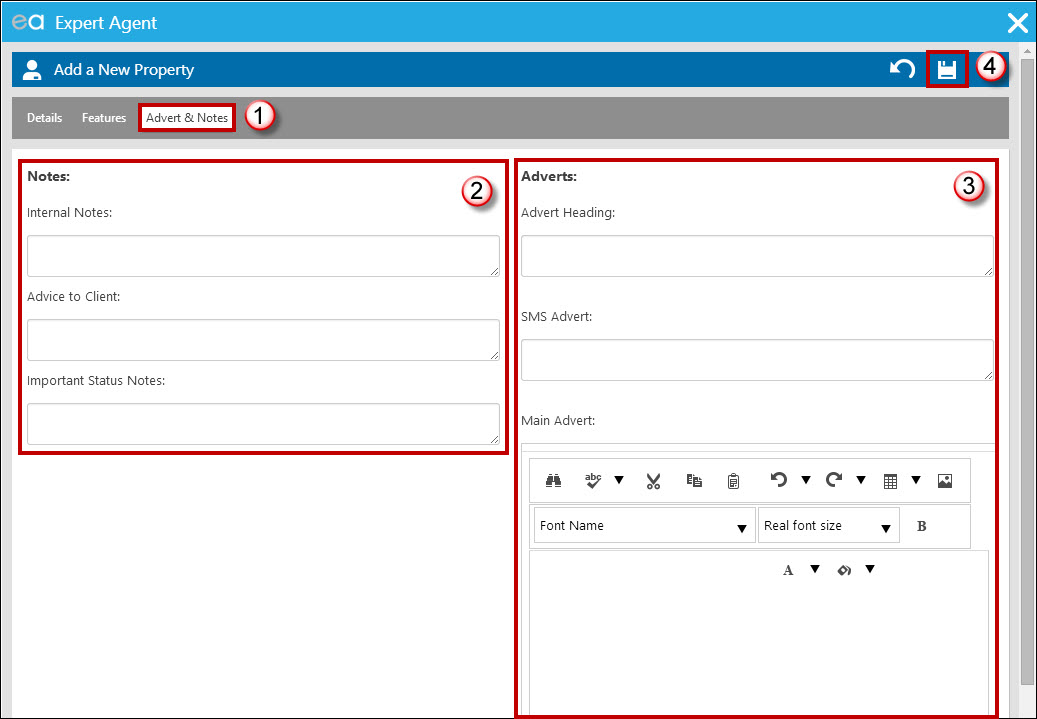
- Select the Adverts & Notes tab.
- Add any important notes you may have collected from the Potential Vendor such as “A conservatory has been added in the last year” to help assist the Valuers with aspects such as comparables etc.
- Adverts section allows you to enter text used for the properties advertising. Again, you may not be able to enter these details until after the Valuation has been carried out.
- Save the property to add your new property into Expert Agent and direct you back to your appointment. If we had added the property using one of the other methods, then we’d have been taken to the property record.
Back in our appointment:
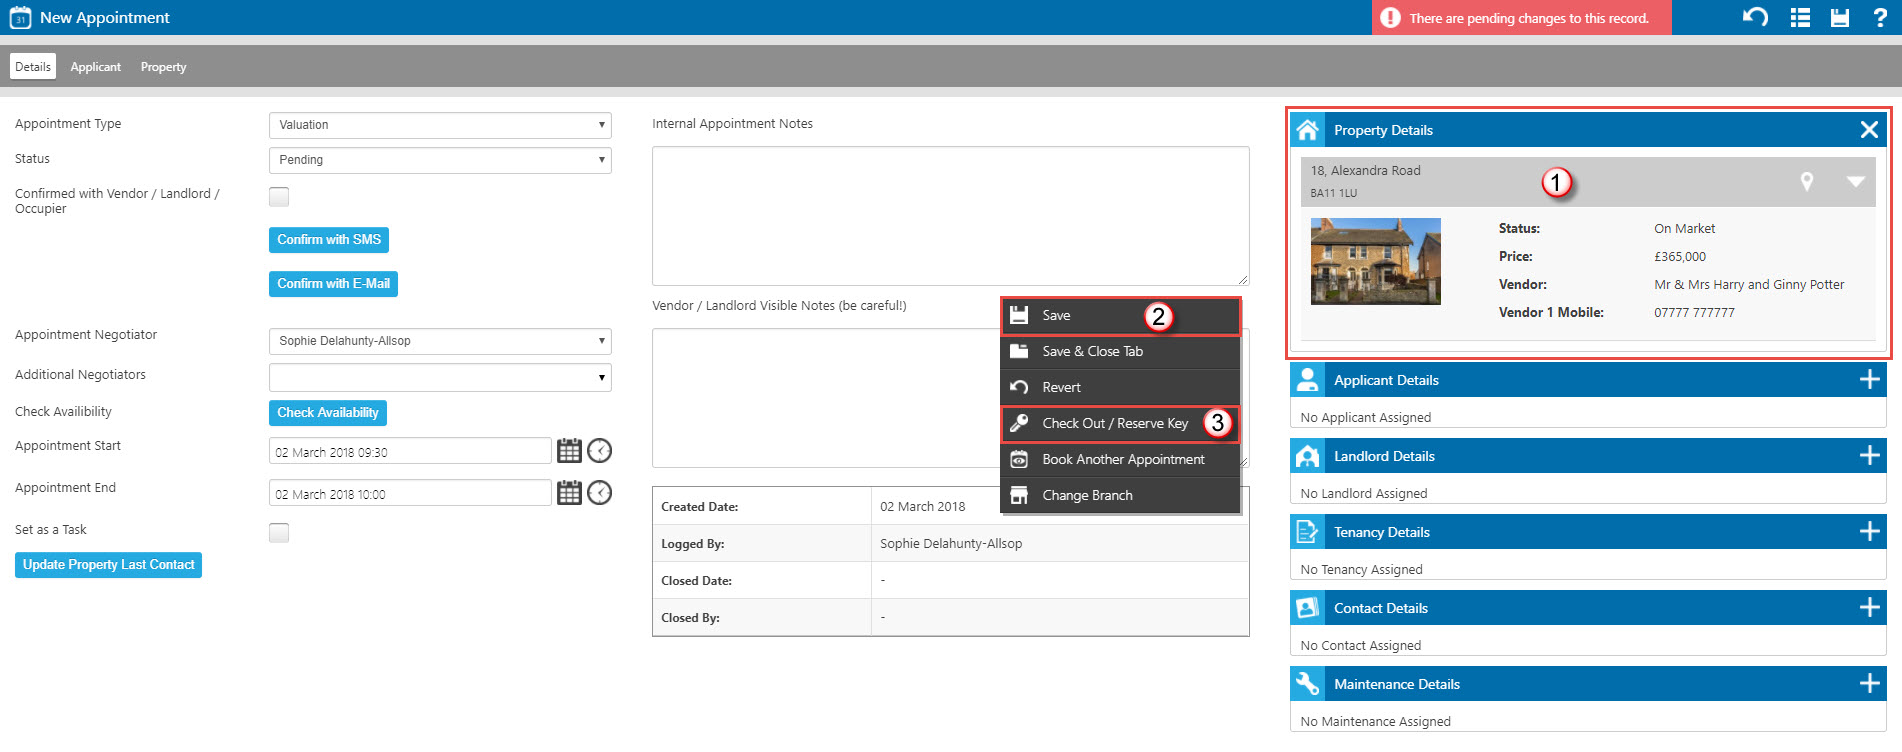
- Your new property is now assigned to the valuation.
- Click “Save” to add your appointment to the diary.
- Check out or reserve any keys if necessary.
More:

 Login
Login

