Property Action Menu
Due to the number of actions performed from a property record, the property action menu has a shorter main action menu with a number of sub-categories.
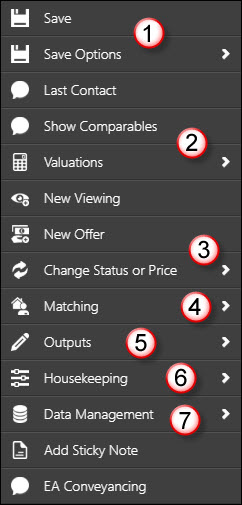
The menu you will see when you first right click will look like this (example shown is from a sales property record):

Save - saves any changes made to the record.
Save Options (1 on above image) - This contains
Save and Flag (saves any changes to the record and flags the record in red in your Navigation History) and
Revert (acts like an 'undo' button).
Last Contact - allows you to update contact dates, add notes, etc.
Valuations (2 on above image) - this opens a sub-menu from which you can book a valuation appointment and confirm details post-valuation. Both of these processes are covered in detail in Valuations & Market Appraisals.
New Viewing - this will take you in to the wizard for booking a viewing.
New Offer - this will take you in to the wizard for booking an offer.
Change Status or Price (3 on above image) - This contains
Change Price (this is the option used for editing everything to do with the advertised price of a property - the amount itself, the prefix, the price text ('paddock available separately', 'to include carpets' etc). There are several things to consider when setting the property price up - things that can affect the way a property looks on your site, portals and the way it matches. Have a look at this FAQ article When I do a Price Change, Why does a property have multiple prices?) and
Change Status (this is where you make status changes such as marking a property on the market. This is covered in Putting the property on the market. There is a manual status change option available from here which will display all statuses, regardless of the current property status).
Matching (4 on above image) - this opens a sub-menu from which you can open Match Processor or Quick Match. Both are explained in Simple property matching.
Letters/E-Mails/SMS (5 on above image) - this opens a sub-menu allowing you to use a pre-prepared template to contact the vendor, or to send them a text message, or to send a colleague a quick message attaching the record along with your message.
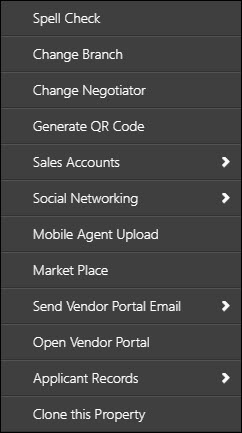
Housekeeping (6 on above image) - this opens a sub-menu with a number of options:

Spell Check - performs a spell check on that page of the record.
Change Branch - allows you to change the branch assigned to the property record.
Change Negotiator - allows you to change the negotiator assigned to the property record.
Generate QR Code - gives you a QR code to use when advertising the property.
(MultiList Options - this will only show if you are set up for MultiListing - details of this are in the Receiving and managing Multi-Listed properties section.)
Sales Accounts - this relates to the Charges tab of a property record where you can list charges for things like EPCs, advertising, etc. When you exchange an offer through Expert Agent it also applies the commission due to the Charges tab. The Accounts menu allows you to invoice for charges, create statements, and receive payments. Everything else is done from the Charges Tab itself.
Social Networking - allows you to post properties to Facebook and/or Twitter. For information on this see the Social Media section.
Mobile Agent Upload - this option allows Mobile Agent users to upload the XML file and/or floor plans and have Expert Agent map the details to the correct places in Expert Agent for you.
Market Place - opens the Expert Agent Market Place pop-up - see Expert Agent Market Place for more information on this.
Send Vendor Portal Email - You can send the Vendor Portal if this property is on the market. Vendor Portal Configuration
Open Vendor Portal - If you have previously sent the Vendor Portal you can open it from here.
Applicant Records - allows you to create an applicant record for your vendor (or Vendor 2 if you have a second Vendor) - the system will instantly transfer their details across for you.
Clone this Property - allows you to make a copy of the property record, should you need to.
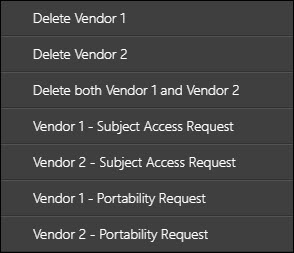
Data Management (7 on above image) - Data Management if part of the GDPR release. This option contains

Delete Vendor 1 - GDPR Deletions
Delete Vendor 2 - GDPR Deletions
Delete both Vendor 1 and 2 - GDPR Deletions
Vendor 1 - Subject Access Request - GDPR Subject Access Request
Vendor 2 - Subject Access Request - GDPR Subject Access Request
Vendor 1 - Portability Request - GDPR Data Portability
Vendor 2 - Portability Request - GDPR Data Portability
Add Sticky Note - You can add a virtual sticky note to this record from here. Sticky Notes

 Login
Login

