Putting the property on the market
Upon receipt of the approved particulars from the Vendor you should be ready to market the property on the web and match the property to suitable applicants.
In order to achieve this, as soon as you are confident the property is ready to go on the market the following steps need to be taken:

- Right click when in the property record, and hover over ‘Change Status or Price’.
- From the sub-menu select the ‘Change Status’ option.
- Select 'Put on Market'. If this is a Lettings property the status options will show lettings related statuses such as ‘Available to Let’.
You will then be presented with the following screen:
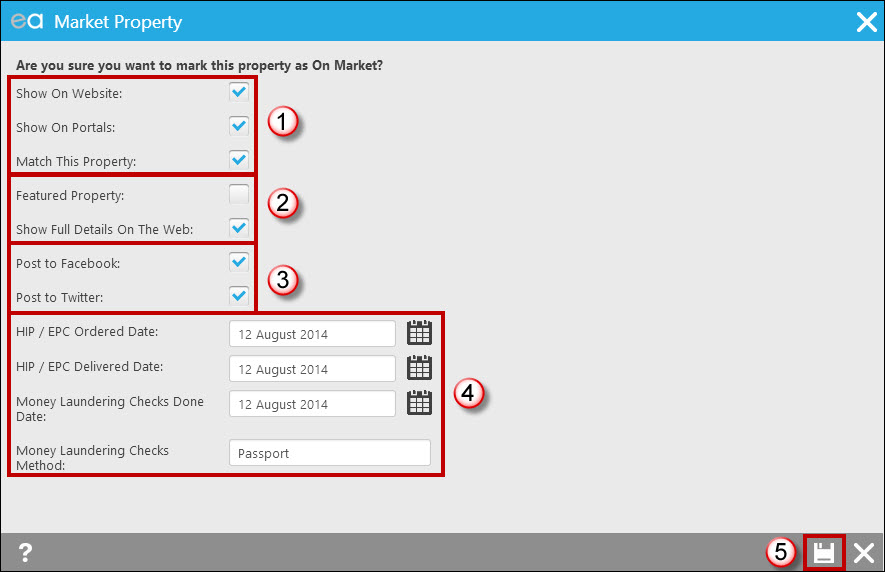
- Make your marketing selections here. ‘Show on Website’ dictates whether the property will be visible on your website. ‘Show on Portals’ dictates whether the property will be sent in your next portal upload. ‘Match this Property’ dictates whether when you run matches the property will be returned as a match result or not. If you are missing images, adverts, price or anything similar it will warn you that it will stop effective marketing however will allow you to continue to put it on the market should you wish.
- If you would like this to be the Property of the Week or the featured property on your Expert Agent powered website then tick this box. Finally if you would like the full property details including the room details, full particulars etc. to be visible online tick the ‘Show Full Details on the Web’ tick box.
- Tick the boxes if you would like to post this property to either Facebook or Twitter.
- Enter the relevant dates and specify your money laundering checks method.
- Click save.
As we have opted to post the property onto Facebook and Twitter, you will see the Facebook and Twitter login pages. Once logged in you will be presented with the following screens:
 Twitter
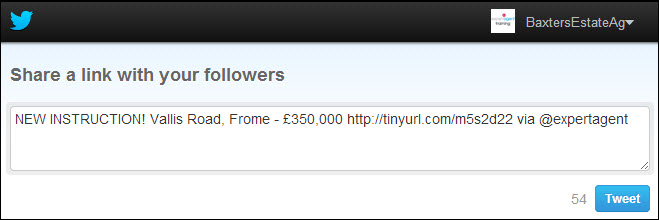
Although Twitter is limited to 140 characters per post you do have some scope to tweak the text. In this example we have added “New Instruction!!” The short URL will automatically be placed at the end of the post (this is created upon changing the property status to On Market).
Click Tweet.
 Facebook
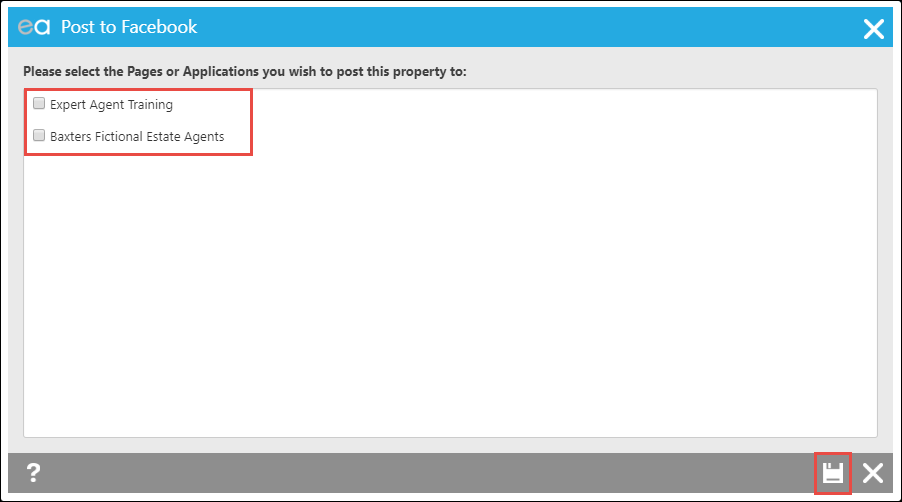
The first step is to select the Pages or Applications your wish to post the property to.
Due to changes in Facebooks API you can no longer make changes to the post before sending to Facebook.
Click on the save icon.
For more information on this please see the Social Media chapter in our manual as relevant.
Your property will now have a status of ‘On Market’ or ‘Available to Let’ as relevant, and it will clearly state in brackets whether the property is being marketed or not.
In configuration when you join Expert Agent, you’ll also have set up when you need to order boards – it is likely that you’ll have set it up so that when putting a property on the market, it prompts you to order one.
The below screen will appear automatically if so:
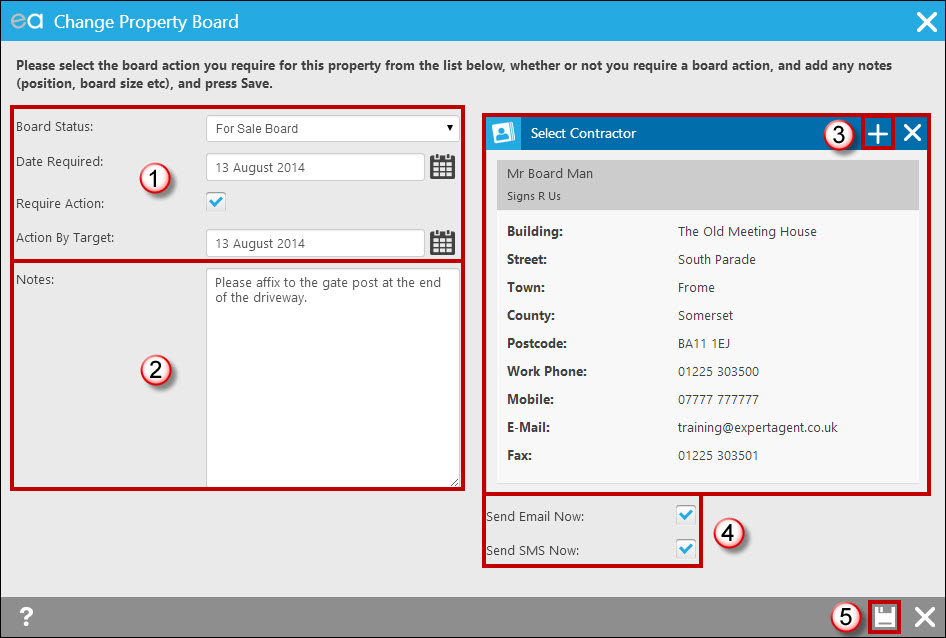
- Select the board status, the date required, whether action is required (ticking this allows you to track this request to ensure the request happens) and a target date for this to have happened by. You track these things from your board quick links and from the Board Movements grid – see the Managing and checking Board movements chapter for information on this.
- Add any notes relevant, such as where to place the board, whether it is a repair as opposed to a new board required, etc.
- If you assigned a default contractor when setting up your system they will list here. You can remove them if you would like to use a different contractor on this occasion, or if you find there is no contractor assigned there will be a ‘+’ button for you to select from your contacts list.
- Tick ‘Send Email Now’ and/or ‘Send SMS Now’ to send the request to the contractor as you’d like. These options will only display if the contractor has a mobile number and email address assigned.
- Click ‘Save’.
If you have selected to send a text message and/or an email, the following windows will appear:
SMS
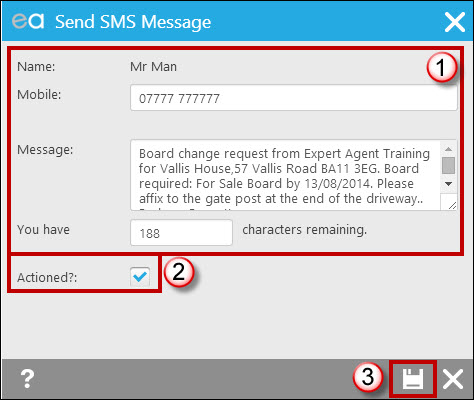
- Edit the message as required.
- Tick the ‘Mark as Actioned’ box if you are happy that the order has been placed and therefore you don’t want this request showing as a non-actioned request – these are what you will see from the Board Movements grid by default.
- Click ‘Send’.
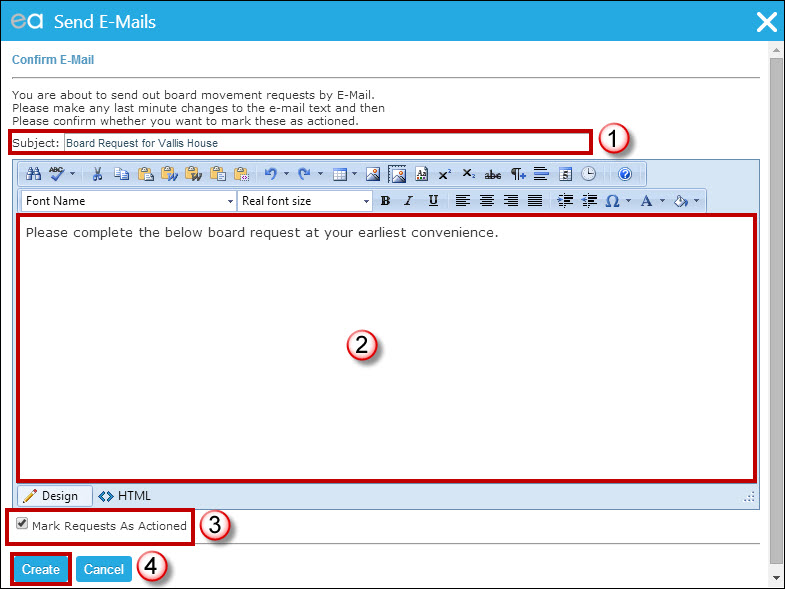
- Give the email a suitable subject.
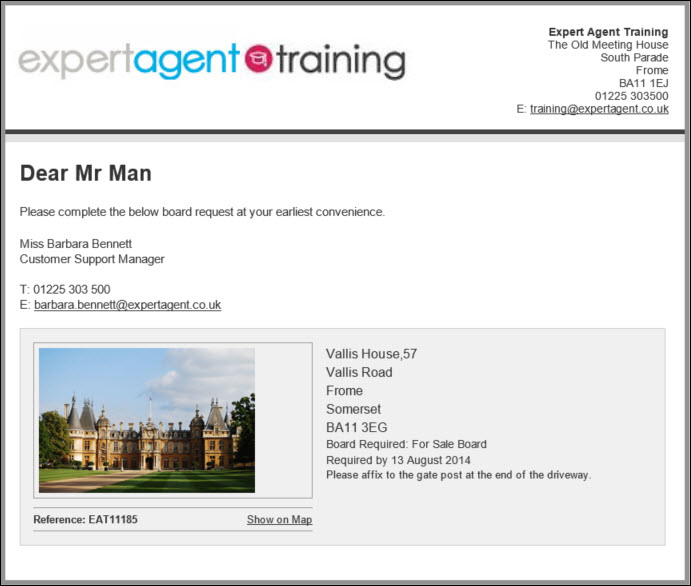
- Edit the default message if needed. You don’t need to give any branch details, negotiator details, property or board details here – all of this will be automatically included for you.
- Tick ‘Mark Requests as Actioned’ if you are happy to upon sending this email.
- Click ‘Create’.
The resultant email will look like this:

 Login
Login

