Chasing your Matches / Ringing Out Matches
Some agents chase matches the moment they've emailed the applicant and some like to chase some time afterwards
There are 2 ways of doing this in Expert Agent
Method 1. Use "Pending Matches"
Pros: Really quick! multiple negs can interact on the same ring-around. Easy updating of status notes. Quick "make a viewing" button. Proper Closure on match records ensuring property events are updated.
Cons: needs a bit of explaining!
Method 2. Use the "last matched" date and Quick Links
Pros: can be less confusing for new users - a quick link shows that you need to chase specific applicants - you don't have to sort grids etc. We train this method in our matching course
Cons: too easy to leave matches "Pending", no formal match "closure". No easy "remove from selection" option to save tripping over other negs.
Method 1 - use "Pending Matches"
This method allows you to ring out in circumstances where an applicant may have one or more pending matches.
Do a simple property match or batch match several properties.
Click on Outstanding Matches under applicants.
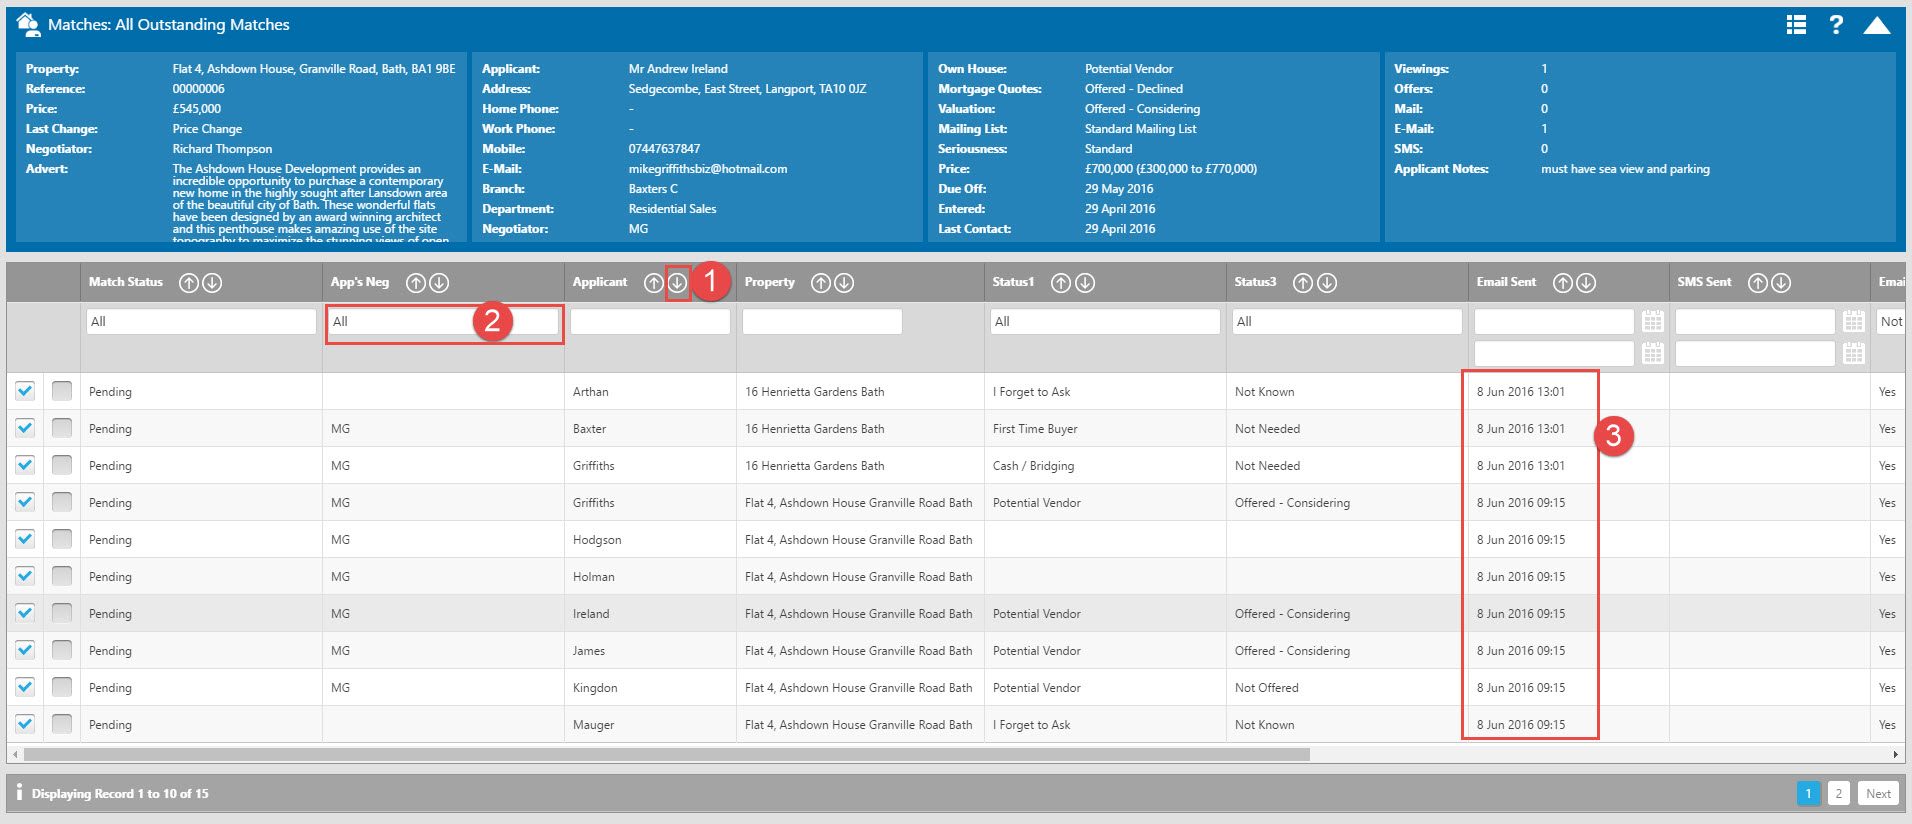
The form below is displayed
|
A USEFUL CONFIGURATION TIP IF YOU HAVE LOTS OF STAFF DOING RING-AROUNDS AT THE SAME TIME This version of the form is showing applicant contact details at the top. That's great if ring-arounds are done by one person. However, if two or more of you are ringing out, you need to stop yourselves from tripping over and both calling the same applicant. To overcome this, there's an option in Configuration>Matching Defaults. If you put a number in the Lock Match Details field, it has a couple of effects. Firstly, it obscures the contact details at the top of the match process form. This forces the negotiator to click into the record to get the phone numbers. This action locks the match record for the number of minutes you specified in the Configuration>Matching Defaults form. A second negotiator can still see the match record in the grid but if he or she click to try to open it - they get a "Locked by Mike for 5 minutes" or similar message. If you don't think your people will trip over each other, set the Lock Match Details number to zero and the phone numbers will appear at the top of the grid.
|
The first thing to do is to sort your matches by applicant surname. This is important so that you can see if one applicant needs to be chased about multiple properties. In the example above, Griffiths has two suitable properties that he needs to be spoken about.
If you don't have the applicant surname column showing (1 in our example above), right click>choose Columns, select it and maybe use the up arrow keys to take it closer to the top of the selected fields such that it shows closer to the left on the grid.
What you do next depends on how you manage the "ownership" of applicants in your business. If your applicants are "communal", you are ready to start your ring-around.
If you "own" your own applicants, shout around the office - tell everyone there's some new matches that need ringing out and get get everyone to choose All Outstanding Matches under Applicants at the top menu.
They'll need to make sure they've got the column called App's neg visible - if not, right click>choose columns, select App's neg and maybe use the up arrows to bring it further up the selection and therefore closer to the left on the grid. You can see this column in our example (marked 2 above) has been put second in the list. They'll also need to filter by negotiator name
Either way, You've now got your "ring around" list on screen.
Hover over each in turn. As standard, you'll see contact details for your applicant at the top of the screen. However, if you are very vicious with your negs, there's a way of getting even more control. if you are a superuser you can go to Tools>Configure>output Configuration>matching defaults and specify the number of minutes that you'd like the match details locked for. If you put 10 minutes in here, contact details would vanish from the match processor's header info panel. Your team would then have to click into a match to see the contact details and, at that point, nobody else can access that match for 10 minutes.
All you have to do is to Click into each match in turn. They will open in a separate page tab as below:

Call the applicant - full contact details are on the right (1) but hidden deliberately to cover Data Protection in case you left the screen showing and went out. Use the down arrow on the grey bar to see more details OR click the applicant tab at the top (2). if you want to open the applicant record to make changes - click the applicant name on the first tab (shown 1) and this will open the applicant in a new tab. If you need more info about the property, click the property tab (2)
If you've successfully spoken to your applicant, change the status to one of the Chased status options (shown 3) above. Update the notes (4) as required. Any notes you put in appear on both applicant and property record. Use the Book Viewing button or the Make Offer button if possible (shown as 5 above). Chasing a match doesn't automatically update the last contact date though. You need to use the Update Applicant Last Contact button shown (6) above. When you press the save button top right, the match form closes and you can click back to the Match Processor grid and carry on to the next one.
Important Note - if you leave Matches Pending for more than 2 weeks, we assume you've forgotten about them and we delete them without keeping a record. So, always mark them as completed or Chased
Method 2 - Use the "last matched" date and Quick Links
Pros: can be less confusing for new users - a quick link shows that you need to chase specific applicants - you don't have to sort grids etc. We train this method in our matching course
Cons: too easy to leave matches "Pending", no formal match "closure". No easy "remove from selection" option to save tripping over other negs.
The best way to identify people who have received a match from you recently is to use the ‘Applicants Matched in the Last Week’ quick link – this also ensures it isn’t too long after the match is sent that the call is made.
Calling “Applicants Matched in the Week”
Accessible from either your Right Tool Bar or Applicant dashboard is the quick link for ‘Applicants Matched in the Last Week’.
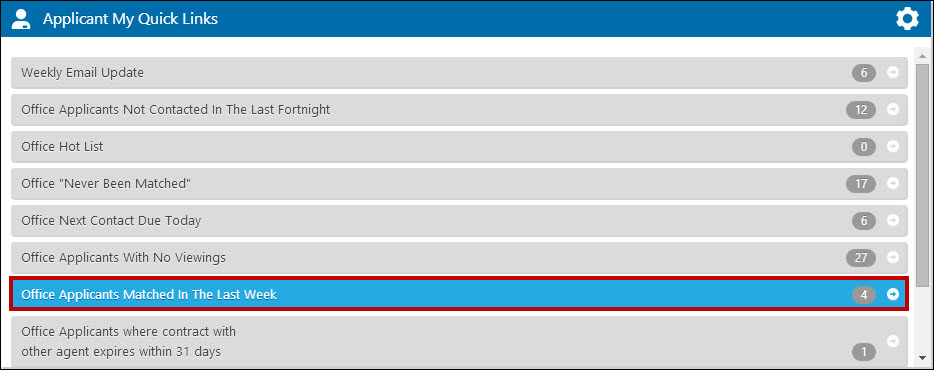
Clicking that link will open up your applicant grid, only showing you applicants who have been matched in the last week. You can then proceed to call your applicants in turn using the grid, as opposed to clicking into each record in turn:
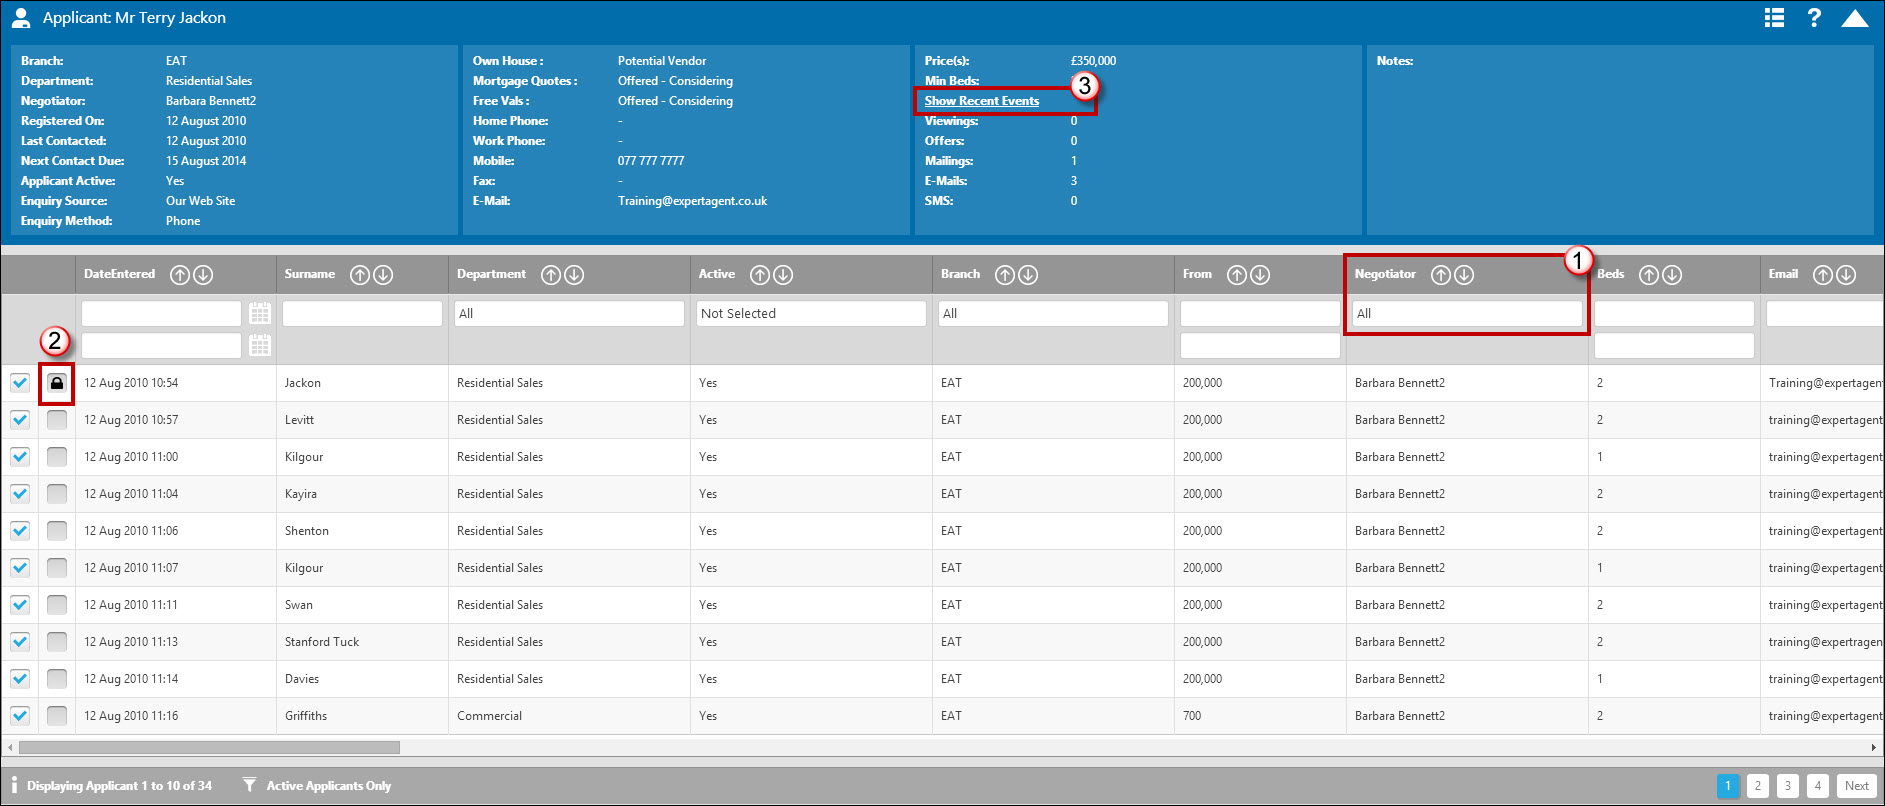
Some ideas to help you with your call out:
- You may need to place a filter on the negotiator column if you only deal with your own applicants.
- Use the ‘Lock’ feature by clicking in the Lock column, to ensure that the applicant you are about to call’s details are fixed in the Tooltip so it doesn’t change as you hover over different areas of the grid as normal.
- Click into “Show Recent Events” on the tooltip to show all the applicants recent matches for you to discuss with them:
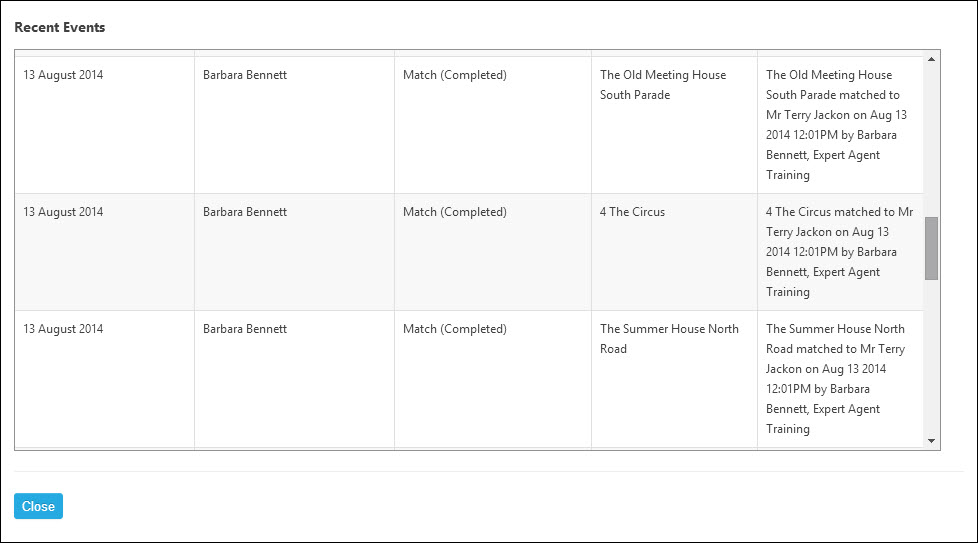
The list of recent matches will appear with the date, negotiator who performed the match, details and notes of each match.
When on the phone to your applicant discussing the properties you can click into each property in turn and add notes. When you click on an entry from the Recent Events screen the standard Match Entry details form appears:
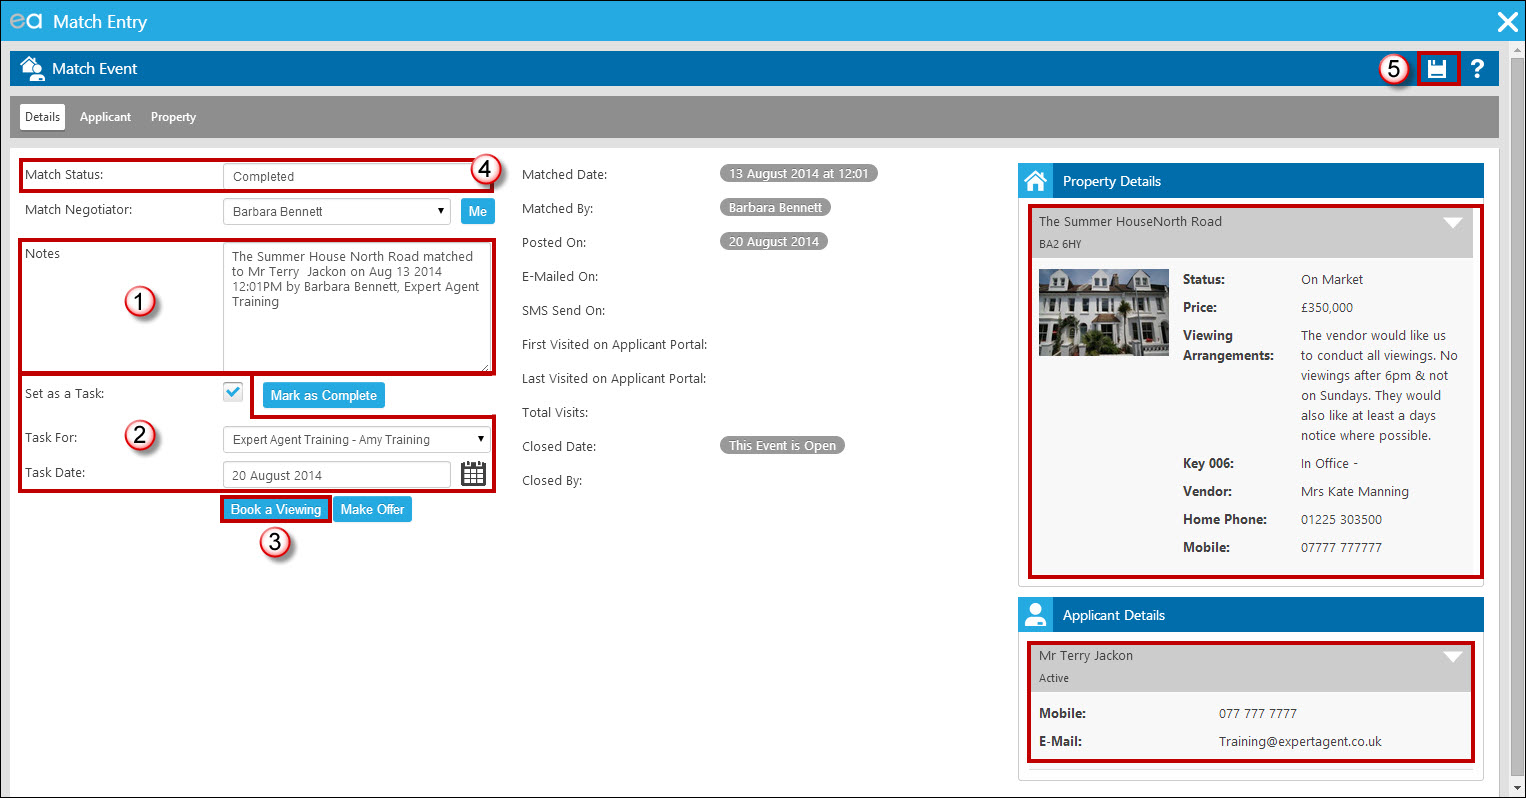
- Make note of the feedback your applicant gives on the property.
- Set a task if this is something you want to follow up at a later date – for example, if the applicant has said they may wish to book a viewing but are going to drive past the property first.
- If the applicant wants to book a viewing straight away, use the ‘Book a Viewing’ link to open the diary.
- Change the match status to ‘Completed’ if necessary. There are many other match status's to change it to such as 'Chased - Interested/ Chased - Not Interested' etc.
- Click ‘Save’ to save your changes, and close the match entry window once saved to return to the Recent Events list. Once finished with this applicant you simply close the recent events window, ‘lock’ the next applicant and repeat this process.
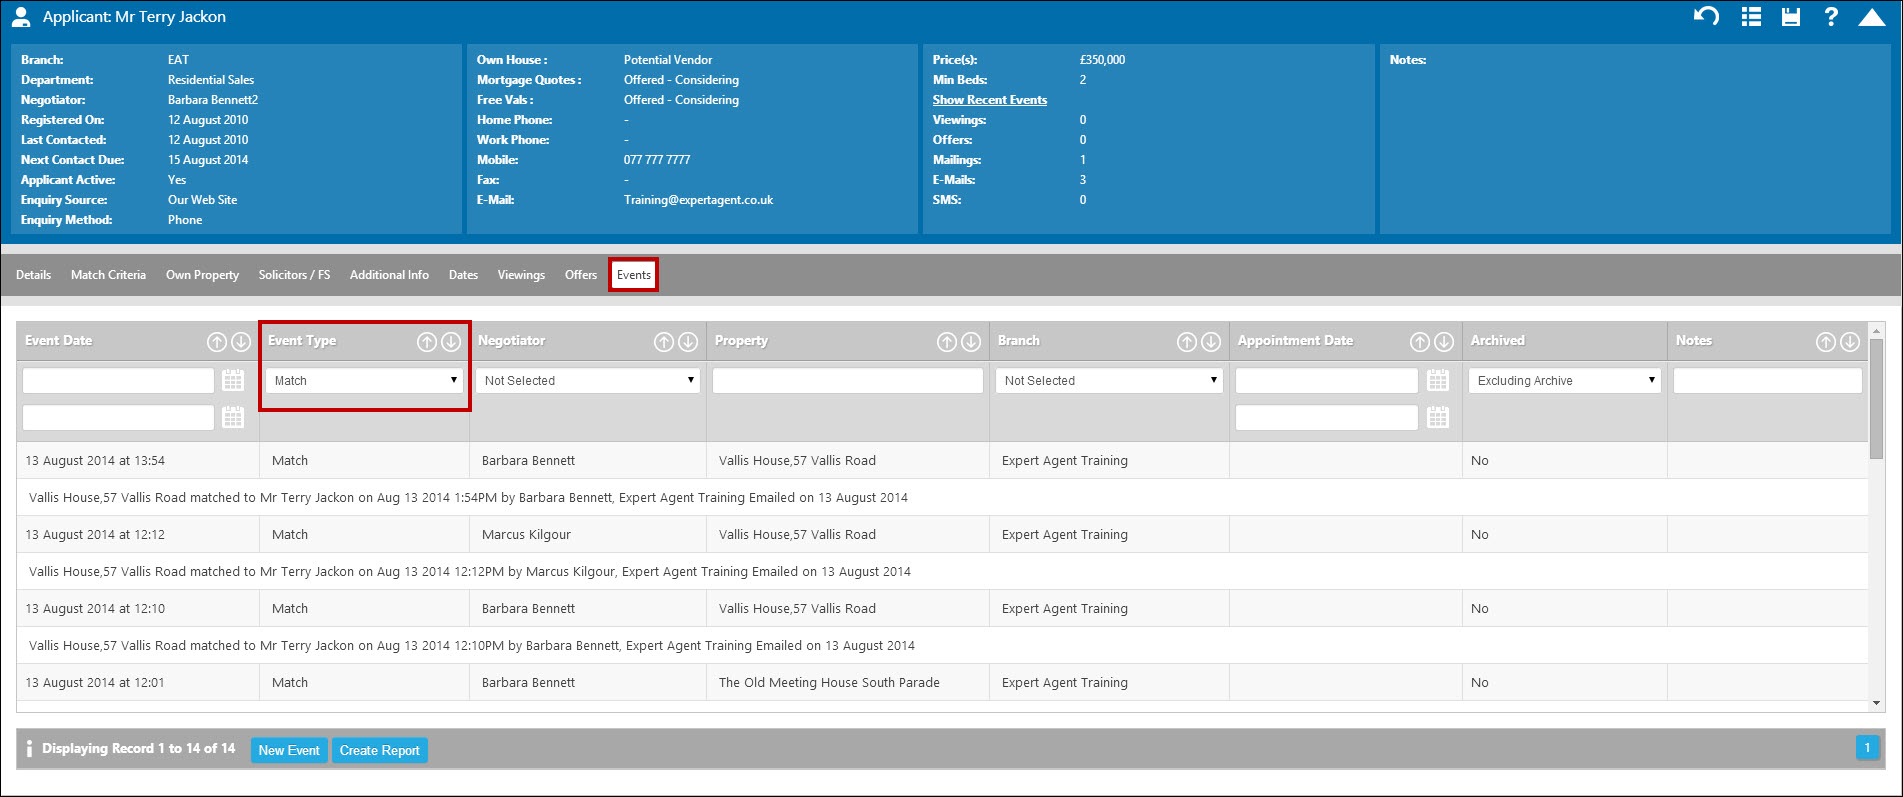
You could also go straight into the Applicants Events page tab, filter the event type on ‘Match’ and follow a similar process to the above if there was a particular applicant you wanted to speak with. If you wanted to chase up all recent matches for a particular property you could go to the Property Events page tab and filter the event type on ‘Match.’ An applicant example is shown below:
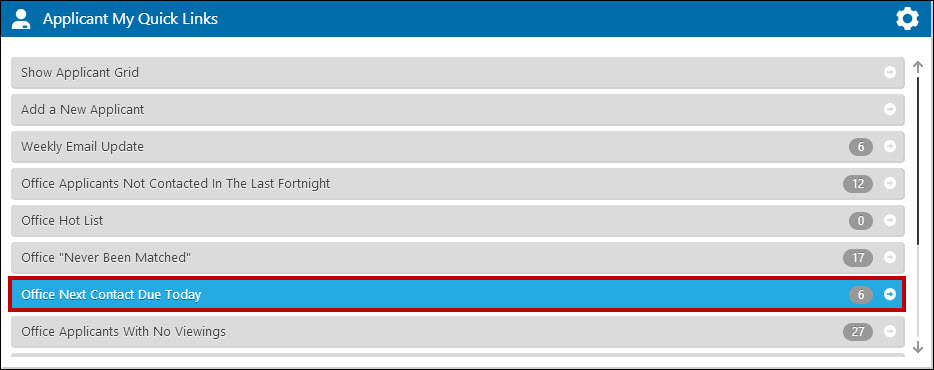
You can also set the system to automatically set the ‘Next Contact Due’ date for your applicant 24 hours after they have been sent a match. This is something that a Super User will need to set up in Applicant Configuration – Applicant Options.
Once done you’ll be able to use the ‘Next Contact Due Today’ Quick Link to follow up your matches:

 Login
Login

