 Login
Login


How do I convert HTML Templates to Word Templates?
Why would I convert from HTML to Wordlink?
HTML is extremely unforgiving. If you get one symbol or character out of place it can cause major issues and is very hard to identify what is causing the issue. Event experts in HTML have to spend time pouring over the code to identify one out of place or missing character.
Wordlink is simple compared to HTML. It's basically the same as editing a Word document (please see Microsoft Word tips if you need any help using Microsoft Word, although Microsoft forums are usually the best place to start).
Additionally, each time you edit an HTML template, it leaves excess code in the background which will eventually start to cause issues.
What is the difference?
HTML (Hyper Text Markup Language) is what web pages are built on. It was the only option at the beginning of Expert Agent to allow the pulling of information from Expert Agent into Templates, but now technology has moved forward, Word can now work in the same way using similar merge codes to pull information into the documents.
So will all my templates work in Word after converting them?
Sadly, the answer is no. Reports still need to be done in HTML, as do e-mails. The reason for this is that they work in a different way.
How do I convert my HTML Templates into Wordlink?
Firstly, it must be noted that we strongly recommend starting from scratch and NOT using the method shown below as you will almost always achieve better results starting from scratch.
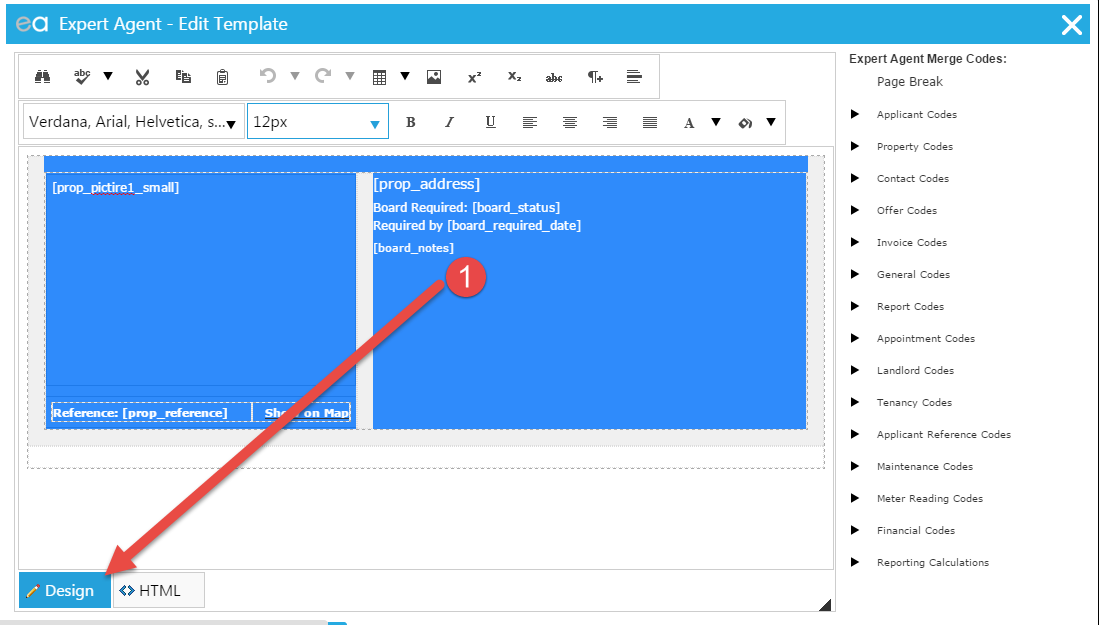
1. Open your HTML template (from Tools -> Configuration -> Output Config -> Templates). Find your template in the list and click the "Edit" button next to it. Then click the "Edit Content" button.
2. Make sure you are in the Design Tab (1).
3. Copy the entire area and paste into a blank word document.
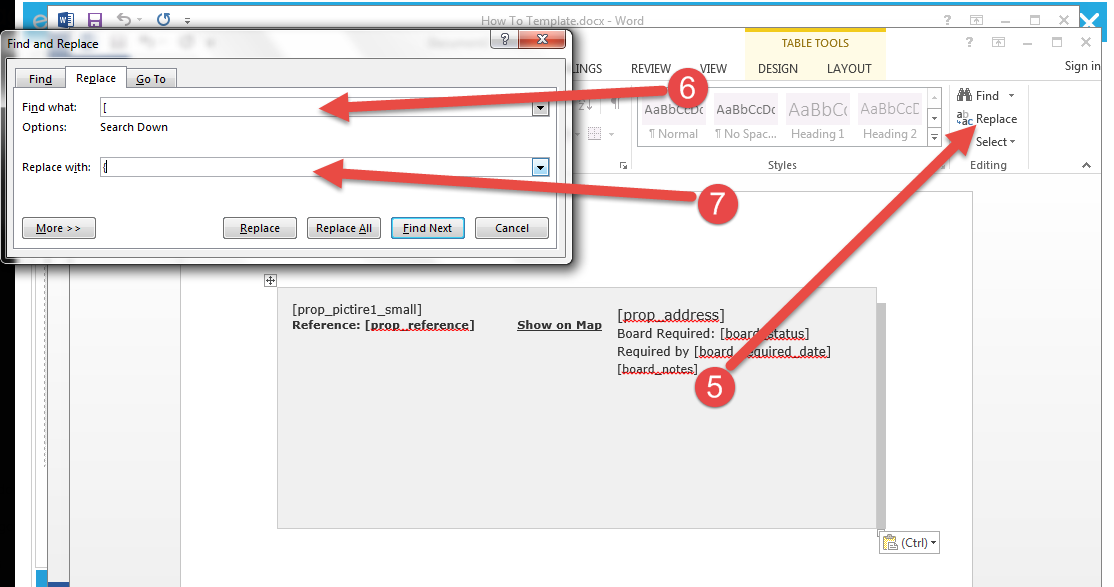
4. You then need to change the brackets of the Merge Codes. HTML uses [ and ] whereas Wordlink using { and }. There is an easy way to do this.
5. Click Find and Replace (use CTRL+F on your Keyboard and click into the Replace option)
6. In the top "Find box" put the [ symbol
7. In the bottom "Replace" box put a {
8. Then click Replace All
9. You will then need to do steps 5 - 8 using ] and } instead.
The template is now editable within Word, and most of the merge codes will work. However, there will be some that don't due to the wording being slightly different. The easiest way to identify these is to upload the template and try to using it.
The Merge Code that are still showing will need to be highlighted and replaced using the merge codes for Word. (Editing letters using EA data)
There is not a perfect way, but it does get the bulk of the HTML templates over to Word and save a little time.
REMEMBER this is only a quick guide to try and help you save time. They will not be final copied and you will still need to edit them to a degree to make them fully usable.
How do I change the margins on an HTML Template?
Why are my HTML Templates no longer displaying correctly?
Different browsers are supposed to work in the same way, however, it has come to light that they actually handle things differently. Chrome reads and displays HTML templates differently to Internet Explorer.
It worked fine in Internet Explorer
Internet Explorer enabled used to use templates that were bigger than the required size by having it use the "shrink to fit" function. Chrome does not have this function. Some printer drivers do, however, this is something you would need to investigate.
Is there a fix?
There is a sort of fix that we suggest doing/ In most cases it prevents the need to re-make all of your Templates. If this does not fix the issue, you may need to recreate your Templates.
How do I change my margins?
The following guide should help you adjust the margins so that your templates don't have to be re-made.
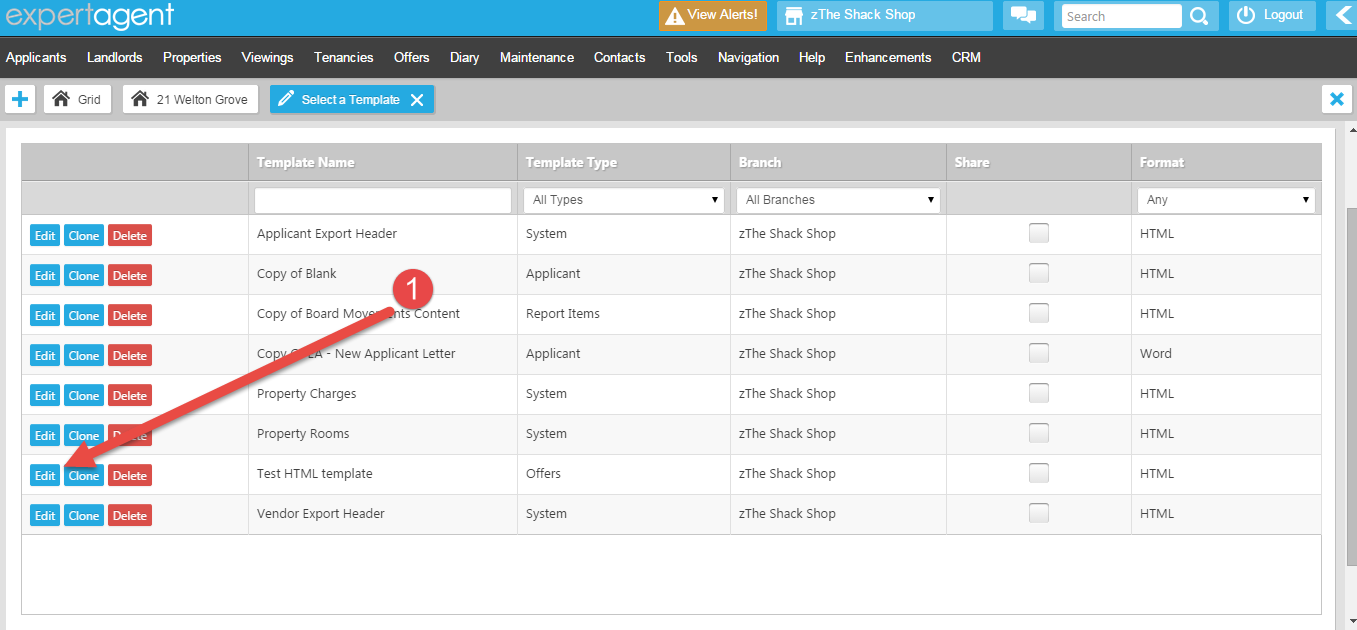
1. When in the "Select Template" page, click "Edit" to edit the required template.
2. As you can see in the image below, our Top, Bottom, Left and Right margins are set to 20mm.
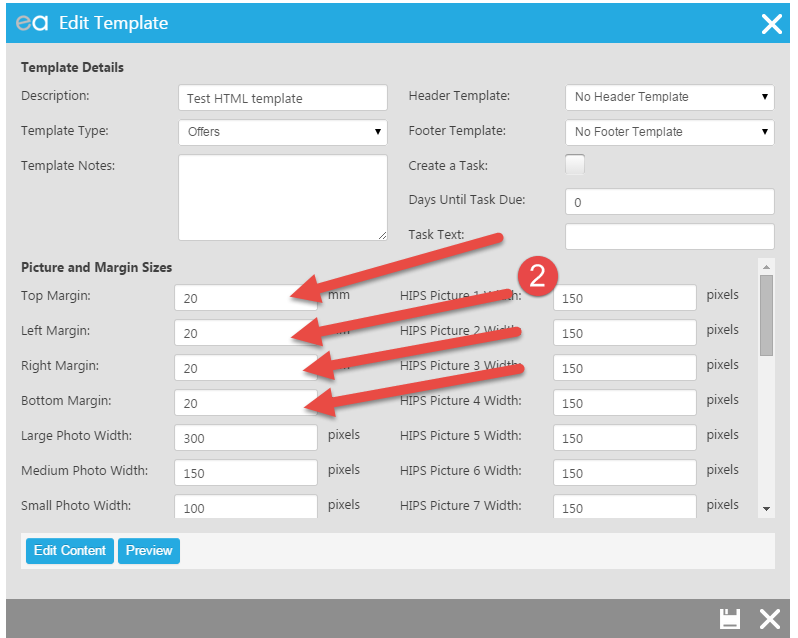
3. The best place to start is to half them, in this case we would change ALL these margins to 10mm.
4. Then click "Preview" to what difference has been made.
5. You may find that you need to raise or lower the number to achieve your desired results.
It should also be noted that these numbers do NOT need to be the same.
You will need to do this with each template before you use it, but once you have changed the margins this way and pressed "Save", it will be a permanent change to that template. However, if you need to use a different template, you will need to adjust it and save it before using.
How do I change the font size in an HTML Template?
Why might I need to change the font size in an HTML Template?
HTML is extremely unforgiving, Internet Explorer allowed us to shrink an image to fit the page. However, this feature is not available in Chrome. This often means that older templates that were made too big to fit on a page, now cannot fit onto a page. By changing the font size, this can create more space on the page, meaning that it makes the contents of the template smaller, requiring less room.
I'm using a report, I can't find the Template!
If you are using a report, you will need to identify the template that is the body of the report.
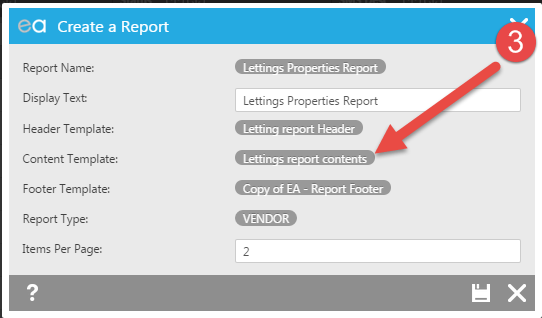
- Right click on the grid you are trying to run the report from, select Outputs -> Create Report.
- Find and click the report you usually use.
- Once clicked, you will see the following screen, the indicated section is the template this report uses and needs to be edited:
Changing the font in the Template
Changing the font is fairly simple, just follow the steps below:
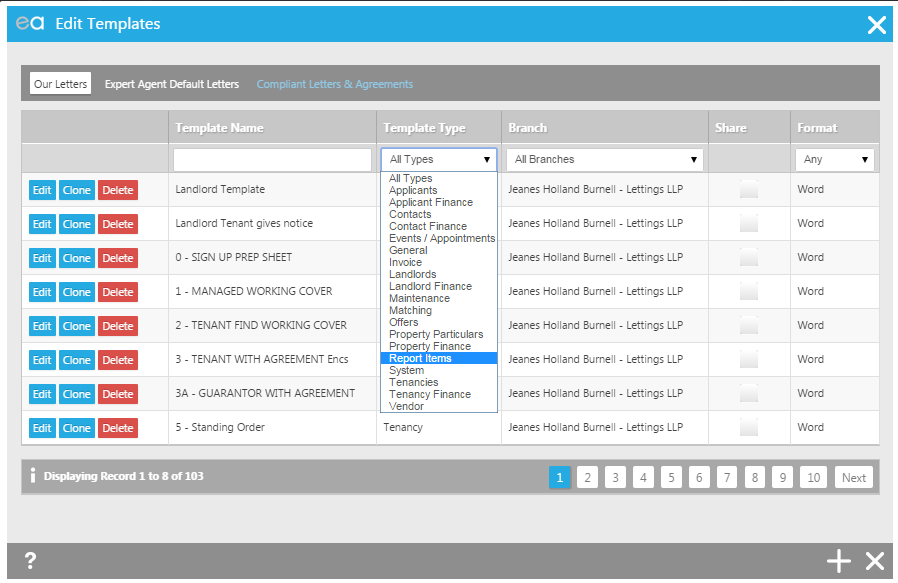
1. Go to Tools -> Configuration -> Output Configuration -> Templates
2. In the Template Type select "Reports"
3. Then find your report and click "Edit".
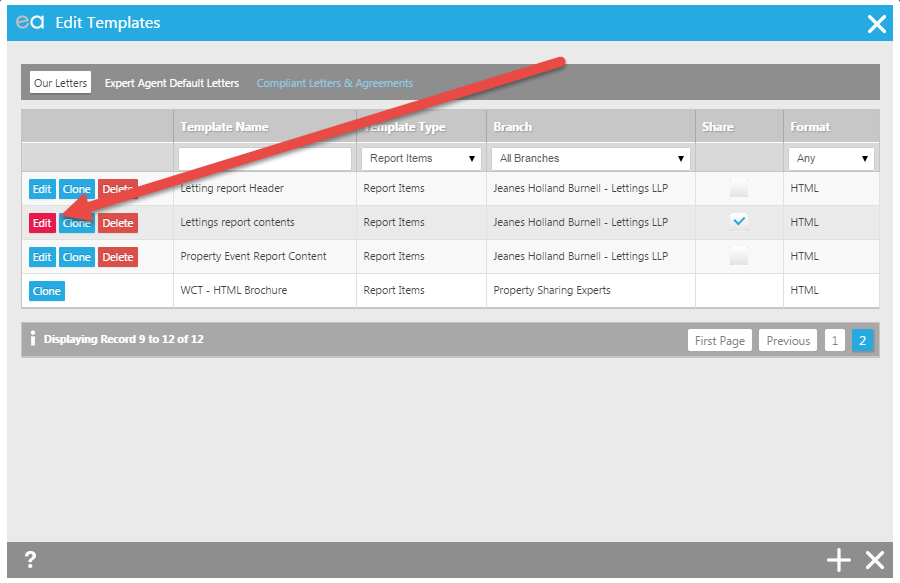
4. Then on the next window, click the "Edit Content" button
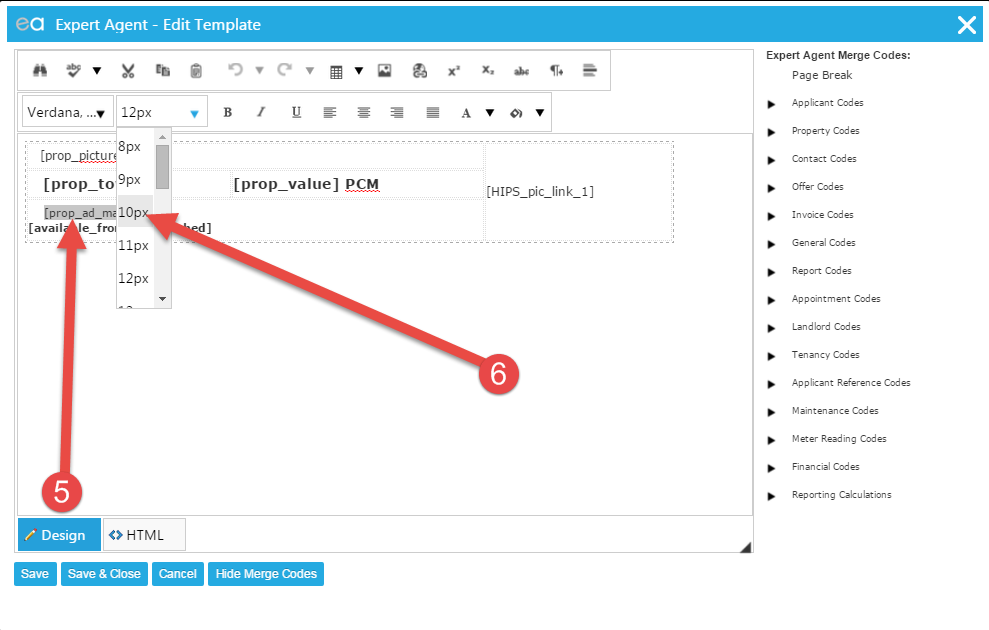
5. Highlight the merge code of the text that you want to format
6. Then use the formatting tools at the top to change the formatting. In this case we are changing the font size.
7. Then click the "Save & Close" button
8. Then click "Preview" to see an example and print preview of the newly edited template
9. If this is not how you want it, repeat steps 4 - 8 accordingly.
N/B This will change ALL reports that use this template.
Network Troubleshooting
What is Network Troubleshooting?
This guide offers a step by step guide on very basic network troubleshooting. There is a lot more to troubleshooting your network, but this guide will help you identify whether the issue is internal or external, and where in your network (approximately) the fault may lie.
Why do I need to troubleshoot my network?
The Expert Agent technical support team would love to be able to offer full technical support, but sadly, due to resources, its just not practical.
Additionally, your network would have been setup by your IT team, so we don't know exactly how your network is setup. This means that if we made changes, it could totally take you offline, and as we don't have physical access, nore do we know your individual setup, we could cause more damage.
What is the best setup for Expert Agent?
Expert Agent runs best on what is described as Domestic or Home network. What this is, is a network where all computers are connected directly (wired or wireless) to the main router that connects to the internet. This means that there is nothing in the way that may be causing issues with the data.
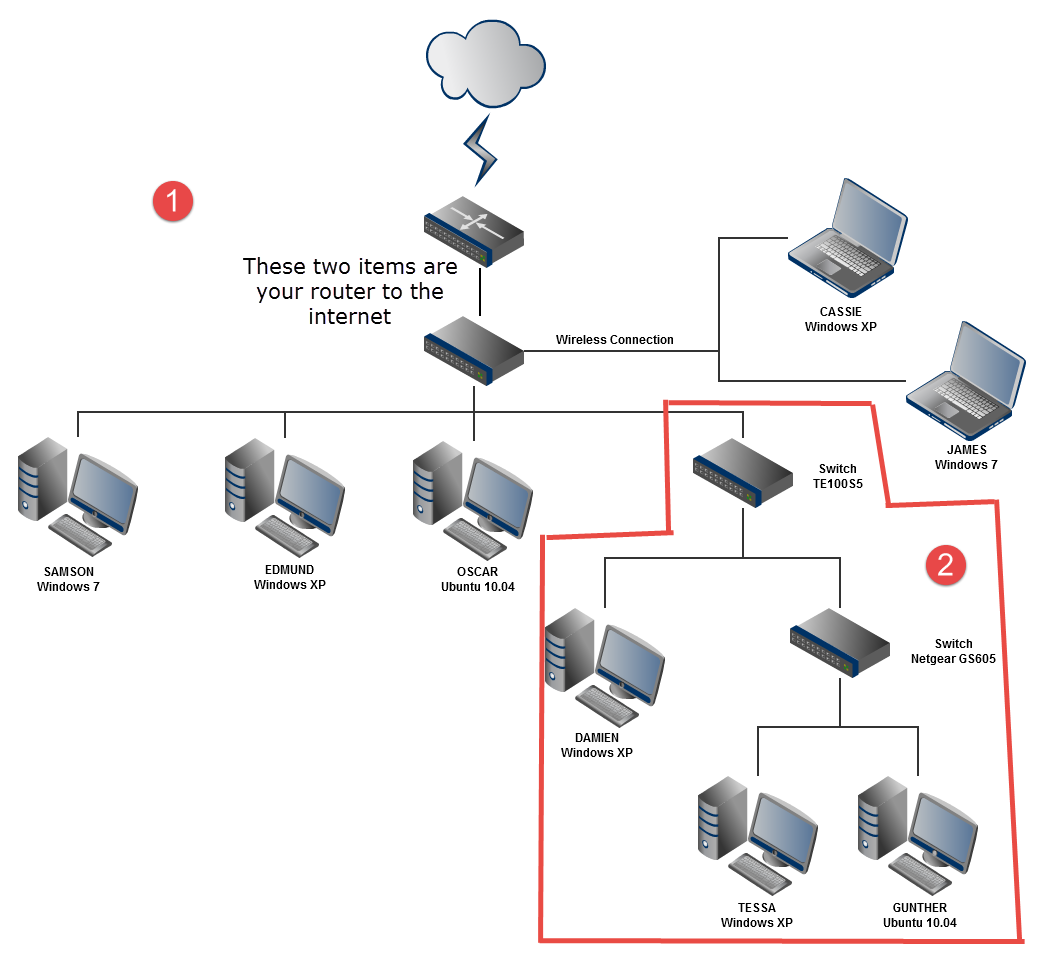
Below is a diagram of a basic domestic network.
The most perfect setup is Section 1 of the diagram. This has nothing that may cause any issues between the machines and the router.
The area shown in section 2 should really be avoided if possible. However, if you have a lot of machines in the office, you will need to have switches to enable more computers to be connected to the network.
The more switches (or any other devices) between the computer and the router increases the change that something could go wrong.
So let's move onto test your network.
You will need a laptop and a short length of Ethernet cable. This is the cable that can connect your computer directly to the router.
Lets get testing!
Below is a diagram of a general office network:
Your office network will likely be slightly different to this one, but we will use this as a point of reference to show the different points around the network that can be tested.
We recommend doing this out of hours so that you have minimal devices "working" that may use data. We also recommend turning all devices off before running these tests. But that can become a lot of work and problematic, which is why we suggest running these tests out of hours.
The test this guide will show you should not be affected too much by any devices that are still running.
In the diagram below, we have identified 3 zones that we will look at. We are ignoring the serves (as Expert Agent does not need servers, and it makes everything that much more complicated), and the wireless.
The Test
The test described below will need to be carried out at point 1, 2 and 3, working away from the router connected to the internet. You may have zone 4, 5 and 6 that may also be tested. But hopefully you will understand the process of how to zone your network.
We will also explain a little about wireless later in this guide.
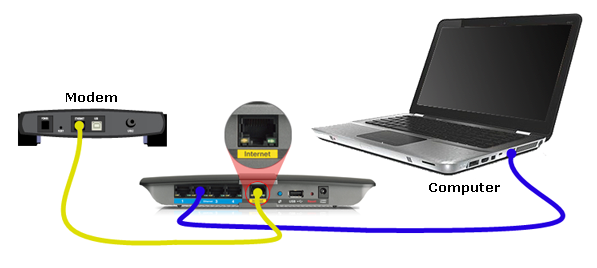
Firstly, connect your laptop directly into your router. It will look something similar to the diagram below. Please note that in this case the modem and router are separate. However, in many cases, they are in the same box.
You will want to start in zone 1 as indicated in the office network diagram.
For the best results, unplug any other Ethernet connection, making it so that your laptop ios the only device connected to the router.
Please note that you will need to leave the DSL cable plugged in, or the cable that foes into the modem, or into the wall. If you unplug this, you will lose connection totally.
Once you have connected to the router, open an internet browser such as Chrome.
In the web address bar type www.speedof.me and hit enter.
The image below is an example of a perfect 40mbps connection.
Things to note on the test below, it is hitting the 4ombps speed, and as its capped at 40mbps, you can see a nice straight line at the capped speed. Its stable and a consistent pattern.
Download speed is blue and upload speed is yellow.
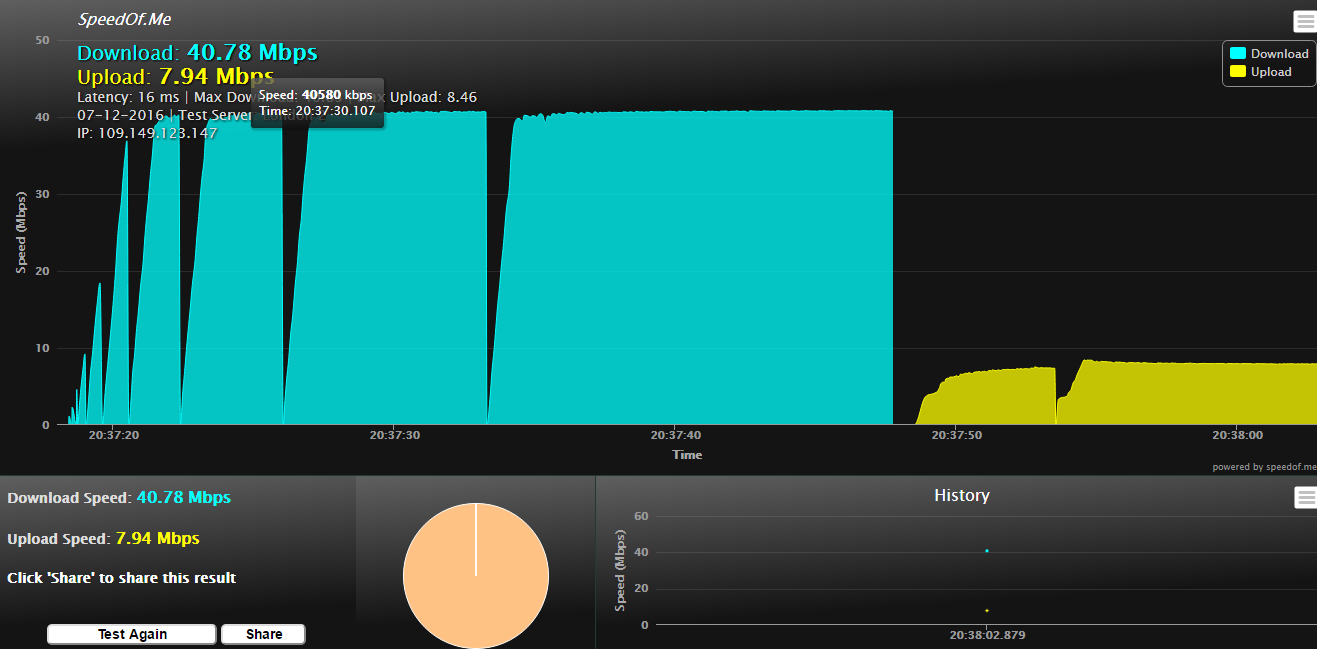
A good rule of thumb with internet connections is that your upload speed should be at least 10% of your download speed. If it's not, there may well be an issue.
You may see more noticeable troughs and peaks in your results. That's fine, as long as it looks consistent, it should be ok.
Once you arrive at the site, click the "start test" button and let the speed test run.
Once complete, you may want to click the "share" button, and copy the link into notepad (text wrangler on a Mac). If you do, it's a good idea to annotate it saying which zone and which test it is.
Also take a note of the speeds you get. The best results should be found in zone 1.
You may also want to give it a couple of minutes, and run the test again, maybe even a third time. You can then work out of the line is stable or not, as if its stable, each test should come back with the same results. If the results differ considerably, you probably have an issue on your line or in the router.
It is likely there will be a slight differences between tests, but it should be minor.
You have now tested zone 1. You can plug back in any cables you unplugged from the router. (If it's not too complicated, you mat want to leave them unplugged whilst you run the nest tests in the next zone, but that's up to you).
So you have tested zone 1.

It's time to test zone 2, working back from the point of entry to the internet.
As we have already described the majority of this, below are bullet points to recap:
- Find the next junction point, this will likely be a switch where one cable is converted to many.
- Unplug all cables if possible, and connect your laptop to the device as you did in zone 1.
- Open a browser and go to www.speedof.me
- Click "start test"
- Let the test run
- Once completed, take a note of the speeds, or click the "share" button and cope the link into your notepad and annotate the link with its description "Zone 2 test 1".
- Repeat another time or two and copy the links into your notepad.
You then repeat this process with each junction (zone) in your network and simply repeat the process as many times as needed depending on your setup, working your way, away from the access point to the internet (router).
Wireless
We have kept wireless separate from the other tests as wireless is quite a complex one to test.
The issue with wireless is that a vast amount of things can interfere with the signal. Generally speaking you probably want to ignore wireless. However, if you need to test it, this is how:
Your wireless router will usually be a part of the main router, unless you have wireless extenders or multiple access points.
If possible, pull out any wires that are connected to the device except the main input cable if it's a separate device to your main router.
Then connect wirelessly to the wifi connection via the laptop preferable, but you can sometimes do this on a mobile device.
Then follow the normal testing procedure as described above.
The problems with wireless is that anything and everything can cause interference.
Wife runs on channels, your neighbours may be running on the same channel as you are, which can cause interference. Your IT guy can change the channel you use.
If everyone's mobile devices are connected, they could be updating which use bandwidth.
There is a thing caused REIN (Repetitive Electronic Impulse Noise) where electronic devices are wires let out an electromagnetic field which causes interference. Fairy lights are one of the worst for this, but even a faulty lamp-post outside can cause issues like this. Even untidy coils of power leads can cause it.
There are so many other things that can cause issues with wireless, we can't list them all. Which is why it it's a good idea to avoid wireless where possible.
Test Results
So now you have your test results, what do you do with them?
Firstly, if you ran 3 tests in each zone, and you notice that the speed differed considerably between each test in the same zone, you have an unstable line. This is essentially the case in zone 1. However, if you find that you get good stable results in zone 1, but in zone 2 you have unstable or inconsistent results, you know the issues is between zone 1 and zone 2.
Comparing Speeds between zones
You know what speeds you should be getting. So when running the test in zone 1, if the speeds are considerably lower than what you are expecting (less than 75% of your expected speeds) you need to speak to to your provider. Speeds are rarely perfect, and depends on things such as how far away you are from your exchange, the quality and condition of the green cabinet at the end of your road and a few other things.
If zone 1 is ok, and you are getting what you would expect, take a look at the speeds of zone 2. Comparing zone 1 and 2, you should find they are of similar speeds, maybe slightly slower in zone 2, it's to be expected. However, if it's considerably slower, or the graph is inconsistent, or looks messy, you have an issues between zone 1 and zone 2.
Do this again and compare zone 2 and zone 3 and use the same interrogation method as you did between 1 and 2. If there is a major difference, you know that there is an issue between zone 2 and 3.
Repeat this for all zones. You should get an idea of how your network is performing between each zone, which in turn should highlight where in your network is the source of the problems.
Conclusion
Doing the above, and taking note of the results should provide enough evidence to your IT team or ISP (internet service provider) that you have an issue. If they are insistent that it's not your network, consider getting a second opinion.
Sometimes, pulling the power out of your router for 2 minutes and plugging it back in will clear any minor errors that have built up over time. It's certainly worth trying!
Tel: 01225 303500 | Email: account.managers@webskyltd.com
Terms of Business | Cookie Policy | Privacy Policy | ZPG Modern Slavery Statement
Designed by the Expert Agent Design Department
