VAT Export MTD
As a VAT registered business, you may find it necessary to export your sales invoices from Expert Agent and import them into your office accounting software to stay compliant with Making Tax Digital (MTD) legislation.
It is vitally important you have completed your configuration before attempting to run this report or all the fields your Accounting Software needs to import the data will not be present. You can then go to your top finance menu - reporting - VAT Export MTD
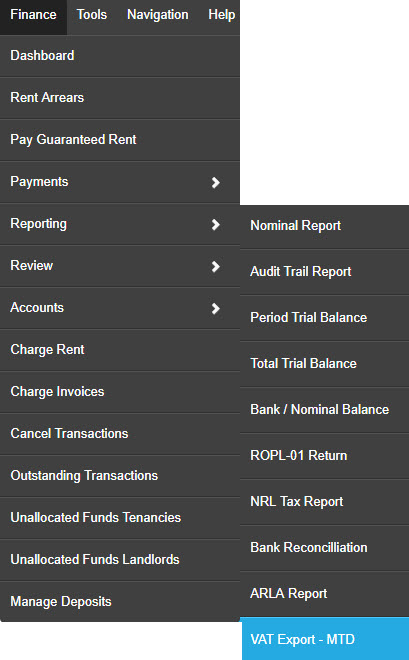
You will be able to make your selections and run your report to show you individual items that have been raised on sales or uplifted purchase invoices within the selected parameters.
Please bear in mind, as per all Lettings Finance training, Expert Agent works on a standard accounting basis so your invoices will show here based on the date they were raised and the report will not take into account what has been paid. If you are looking to view your invoices for any other reason than exporting them for your accounting purposes, please use the Reviewing Sales Invoices/Credit Notes report.

The report will open blank and you will be asked to:
- Select your branch
- Select your date range
- Chose whether you are wanting to export your sales invoice or any uplifted purchase invoices (these need to be done separately if you are wanting to do both)
- Click the “filter” button to load the report
The report will run and you will be presented with the transactions at item level that fall under the parameters selected above allowing you to check over and ensure you are happy with the information displaying.

The information in the columns will be as follows:
- Invoice date and Item date – The date selected as the invoice date when creating your invoice
- Branch – The branch where the invoice was created
- Contact name/Contact Address – The Landlord/Tenancy the invoice was charged to and the address of said Landlord/Tenant
- Property Address – The property the invoice was charged against
- Charge to – Whether the invoice was charged to a landlord, tenant or contractor
- Description – The individual item description entered when creating the invoice
- Nominal Code – Pulled from the ‘Export code’ column of the Nominal Ledger of the branch the invoice was created in. This is based on the nominal you selected when creating the invoice
- Nominal Code description - Pulled from the ‘nominal name’ column of the nominal ledger as above
- Invoice number – The invoice number each item was raised under
- Net Amount, VAT Amount & Total – The numeric breakdown of each item charged
- VAT Rate (%) – The percentage amount of VAT that was added to the item
- VAT Rate Description – Pulled from the ‘export description’ column of the VAT Table in the Financial Defaults of the branch the invoice was created in. Based on the VAT rate you selected when creating the invoice.
- Negotiator – The negotiator that created the invoice. If this column is blank, the invoice was a recurring, auto generated invoice.
- Type – whether this was an invoice or a credit note.
If you chose to run the report for your uplifted purchase invoices you will get two additional columns:
- Contractor name - The contractor that the invoice was raised for
- Sales Invoice number (for reference only, not included in export) – The corresponding sales invoice number that was charged on to the Landlord/Tenant

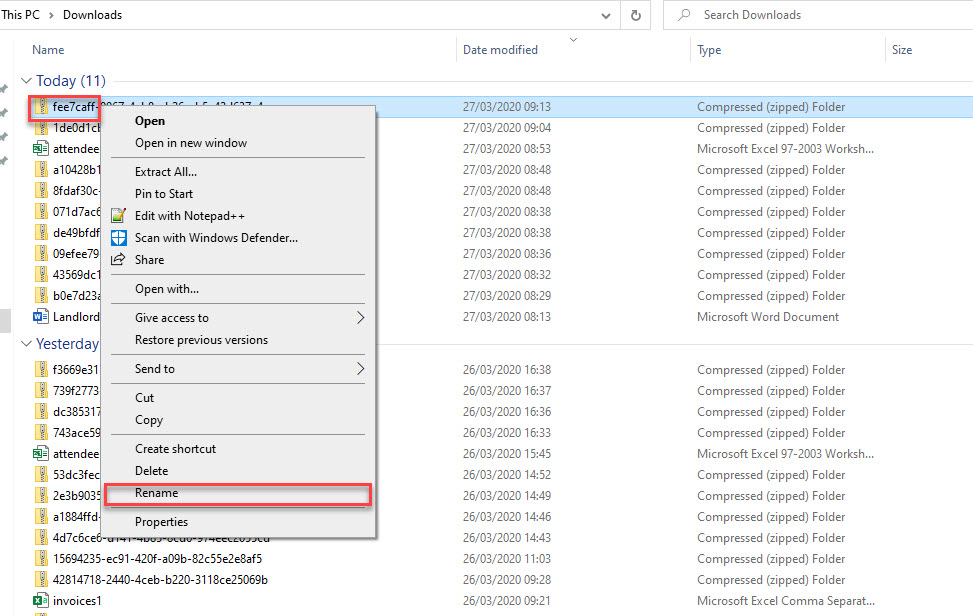
Once you are happy you can click the “export” button and your data will be exported into a CSV format. This will download as a ZIP file automatically in the bottom left hand corner of your screen as with all CSV downloads from Expert Agent. Because the file should not be edited, we do not recommend opening the CSV and re-saving it. It should be uploaded in its original format to ensure the data is correct. If you need to re-save the export in order to change its name, we recommend right clicking on the ZIP file in your Downloads folder and using the rename option.
Based on the Financial Accounting Software you have selected in the Making Tax Digital Configuration of the branch you are running the report from, and any subsequent fields you have completed, the file will display as required.
- If you have entered any invoice prefix, or ‘invoice customer’ references, these will pull through into the relevant fields on the export for you.
- If you have ticked to summarise at nominal level, your invoices/credit items will be grouped together based on the nominal they were raised under (broken down by VAT rate). Each summary total will be assigned a fictitious ‘Invoice number’ to allow the export to work. If you ever need to refer back to the source data to see a breakdown of this total, you can do this by running your review sales invoices report on a detailed version and filtering by nominal. Invoices and Credit notes will still remain separate.
- Each compulsory column that your financial accounting package needs to be able to import the transactions will be included in the report generated and each column heading should be named appropriately so that it is recognised when you import the data. There should be minimal mapping required by yourselves. If your import is to fail, your Accounting Software should confirm why the import has failed. If the issue is within the data, you can address that and re-run the report.
Variations based on the Financial Accounting Software you have selected in your configuration:
Sage: If you have made this selection in your configuration, all sales invoices and credit notes will be included in the same CSV file. Both invoices and credit notes will show as positive figures. It is not currently possible to successfully import a file that uses individual landlord/tenant names as the Customer so you need to ensure you complete the 'Invoice Customer' reference fields in your configuration and all items from your client account will be mapped through to the one 'customer/supplier' in Sage.
Quickbooks: If you have made this selection in your configuration, all sales invoices and credit notes will be included in two separate CSV files.
Xero: If you have made this selection in your configuration, all sales invoices and credit notes will be included in the same CSV file. Xero requires each imported line to have a unique invoice number so if you are importing a detailed report, you will want to ensure when creating sales invoices, you are only adding one item to each invoice. Credit notes will show as negative values.
Other: The above are the only currently supported packages by Expert Agent and the wider Zoopla Group. If you have made this selection in your configuration, all the other configurable options will become unavailable. When you click the export button, a CSV will download with the data in its onscreen format for you to use as you see fit.
Statements via the Payments to Make Report
Statements via the Payments to Make Report
You also have the ability to produce a batch of statements for Landlords who have had payments made to them via the Payments to Make Report. This is the report that loads automatically after you have processed your landlord payments. There are Print Statements and Email Statements buttons along with the Print Remittance and Email Remittance buttons - please see the Remittance Advice page for more information on this.

To produce your landlord statements from this screen you will need to select the landlords you want to include in your statement run. All payments will automatically be selected but you can untick the tick in the grey bar to de-select all landlords and just select the ones you want to send. Alternatively simply untick any you want to exclude from the run.
Once you have made your selections you will want to click on the Print Statements button or the Email Statements button depending on whether you want to print or email your statements.
Clicking email statements will open the below screen:
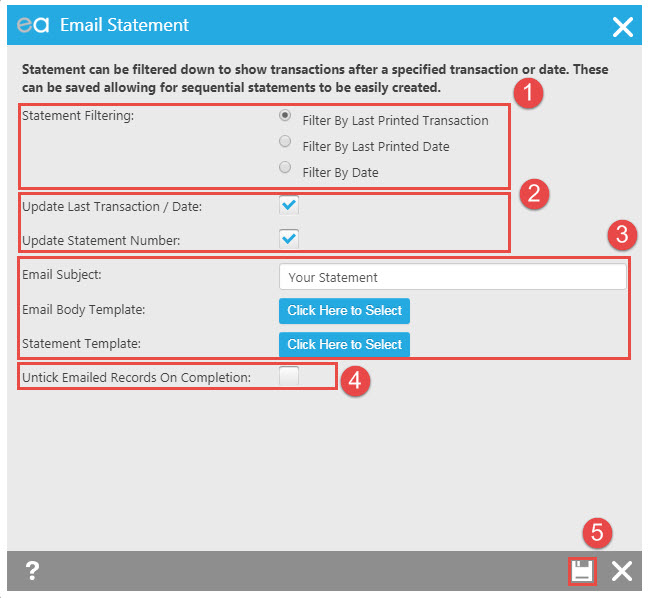
- You need to select whether you want to filter you statement based on the last transaction that was included on the last statement for the individual landlord, the last date you created a statement for that individual landlord or by a generic date range for all landlords included in the run.

2. Leaving the ticks in the boxes will mean that the last transaction date/last printed date along with the statement numbers will get updated for your next statement run.
3. You can edit the email subject (please remember this will be the same subject that all landlord's see so don't make this landlord or property specific) and you will need to select a template for the cover email along with your statement template.
4. Ticking the box 'untick emailed records on completion' will mean that any emails that fail to send due to the landlord not having a valid email address or something similar will remain ticked when you return to the payments to make report. This way you can investigate what's gone wrong or print statements for these landlords.
5. Clicking save will bring up a pop up as below to confirm that the emails have been queued for sending and alert you to any emails that won't send.

Clicking print statements will work in much the same way, you will get the below pop up:
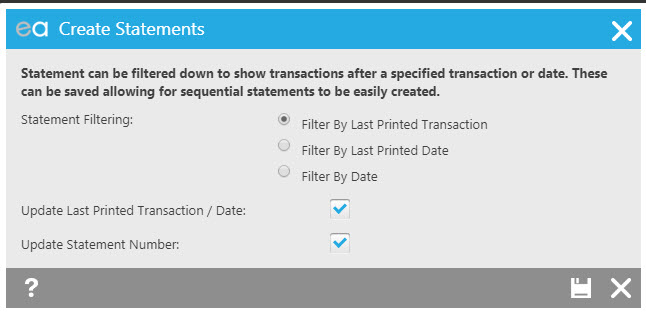
Where you will again need to confirm your filtering options and if you want to update the transaction/date and the statement number. Clicking the 'save' icon will take you through to the select a template screen to chose your statement for printing.
Landlords with Multiple Properties
** If you have a landlord displayed multiple times in the payments to make list where you have processed payments for more than one of their properties, you will want to de-select any duplicate entries otherwise the landlord will receive duplicate statements. Producing statements from the payments to make report will produce one statement for all of the landlord's properties; if you want to produce separate statements for each of their properties you will need to do this from the Landlord record itself. See Statements from a Landlord Record.
Statements from a Landlord Record
Statements from a Landlord Record
You can create a statement for a landlord from the statement tab of their record. You can use the property selector to tell Expert Agent which of the landlord's properties you would like to create a statement for. It will show all properties by default but if you would like to create a statement just for one of their properties you can use the drop down to select the property in question. You will then need to press Create Statement.

You will then get directed to the following window at which point you will need to decide how you want your statement to be generated.
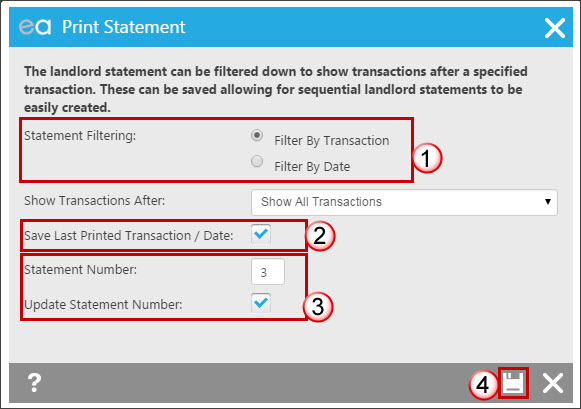
- First select if you wish to filter your statement by transaction or by date - see below for further details on both
- With the tick box ticked, Expert Agent will log which transaction was last on the produced statement or the end of the date range that you have selected for when you create your next statement.
- You are able to number your statements. This field is populated from the Landlord Financial Details Tab. Expert Agent will automatically update this unless you untick the box.
- When you click the 'Save' icon, the Select Template window will open.
If you select to filter your statement by transaction then all transactions posted after your selected transaction (chosen from the drop down box) will appear on the statement. In most instances you would select the last Landlord payment to be the "selected transaction" on the basis that a statement would have been sent to the landlord at that point. Any transaction which has subsequently been posted but given a transaction date prior to the selected transaction will also appear on the statement that you are creating. If you have left the tick box marked No.2 ticked then Expert Agent will log the last transaction shown on this statement and will have it selected as the "show transactions after" choice for a future statement.
In this example the Landlord Payment dated 11 November 2014 has been selected, therefore the statement will list all transactions above the blue line. If any of the transaction listed underneath the blue line had been posted after the landlord payment had been made then they would also be listed on the statement.

If you select to filter your statement by date range, then simply use the calendar icon to stipulate the date range that you wish displayed on your statement. Expert Agent will default to use the day after your last statement date if this is available, if not it will default to a month for you.

Once you have selected your filter option, press the save icon and the Select Template window will open:
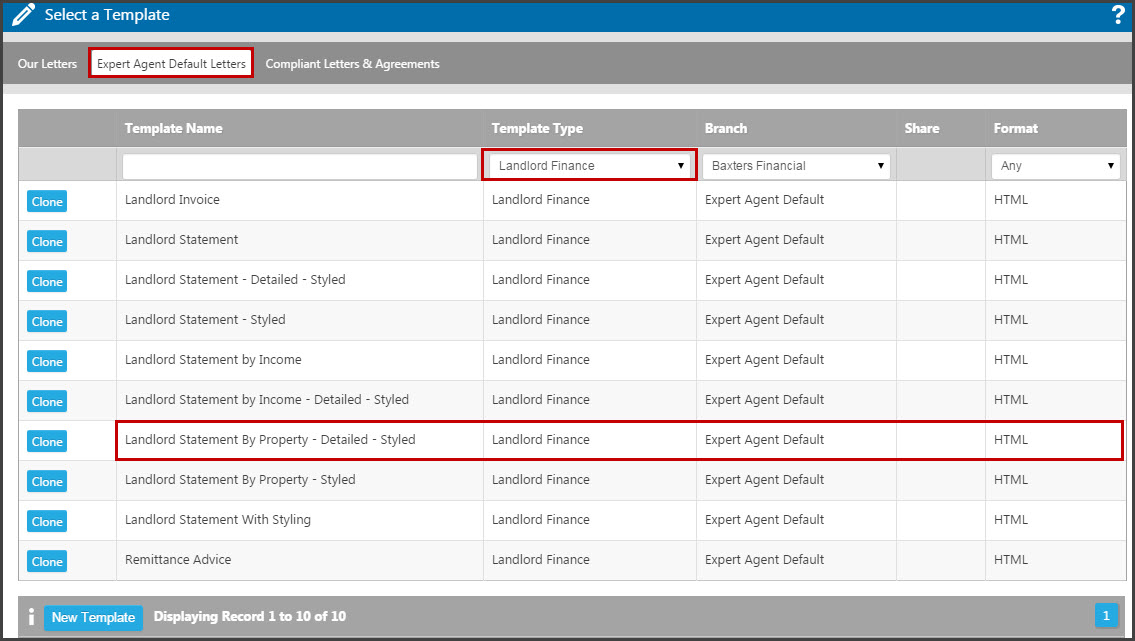
From the Expert Agent Default Letters tab you have the ability to clone or directly create any one of our templates by clicking on the row. In this example we have created the Landlord Statement By Property - Detailed - Styled. Please see the Landlord Statement Examples section for more information on the different statement templates.
Once you have selected your template, the statement will open:
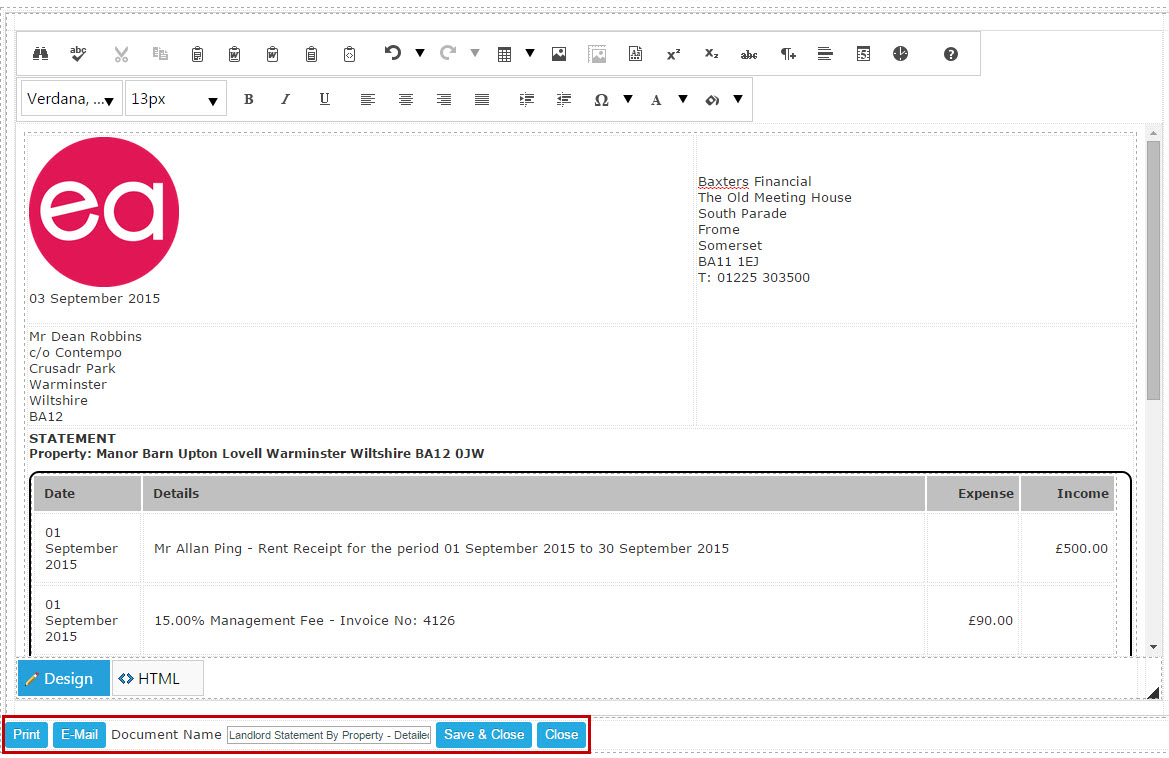
As with normal letters created through Expert Agent, you are able to edit the statement in this preview window and then Print or Email the statement using the buttons in the left hand bottom corner. If you choose email at this point the following window will open:
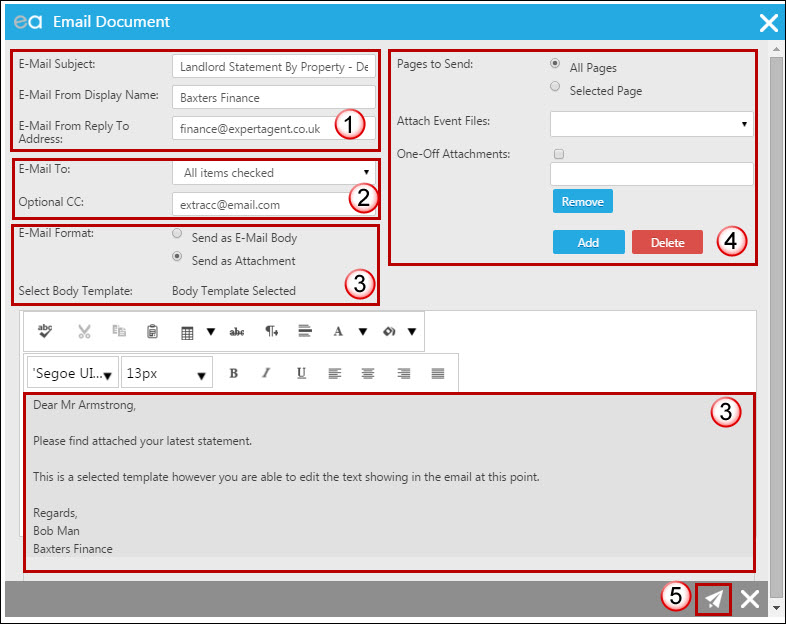
- You are able to enter a subject for your email. The statement template that you chose will be the default subject. You can also change the display name and change the reply to address if required.
- Then select who you wish to send the email to. Any email address on the record will be listed in the drop down option therefore if you have entered the landlord's accountant's email address in the record for example it will be listed. You can also manually enter another CC if you wish.
- You need to select whether you wish the statement to be sent in the body of the email or as an attachment. If you chose the latter then you will need to select a template for the body of the email. Once you have selected one it will appear in the display beneath at which point you are able to make any amendments to the text.
- You are able to attach either previously uploaded event files or files from your computer as additional attachments to the email if you wish.
- Clicking on the save icon will start the email process.

Clicking"ok" will close this window. When Expert Agent has sent the email you will get a message which you can access via the top Message icon on your Expert Agent window.
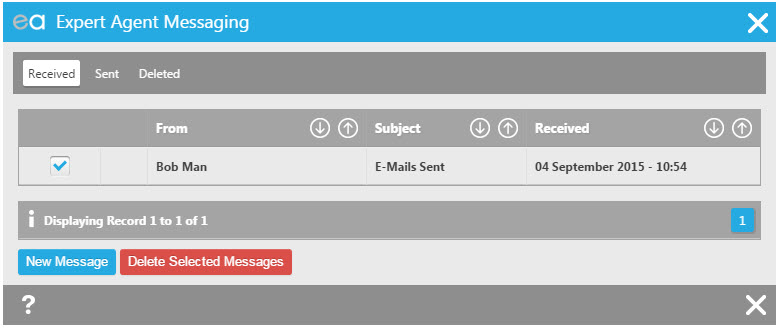
You can delete that message. Expert Agent will create an event on the landlord record which will include a copy of the statement sent.
Statements via the Landlord Grid
Statements via the Landlord Grid
You can also easily create a batch of statements via the Landlord Grid. There is even some quick links that you can add to your Quick Links in the Finance dashboard or Right Hand Tool Bar called "Landlords with Payments Made By This Office xxxx” with differing timescales such as "Today" and "in last 7 days" as shown below
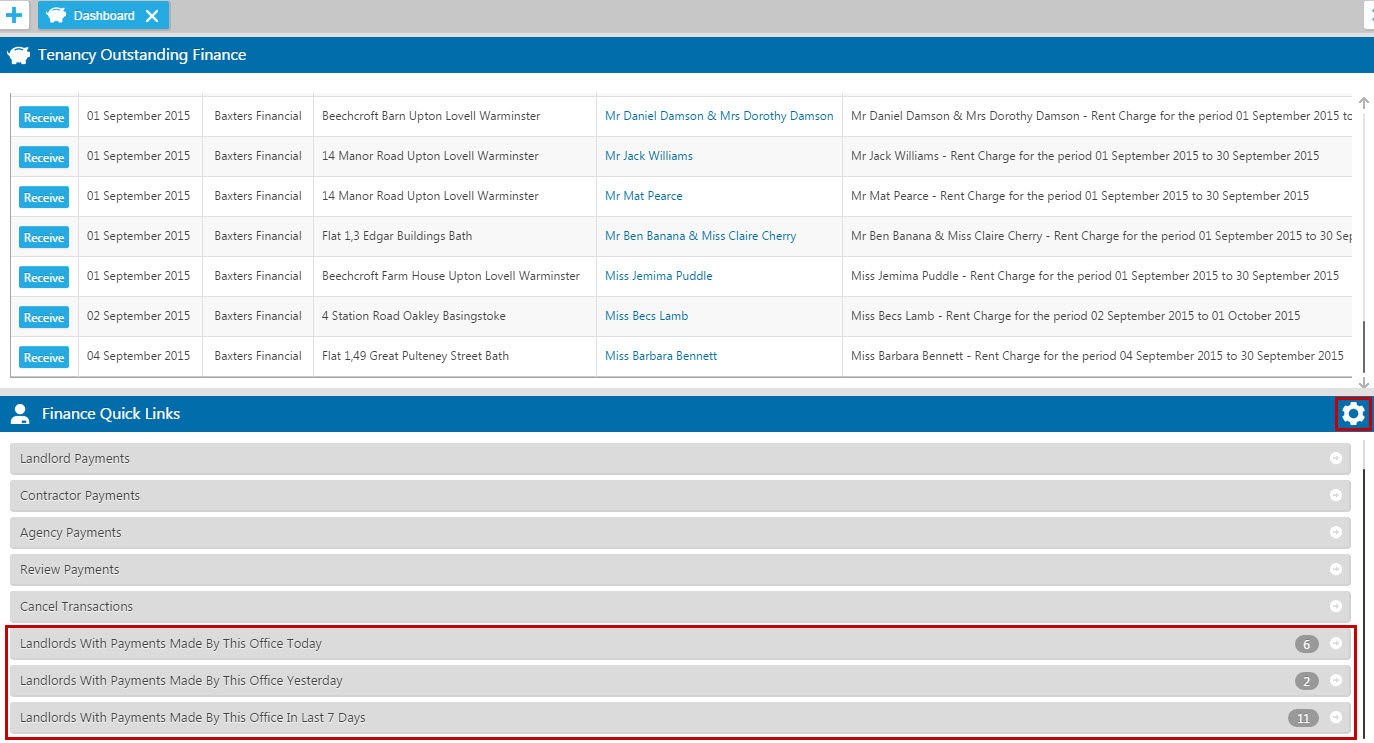
By clicking on this Quicklink, you will open a grid which shows all landlords paid.
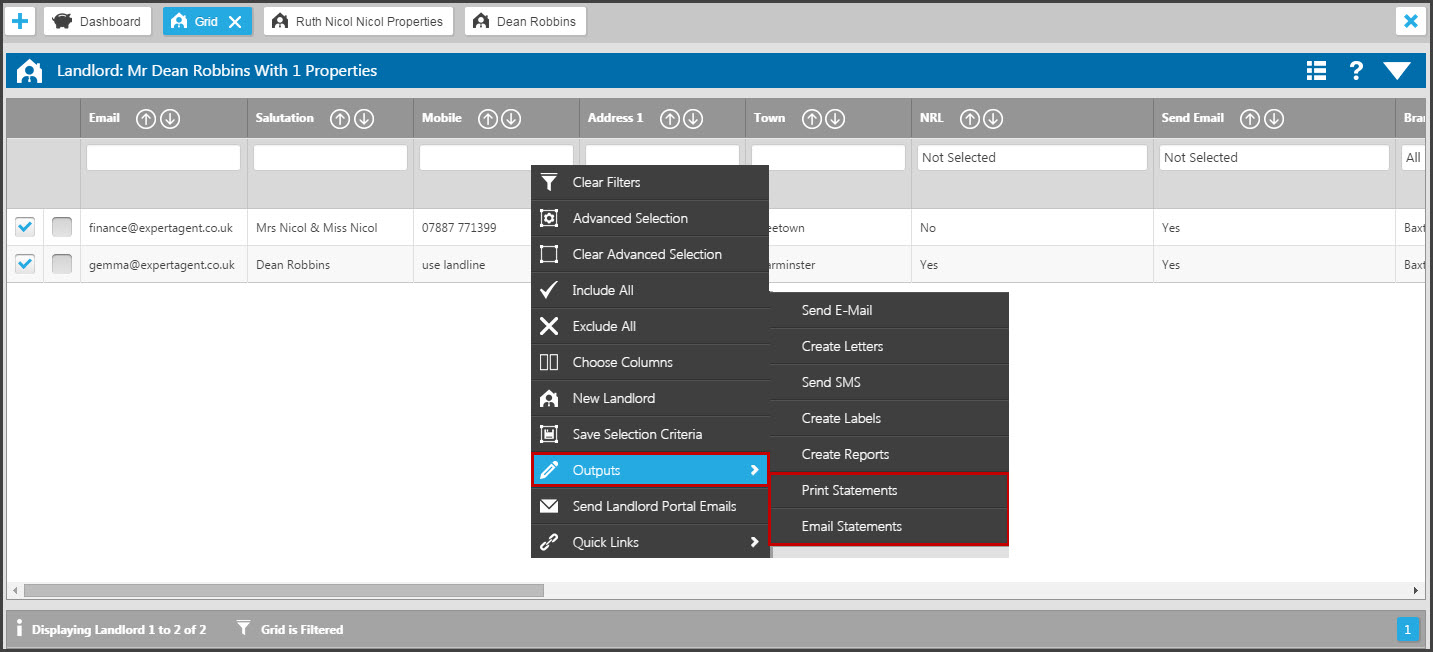
- Use the tick boxes in the left had column to choose which Landlords you wish to create statements for.
- Right click on the screen to bring up the Right Click Menu.
- Choose either “Print Statements” or “Email Statements” from the Outputs sub menu
The following window will open
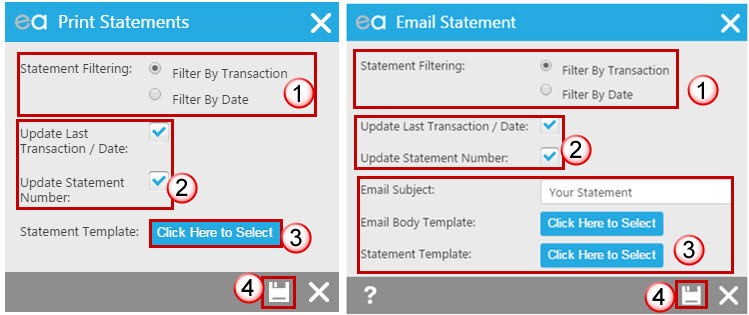
- Select whether you wish the statement to be filtered by transaction or date range. Expert Agent will used the last transaction date on the previous statement to create the new statement.
- These fields will automatically be ticked and therefore will update the two options.
- Select which templates you wish to use for your statements and if emailing what subject you wish for your email
- When you click the ‘Save' icon one of the following messages will appear.
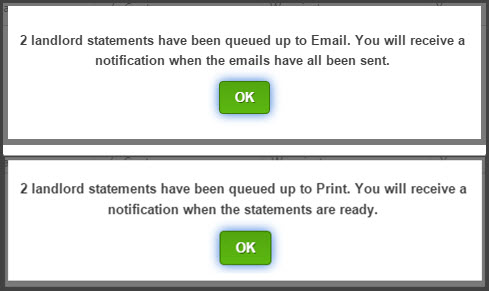
Rather than having to wait for Expert Agent to process your request, you are able to continue with other tasks. A message will appear in your top message area confirming when the statements are ready for printing or when they have been emailed out to the recipients.
Landlord Portal Tab
The Landlord Portal tab on the Landlord Record allows you to send invitations to your landlords so that they can access their own Landlord Portal and see just the information you want to give them

 The Landlord Portal has to be Configured first - this and usage information are contained in the Landlord Portal chapter.

 Login
Login

