 Login
Login


Setting up eSigning in the Configuration Multi Branch
To link multiple branches together within one PropertyFile account, a Superuser in your office will need to go to Tools - Configuration - Business Configuration - PropertyFile.
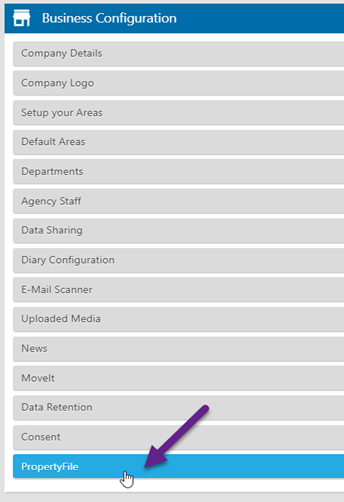
And complete the relevant details for your branch.
![]()
1: Add in a subdomain. The subdomain can be anything you wish but should relate to your agency name and contain only alphanumeric characters (no spaces)
2: Complete your name, email and contact number fields
3: Select your main branch
4: Each branch within the group will be listed in the "Available Branches" box. For each branch that you want to have a shared configuration, you will need to click the arrow alongside it to move it over into the "selected branches" box. If you want to set each branch up separately, please see PropertyFile Configuration for a Single Branch
5: Click to Activate PropertyFile
Once activated, you will get the option to launch the general configuration for PropertyFile.
Where have the prescribed notices gone from the compliant letters and agreements pack?
For anyone who subscribes to the Compliant Letters and Agreements pack supplied to you by The Letting Centre, hopefully you will have seen the alerts that we put up on Thursday the 27th August 2020 and again on Tuesday 1st September, but just in case you missed them, please see a summary below.
Changes have been introduced to the notice requirements under Section 8 and Section 21 of the Housing Act and there has been no clarification over the fact two versions of the prescribed forms remain. Until such clarification has been provided, The Letting Centre have decided to remove the section 21 and section 8 prescribed forms from the Letting Centre legal forms pack. So you will no longer be able to access these via the Compliant Letters and Agreements tab.
For a full explanation from The Letting Centre themselves, please see below:
Section 21 (Form 6A) and Section 8 (Form 3) Notices
The Letting Centre have removed the Section 21 and Section 8 prescribed notices from the pack. The Letting Centre takes the view that it is no longer possible to supply these types of prescribed forms due to legal uncertainty. Since 2020, the only way for landlords and agents to use the correct ‘official form’ with certainty is by downloading the latest form from the Government website, and even legal experts disagree about the validity of other versions of these forms supplied by external providers. This is not an ideal situation when the success of a possession action can be determined by a dispute over the standard wording of the possession notice and is further compounded by current practice where the Government give little or no notice of the introduction of a new version of the prescribed form – hence making previous versions invalid.
The Government versions can be accessed below:
These forms are prescribed by legislation and need to be provided as prescribed or substantially to the same effect therefore making it more difficult to issue to our software customers where little or no notice, and lack of clarity, is given by the Government when a new version is introduced.
You should check with your legal advisor to ensure that the correct notice is served.
The Letting Centre, 2022
Whenever we make any changes to the Compliant Letters and Agreements, we always provide you with an alert in your "View Alerts!" section which you can locate next to your profile at the top of your Expert Agent screen so please do read these alerts to ensure you are kept up to date.
How can I create an annual statement for my Landlord?
If you are looking to create an annual statement for your Landlord, you can do this in the same way you would run any other statement.
From the Landlord record - statement tab - use the property filter to select the relevant property if your Landlord has multiple properties and you are wanting to create the statement for just one of the properties.
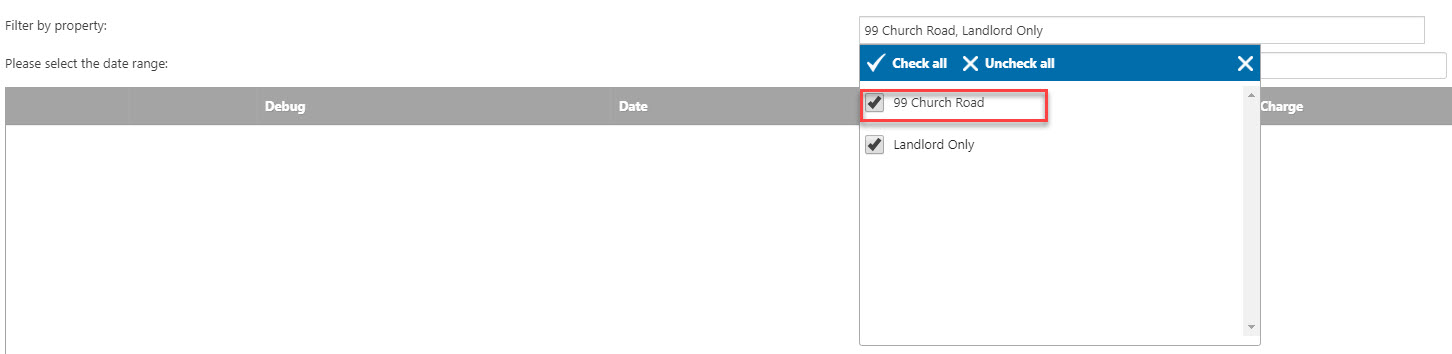
You can then click the 'create statement' button in the bottom left hand corner which will open the print statement window.

- Select to run the statement by date range
- Enter the date range in question
- Chose to whether you untick the update statement number and statement dates tick boxes dependent on your preference
- Save
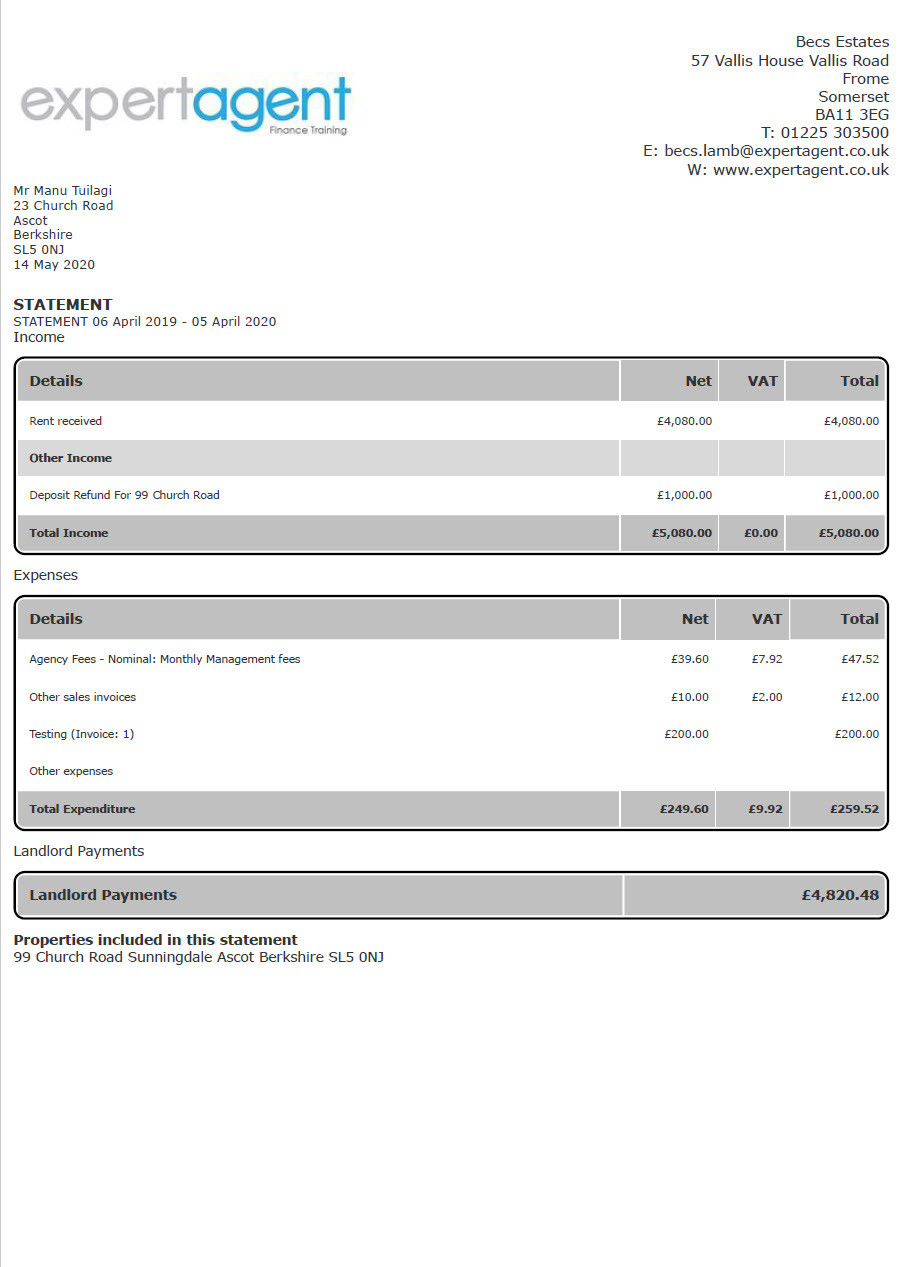
This will take you to the select a template window.

Where you will find the 'Landlord Annual Statement - Styled' template under the 'Expert Agent Default Letters' tab that you can clone across to add headers and footers. As with all other statement templates, the main body of the template is hard-coded and cannot be edited. Once you have selected your template you can then either print or email the statement as normal.
Please see Landlord Statements for more detailed information on creating statements should you wish to create these in bulk for all of your landlords from the Landlord Grid for example.
Landlord Annual Statement - Styled
Tel: 01225 303500 | Email: account.managers@webskyltd.com
Terms of Business | Cookie Policy | Privacy Policy | ZPG Modern Slavery Statement
Designed by the Expert Agent Design Department
