 Login
Login


How do I ensure that I keep the Client's information in case HMRC requests this from me?
Under Tools -> Configuration -> Business Configuration -> Data Retention you have the option to set these settings.
See the ICO website for more information.
Landlord Action Menu
As all records, the Landlord has its own Action Menu, available from the Right Click of the mouse or the white list icon at the top right hand side of the record.
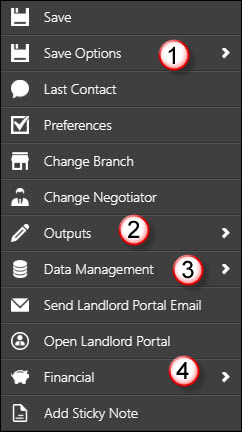
Save - This will Save the Landlord Record.
Save Options - (1 on above image)

Save and Flag - This will save the record and flag it in Red in your Navigation History
Revert - This will revert to the last Save point.
Last Contact - This updates the Landlord's last contacted date and will allow you to set a Next Contact date for you to keep on top of your call lists.
Preferences - This will allow you to update the Landlords Consent Preferences. See GDPR Consent.
Change Branch - If you are part of a Multi Branch Firm you may have the option of changing the branch on this Landlord.
Change Negotiator - You can also change the Negotiator on the Landlord.
Outputs - (2 on above image)
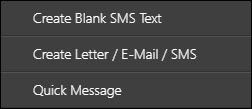
Create Blank SMS Text - allows you to create a blank text message to your Landlord.
Create Letter / E-Mail / SMS - will take you to the Template Grid to use any of your Letter/Email/SMS templates
Quick Message - This will send an internal Quick Message to a chosen colleague with the Landlord Record attached.
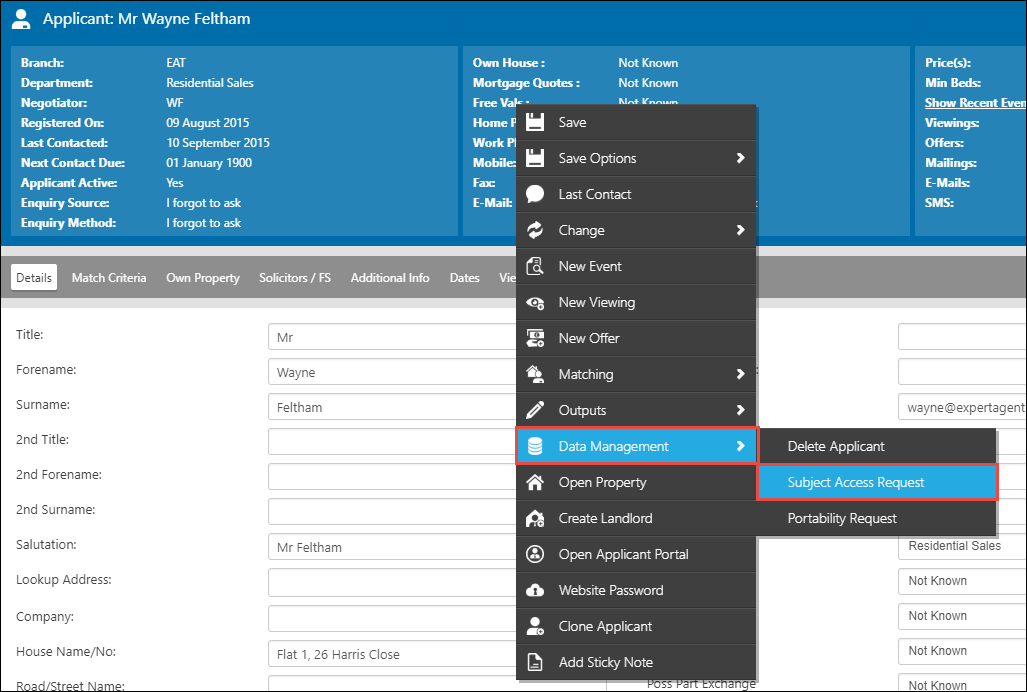
Data Management - (3 on above image)
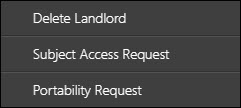
Delete Landlord - This allows you to delete the Landlord Record - please see GDPR Deletions for more information
Subject Access Request - If a Landlord requests all the personal information you hold on them, you can do this from here - please see GDPR Subject Access Request for more information (COMING SOON!)
Portability Request - If a Landlord requests a .csv format of the data you hold on them, you can do this from here - please see GDPR Data Portability for more information (COMING SOON!)
Send Landlord Portal Email - Please see Landlord Portal Configuration & Usage for more information
Open Landlord Portal - Please see Landlord Portal Configuration & Usage for more information
Financial - (4 on above image)
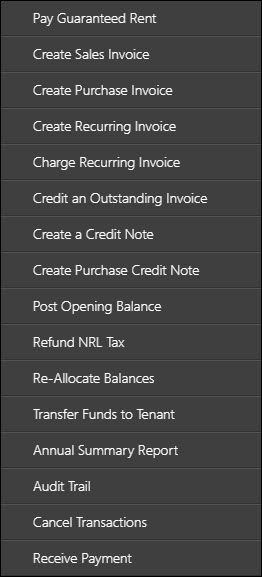
If you are using Lettings Finance there is a lot of options under the Finance menu. Please see Lettings Financials - The Basics and Lettings Financials - Advanced for more information.
Add Sticky Note - You can add a virtual Post-It note to all records within Expert Agent. Please see Sticky Notes for more information.
GDPR Personal Information Requests
With the new GDPR Regulations coming into force on May 25th, we have added the ability for your to supply your customers with their personal data if they request it.
Personal Information Requests can be broken down to two formats:
Subject Access Request - a contact requests to see what personal data you hold on them.
Data Portability Request - a contact requests their personal data to transfer one one data controller to another.
Both of these can be done from the contact record.
Article Contents
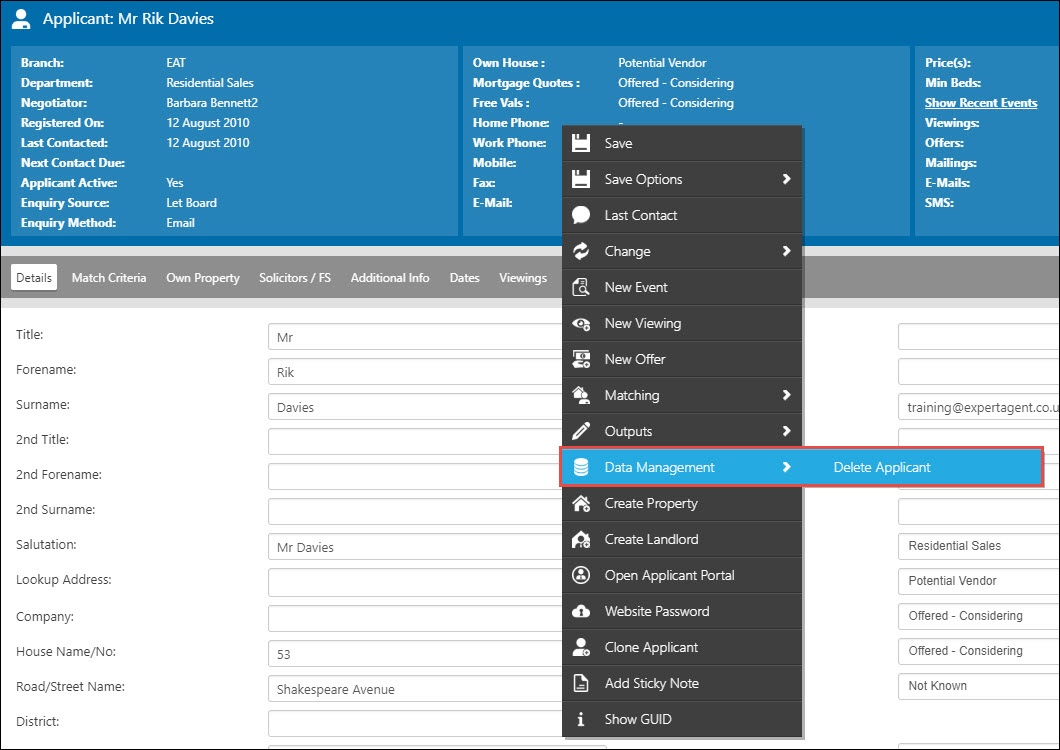
Applicants
From the Applicant Record, under Data Management on the Action Menu you can run a Subject Access Request or Portability Request.
Subject Access Request
When an Applicant requests to see what personal data you hold on them, you can do this from the Action Menu. Right Click -> Data Management -> Subject Access Request
You then get presented with the below screen:
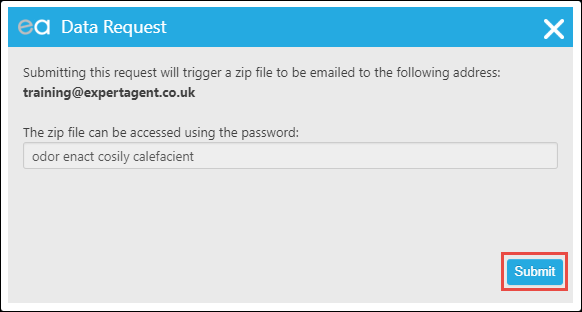
This will send the Negotiator requesting the data an email (NOT the contacts negotiator). The Zip file will be accessed by a randomly generated password that will be presented to you on the above screen. Pressing Submit will send the email.
Once you receive the zip file, it is your responsibility to provide the data to the data subject.
Data Portability Request
An applicant has the right to request a file of their data in a format that can be transferable to a different data controller. If this happens you can request this from the Applicant record. Right Click -> Data Management -> Data Portability.
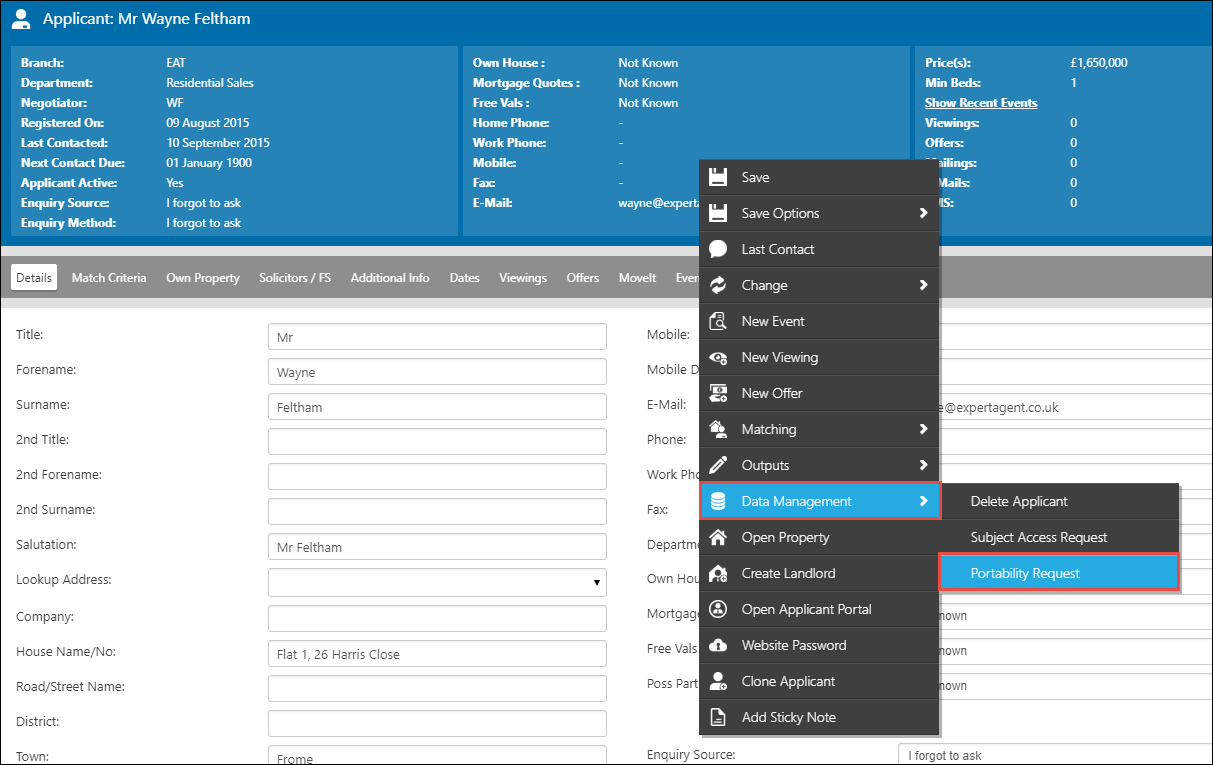
Once you press Portability Request you will be presented with the screen below:
Once again this will send the the negotiator requesting the data rather than the negotiator assigned to the contact. The password will be randomly generated.
With both of the above requests, once you press Submit you will receive the green confirmation flash at the bottom of your screen:

Vendors
The process with Subject Access Requersts and Data Portability for Vendors is exactly the same as Applicant (as above), however with Vendors you get the option for either Vendor 1 or Vendor 2.
Subject Access Request
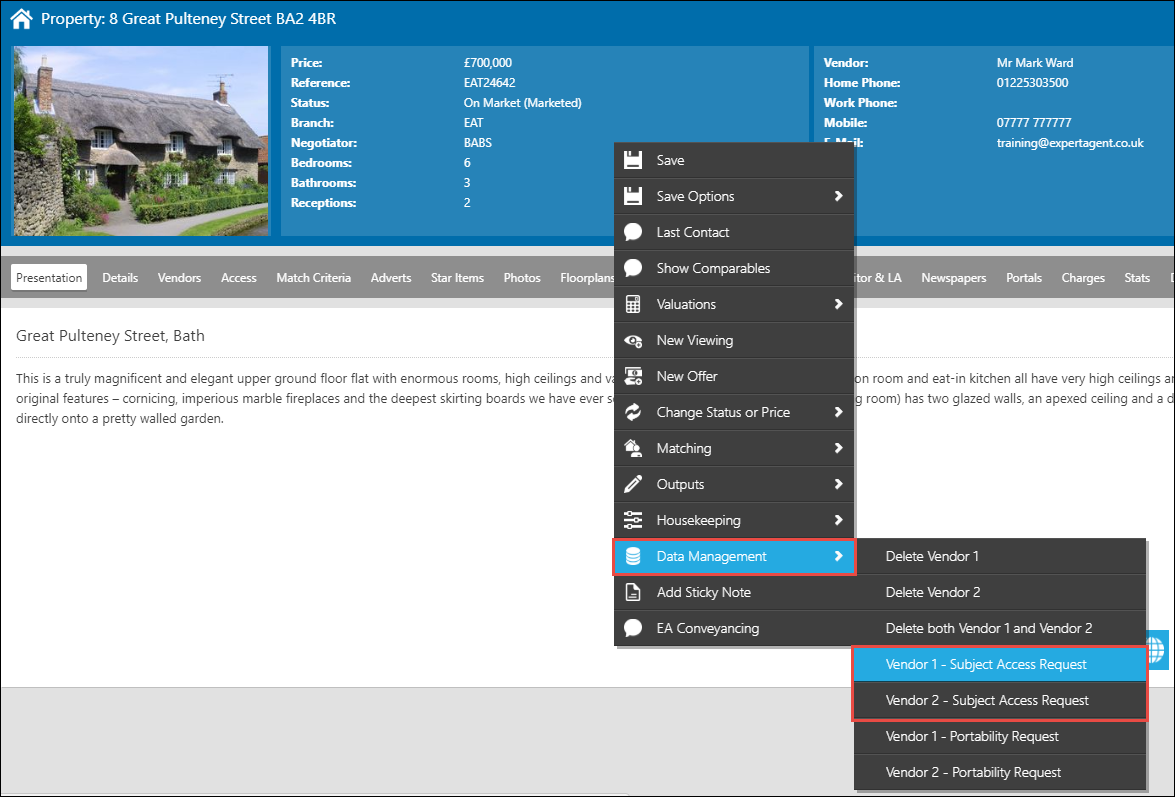
You will get the same screen, confirming that the zip file will be sent to the negotiator requesting the data, with a randomly generated password:
Data Portability Request
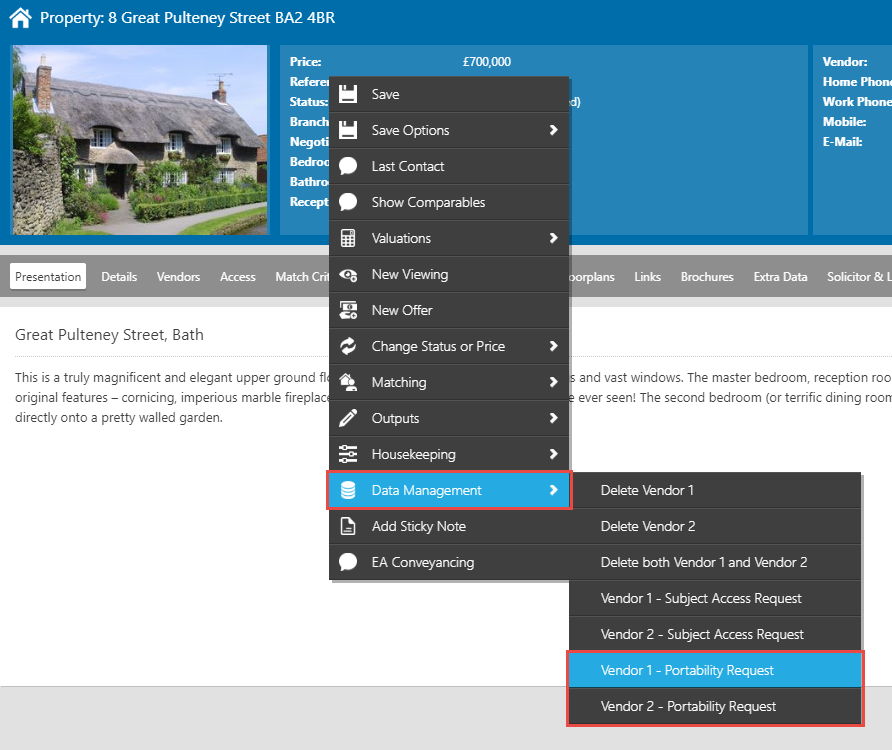
Once again you will get the Data Request screen with a randomly generated password to access the zip file of data:
And pressing submit on either Subject Access Request or Data Portability will give you the green confirmation flash:
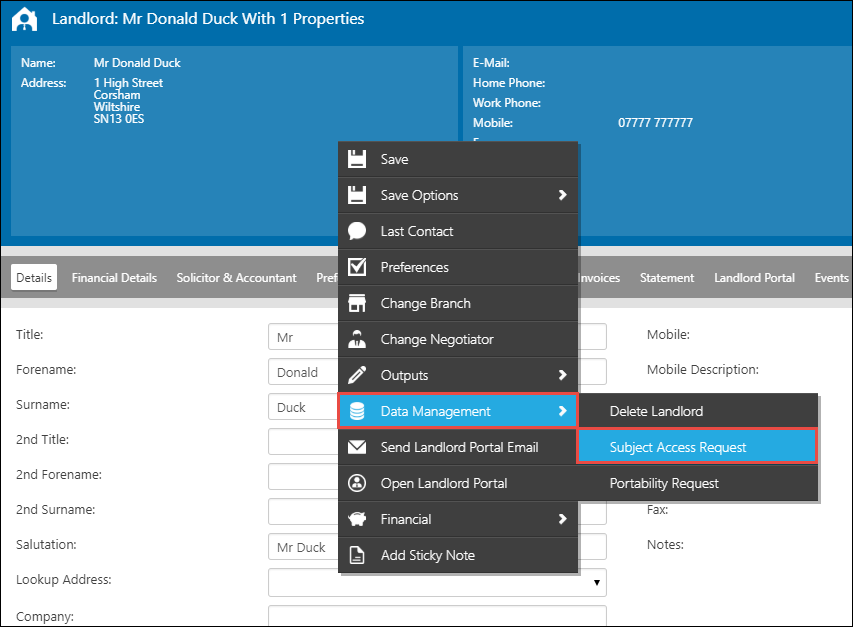
Landlords
Subject Access Request
As with Applicants and Vendors you can access the Subject Access Request option from the Data Management option on the Action Menu:
On the Data Request screen, note the randomly generated password and press Submit:
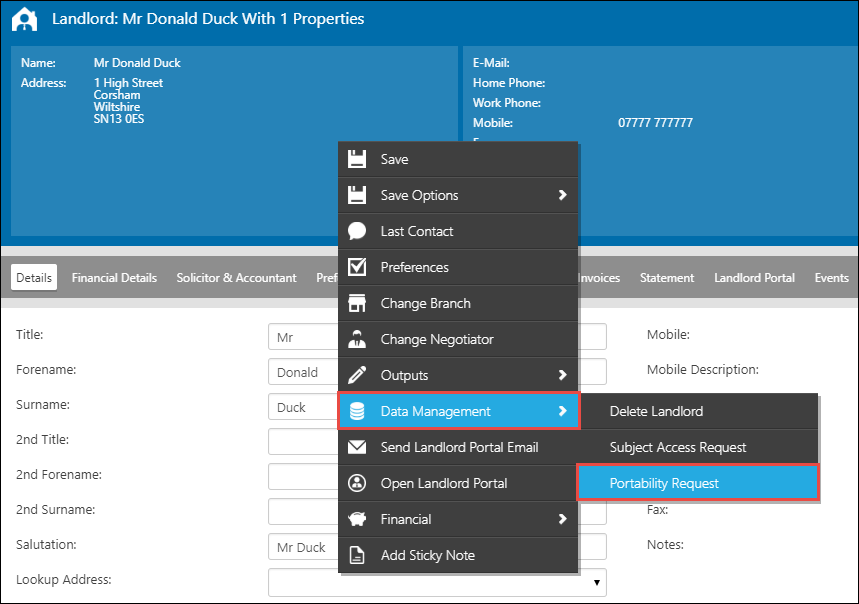
Data Portability Request
This is access via Data Management on the Landlords record:
GDPR Deletions
With the new GDPR Regulations coming into force on May 25th, we have added the ability for you to delete certain records within Expert Agent to allow you to be compliant.
If you are ever in doubt, it is always best to seek advice from the ICO website.
Article Contents
Configuration
There are two places within Configuration you will need to check for the new Deletion updates.
Data Retention Configuration This allows you to set lengths of time before Expert Agent will allow you delete certain records.
Agency Staff There are two new staff permissions with regards to GDPR under the Advanced tab of Staff Permissions. N.B No one will be able to delete by default so Super Users will need to enable this for all applicable staff members first.
Applicants
You can delete Applicants from 2 places. From the Applicant Grid, and from the Applicant Record.
From Applicant Record:
On the Applicant Action Menu there is a new Data Management option. Under this you have the option to delete the Applicant Record.

Please do take time to read the above screen as it will explain what we can and can't delete from the system, taking your Data Retention Configuration into account.
You have to click the tick box before the Submit button is activated. Once you are happy, press Submit.

You will get the green confirmation flash at the bottom right hand side of the Applicant Record. Please see Deletion Management for what to do next.
From the Grid:
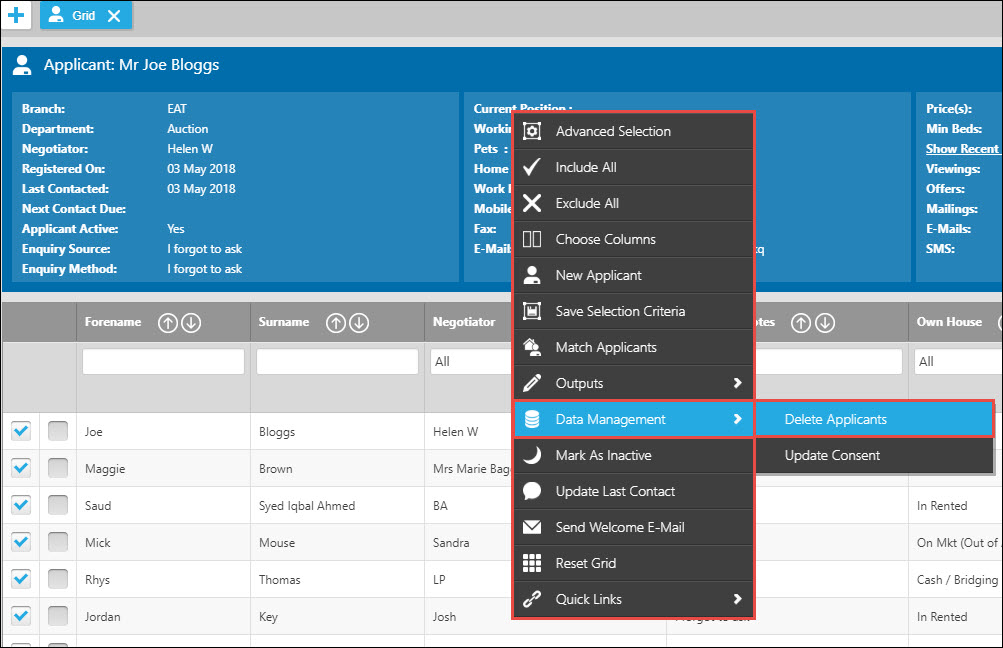
Once you have filtered (Filtering Grids) out the Applicants you want to KEEP, and only the Applicants you wish to DELETE are sitting in the Grid, Right Click -> Hover over Data Management and select Delete Applicants.
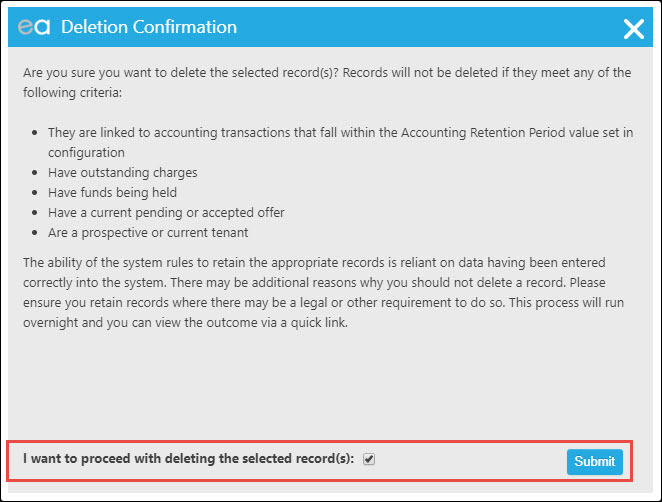
Please do take time to read the above screen as it will explain what we can and can't delete from the system, taking your Data Retention Configuration into account.
You have to click the tick box before the Submit button is activated. Once you are happy, press Submit.

You will get the green confirmation flash at the bottom right hand side of the Grid. And all Super Users in your Branch will receive an email alerting them that a Bulk Delete has been requested.
Deletion Management
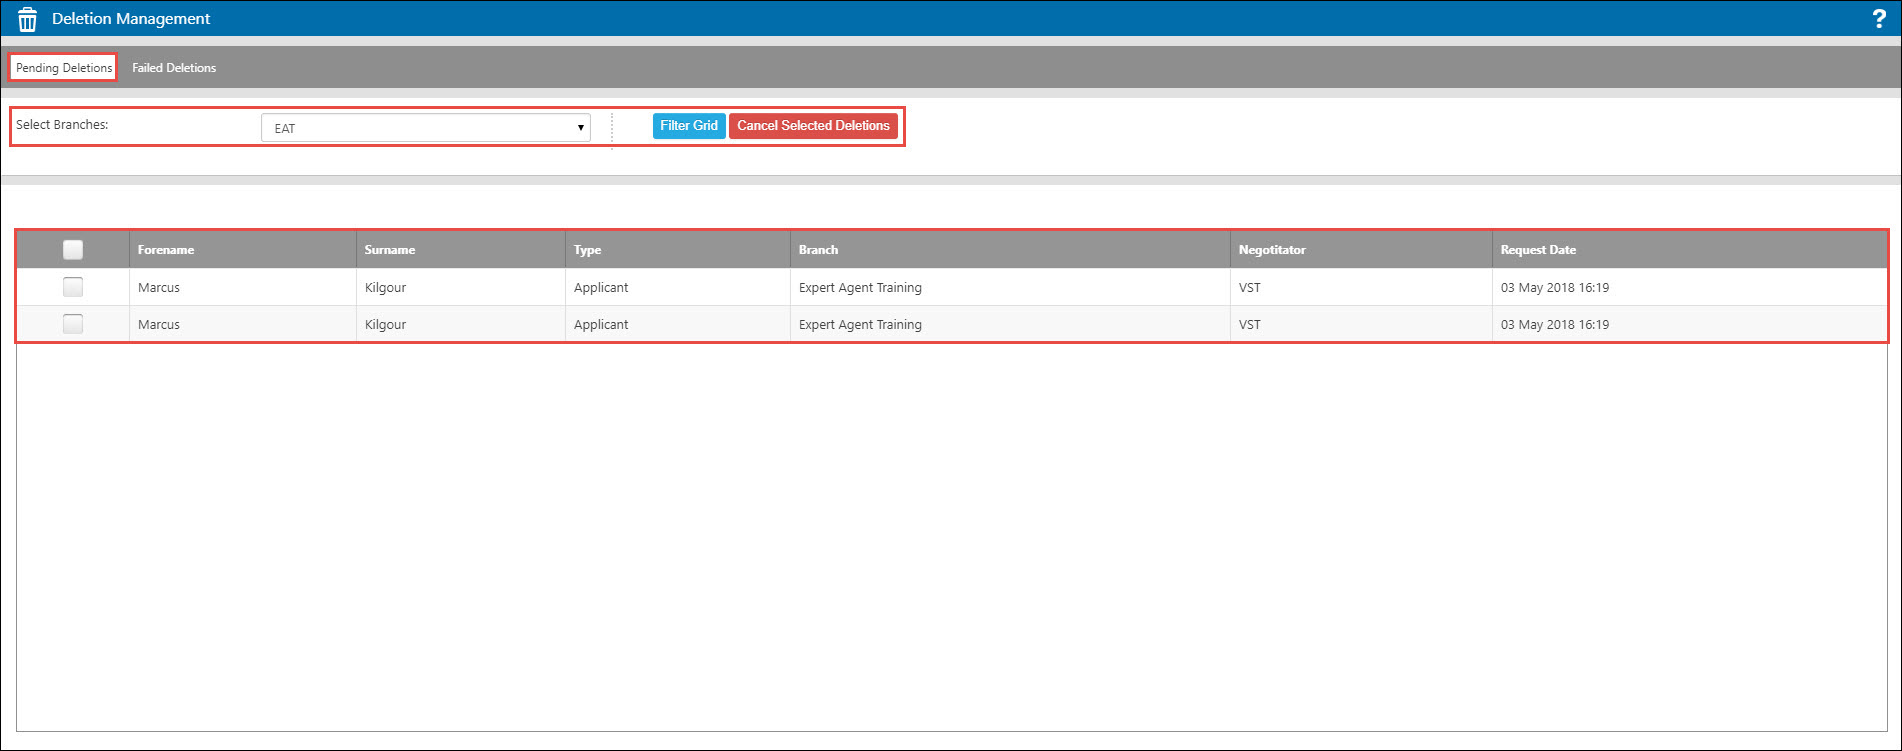
The Deletion Requests for all records are not removed from the Grids immediately. EA will give you a grace period to remove these if you have done it in error. We run the process overnight.
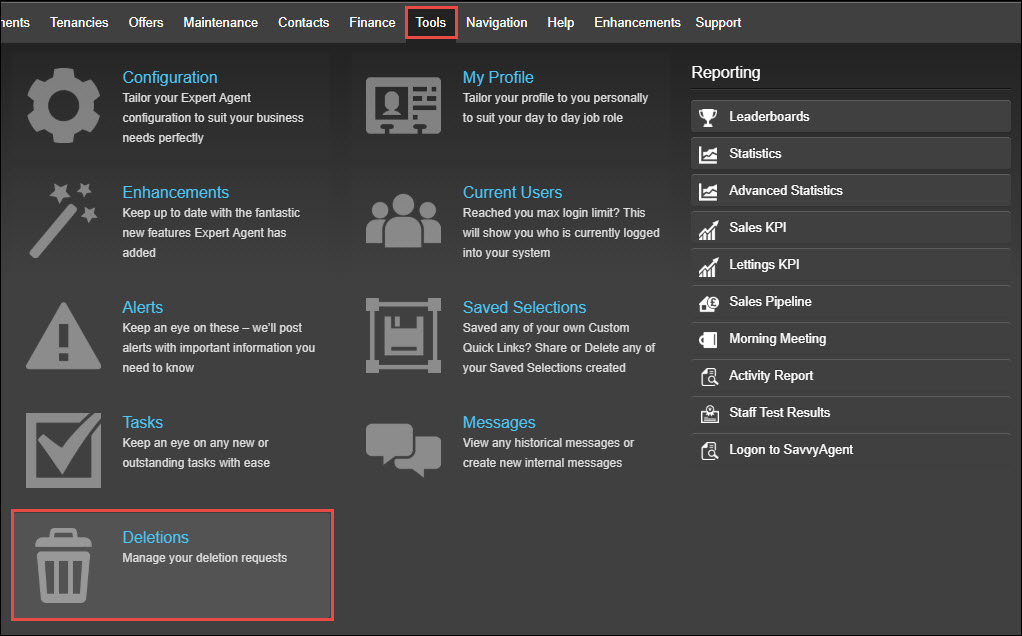
Hover over Tools in the top menu and select Deletions:
On Pending Deletions you will see all deletion requests that have not yet been deleted. This gives you time to cancel them by selecting them from below and clicking Cancel Selected Deletions. You can also filter on specific branches and then press Filter Grid.
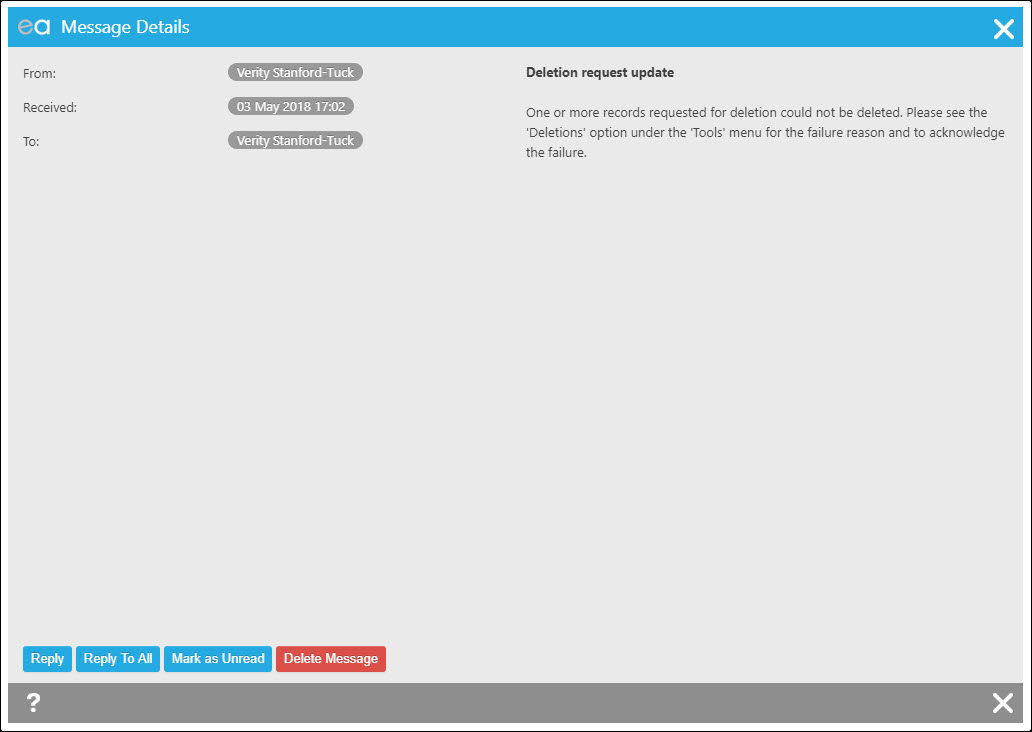
Under Failed Deletions, once the deletion procedure has been run over night, any failed deletions will be listed in the grid, and the reason why it failed. In this example they have a current offer. Make sure that the record is selected from the left hand side and click "Acknowledge Failed Deletions".

This will place the record back into Expert Agent for you to either rectify the issue and request a deletion again or leave the record in your Expert Agent.
When your records have been deleted, or failed, you will receive an update by means of Internal Message.


Vendors
Vendors can be deleted from the Property Grid, or the Property Record.
From Property Record
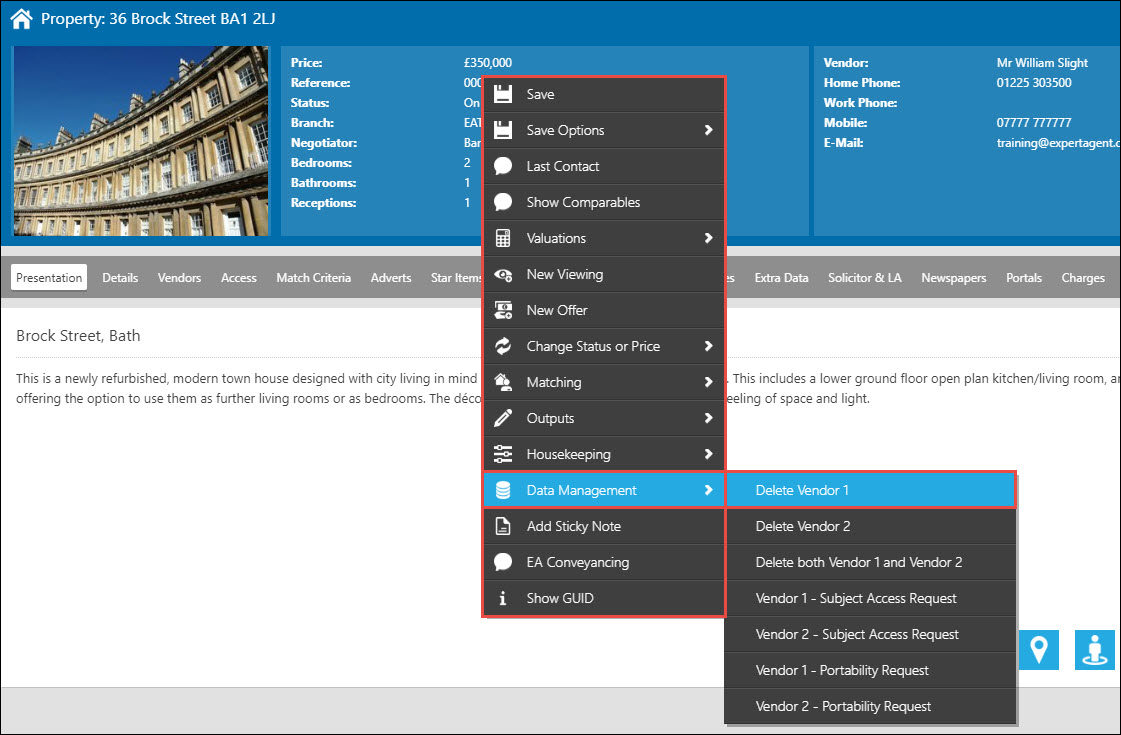
From the Property Record you have the new Action Menu item of Data Management. Hovering over that will give you a lot of options, some of these are coming soon. But the one you will be selecting is either Delete Vendor 1 or Delete Vendor 2.
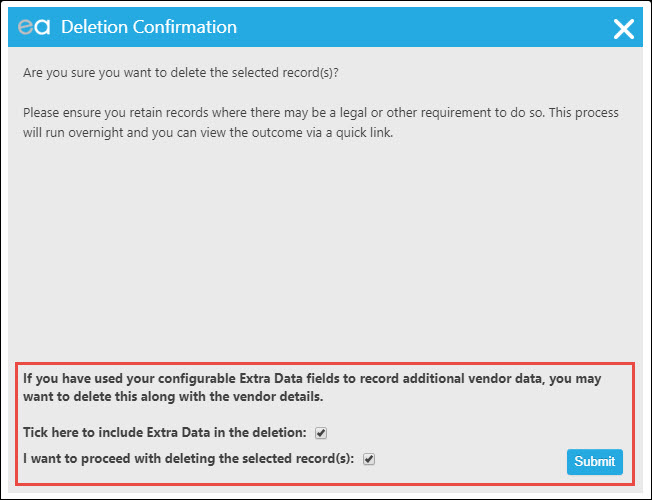
If you are using Extra Data then you do have the option to delete the Extra Data items as well. Expert Agent cannot check if these have personal data in them but it can delete the fields if you wish.
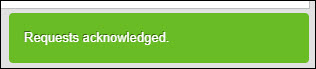
Once you have pressed Submit, you will receive the green confirmation flash at the bottom right of the screen.

This deletion request will go into Deletion Management
From Property Grid:
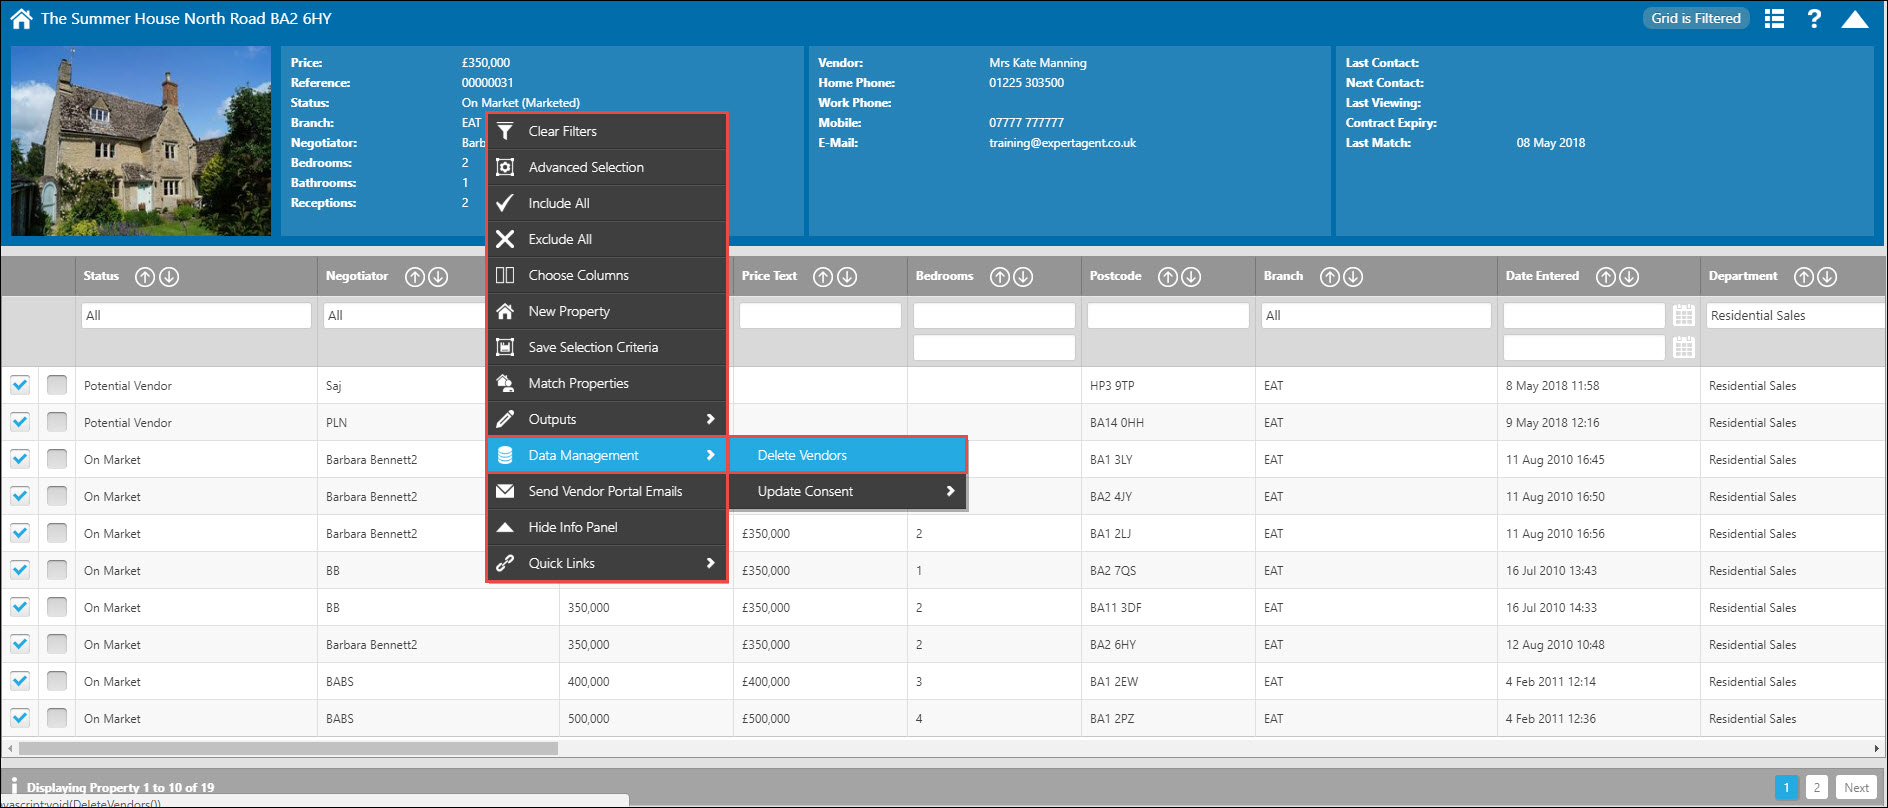
From the Vendor Grid you have the ability to mass delete. Once you have set all the relevant filters then right click -> Hover over Data Management and select Delete Vendors (please note this will only delete Vendors from SALES properties and will NOT delete Landlords from any Lettings Properties that may be in the grid).
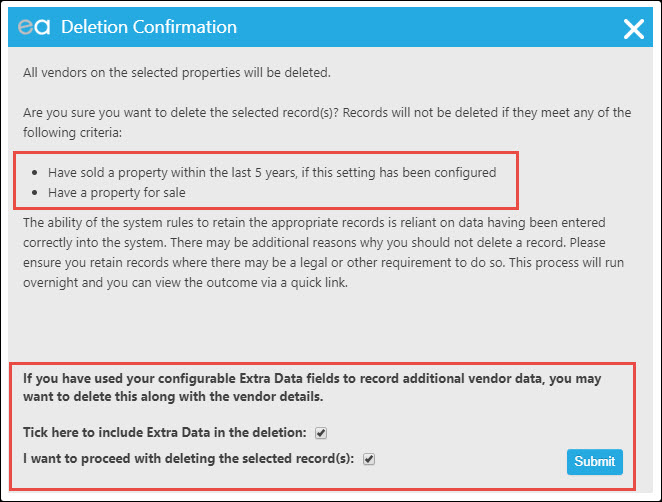
Do take the time to read the above notification as this will prevent some records from being deleted. Make sure at least one of the tick boxes is ticked so that you can press the Submit button.
These deletion requests will be sent to Deletions in the top menu and processed overnight. Please see Deletion Management for more information.
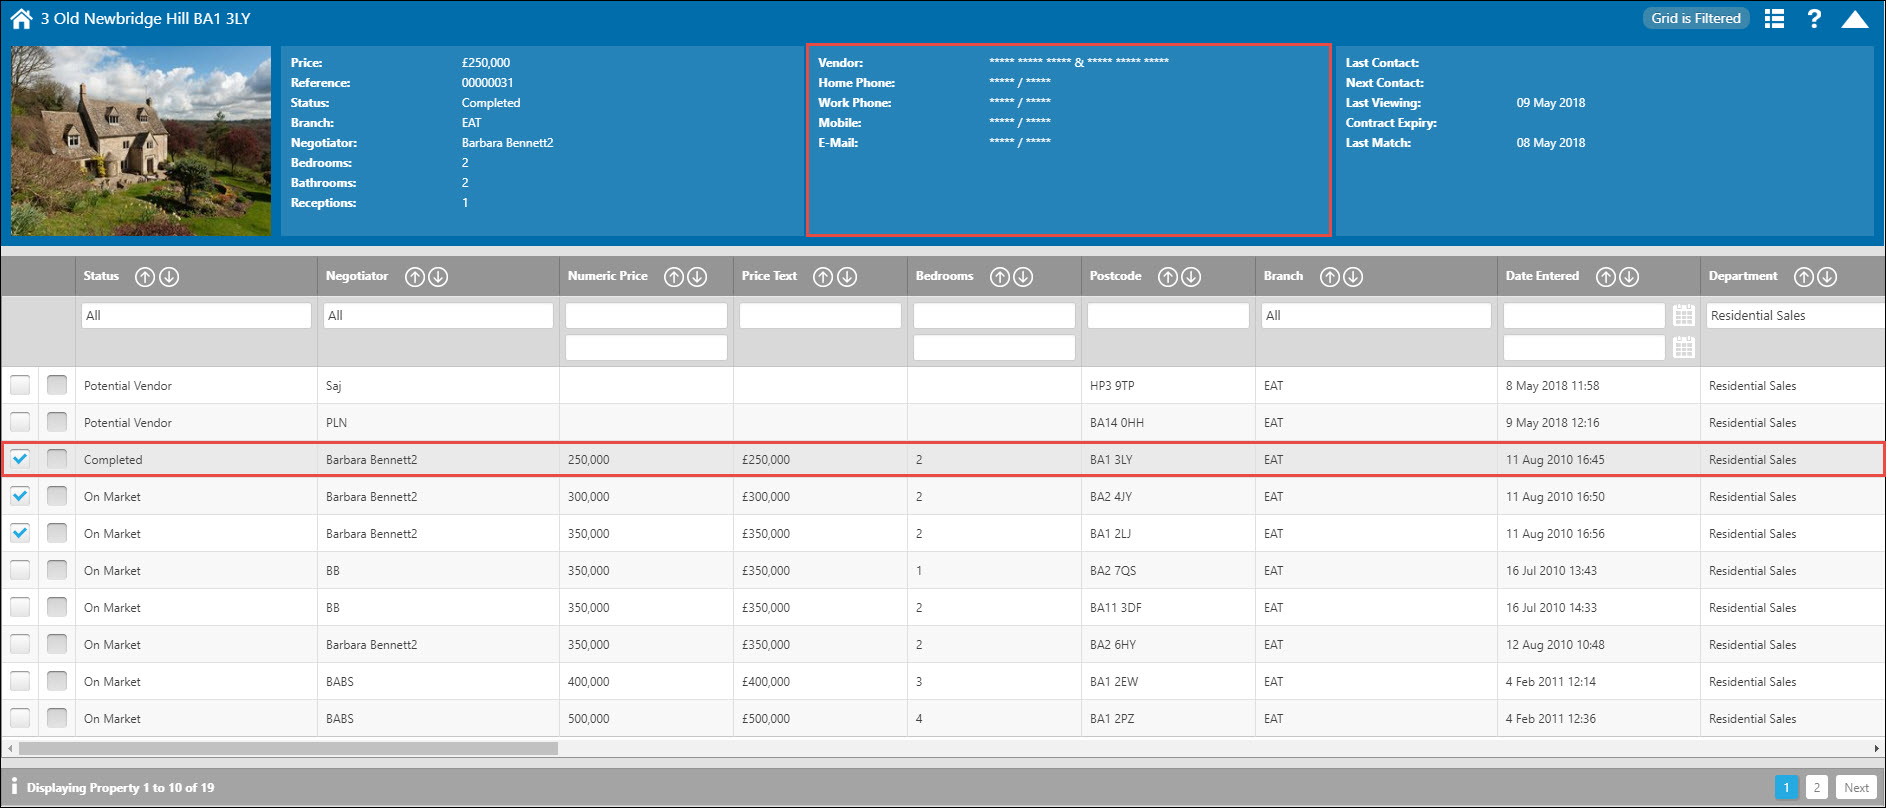
Once the Deletion has occurred, the property will still be in the Property grid but as you can see from the above image, the personal data of the Vendor is replaced with *** instead.
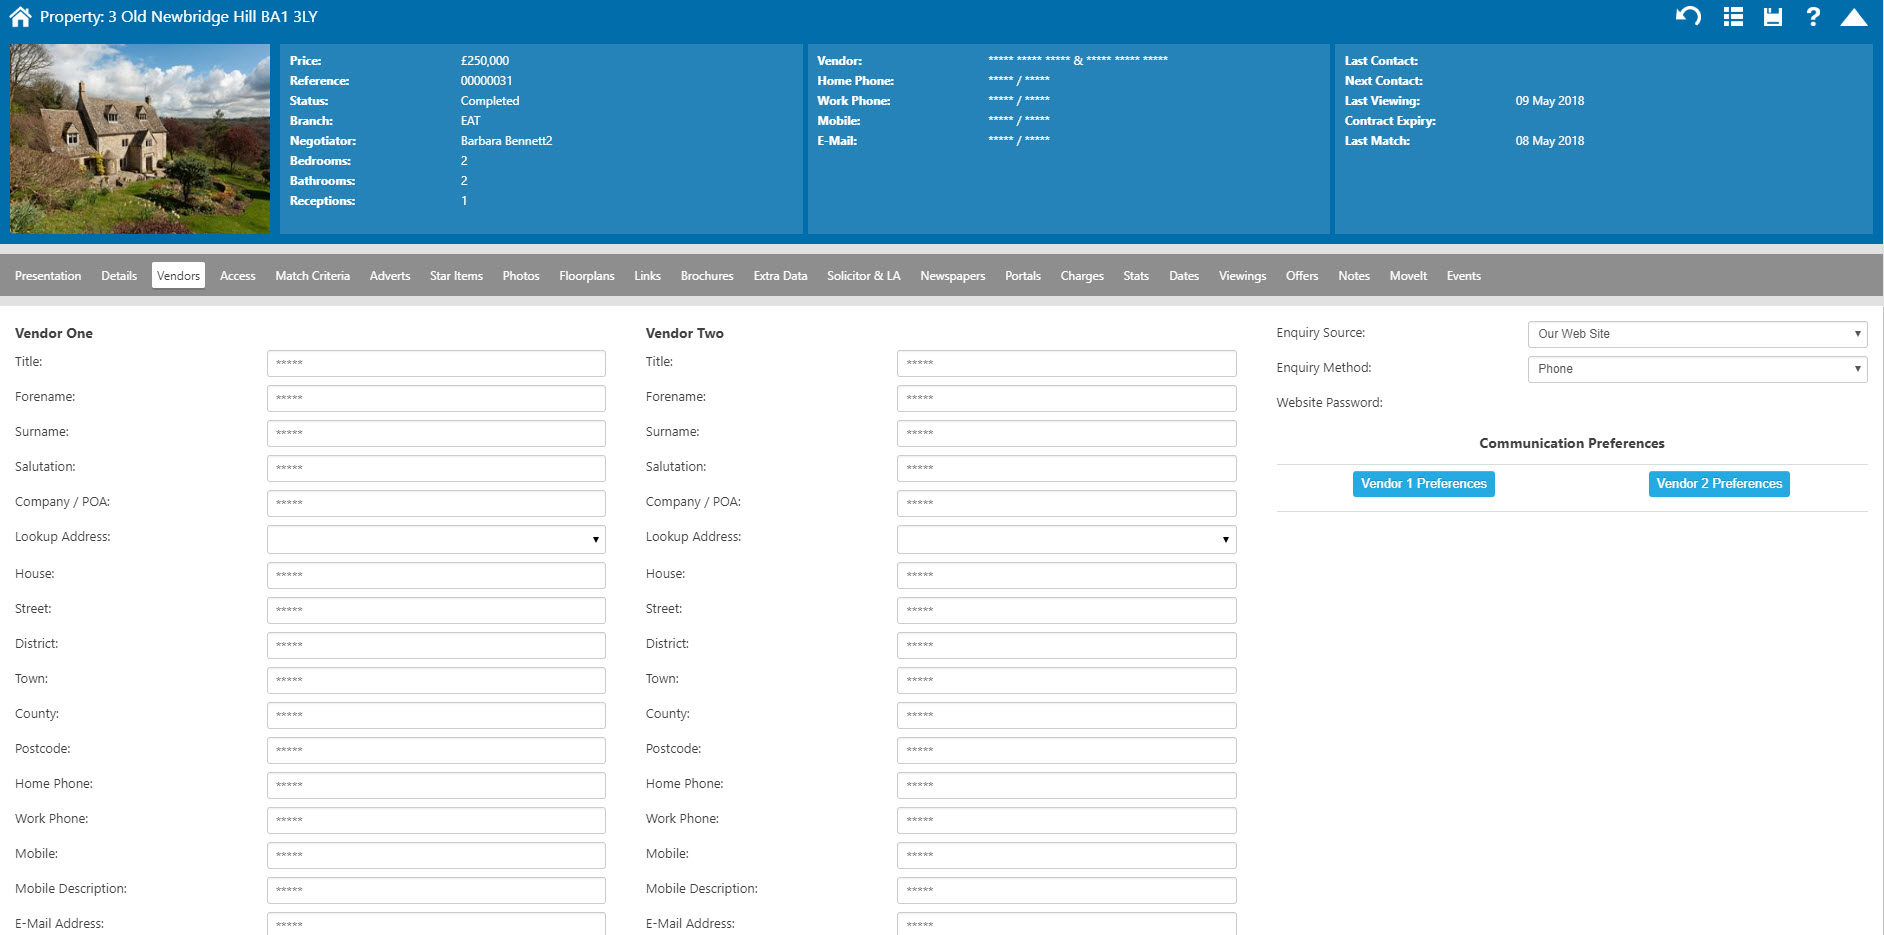
The same is on the Property Record itself (if you delete from the grid OR the property record):
Landlords
Landlords, like Applicants and Vendors, can be deleted from both the Landlord Grid, and the Landlord Record.
From the Landlord Record:
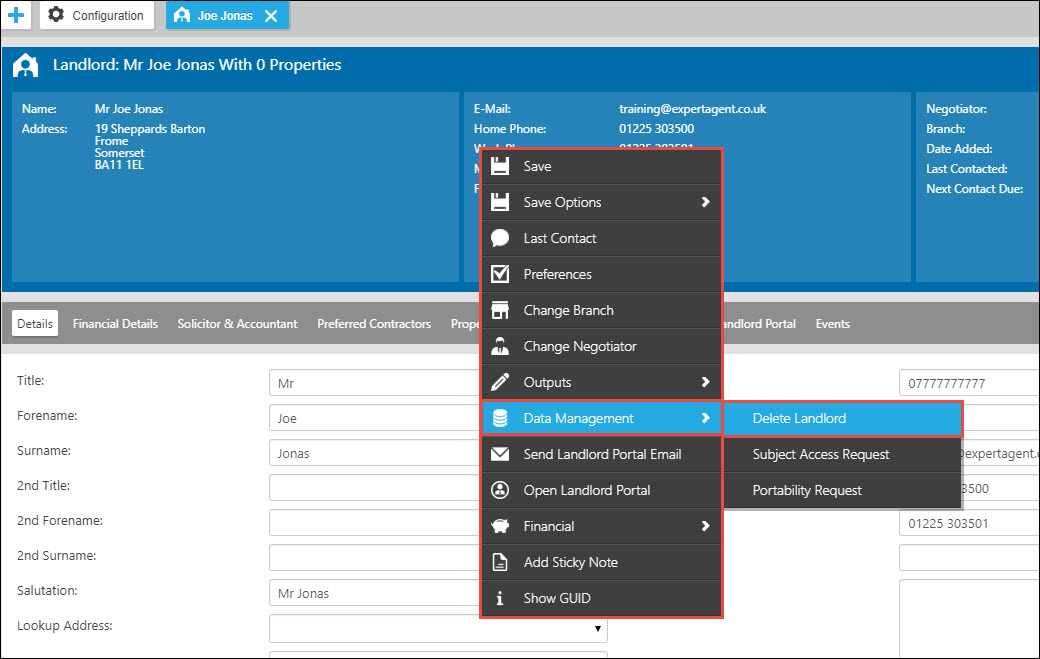
On the Landlord Action Menu, under the Data Management sub menu select "Delete Landlord".
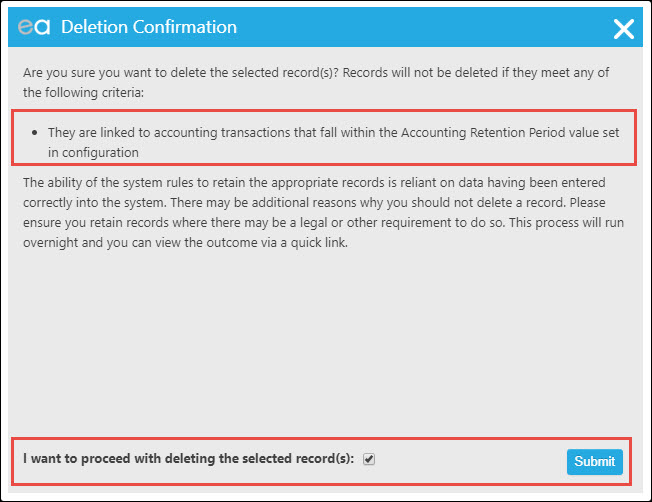
Please do make sure that you read the above message as this will explain what can and can't be deleted from Expert Agent. Make sure once you are happy that you tick the tick box and press Submit. You will receive the green confirmation flash at the bottom right of the screen.
These deletion requests will go into Deletions under the top menu. See Deletion Management for more information.
The Landlord will be removed from Expert Agent.
From Landlord Grid:
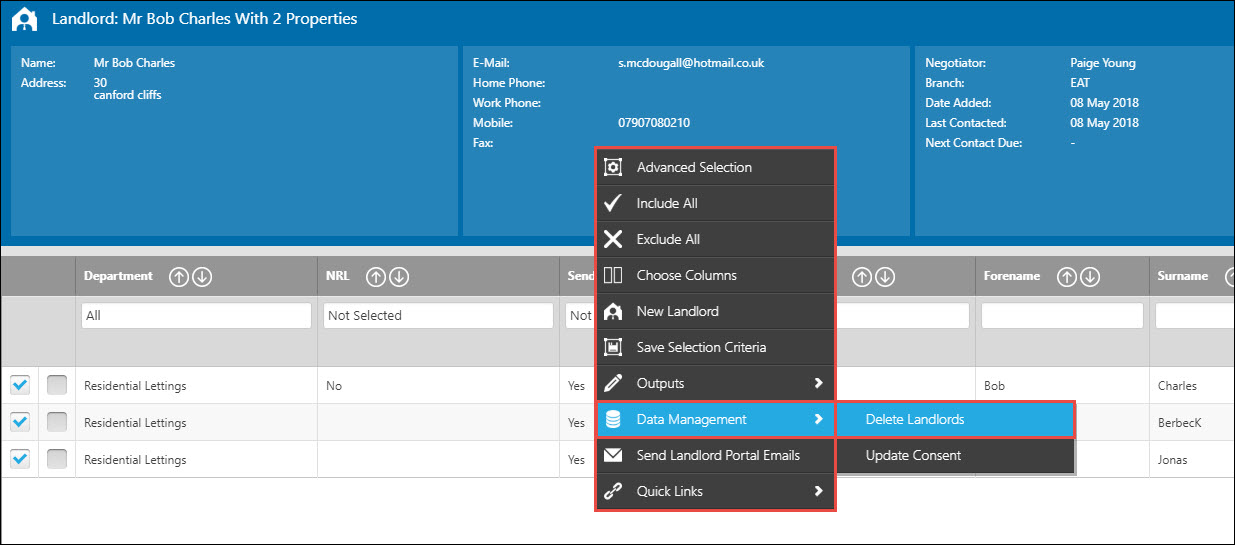
From the Landlord Grid, once you have filtered out the Landlords you wish to keep, Right Click -> Data Management -> Delete Landlords.
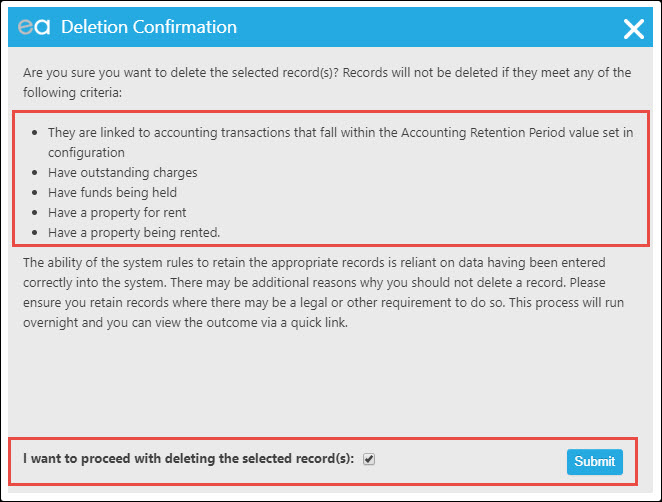
Each time you see the above screen it will be different depending on what record or grid you are trying to delete from. Please do take the time to read each one and know the criteria Expert Agent will look at before deleting. Once happy, tick the tick box and press submit. You will receive the green confirmation flash at the bottom right of the screen.
These deletions will go into Deletions under the Top Menu, please see Deletion Management for more details.
Contacts
Contacts can be deleted from the Contact Record only.
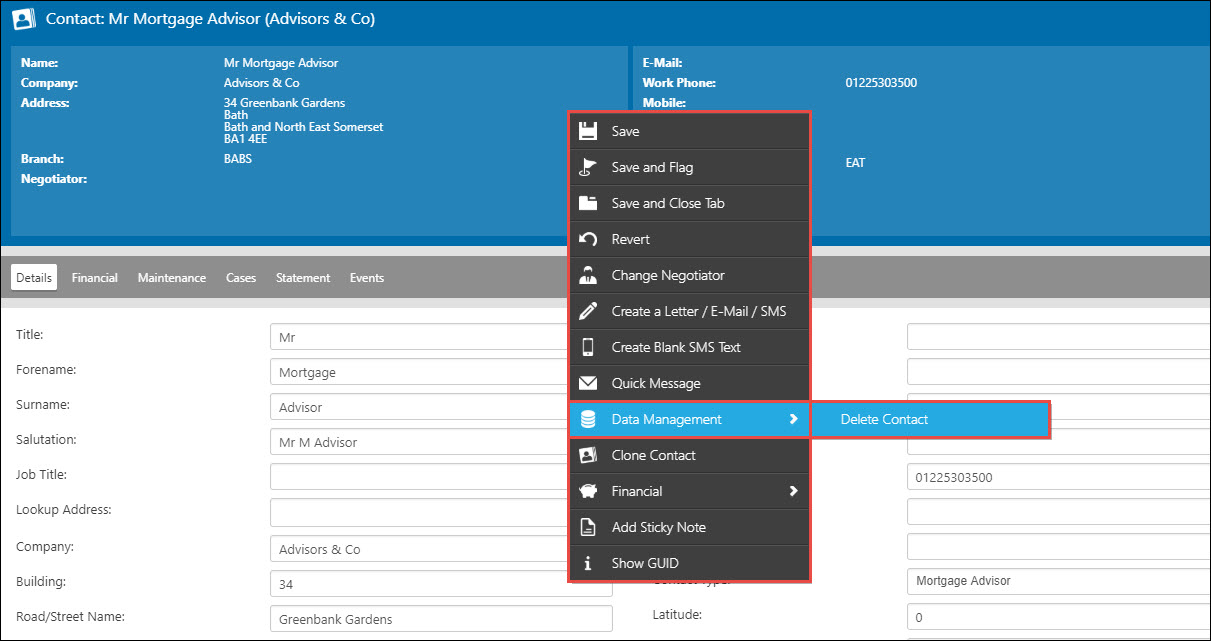
On the Contact Record -> Right Click -> Data Management -> Delete Contact.
Once again you will be be presented with the following screen:
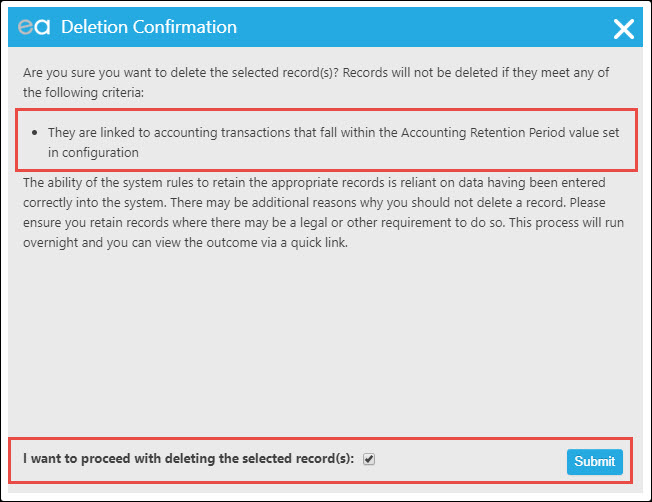
Check the text, tick the tick box and press Submit. You will get the green confirmation flash at the bottom right hand side of the screen and the records will go into Deletions. See Deletion Management.
Tel: 01225 303500 | Email: account.managers@webskyltd.com
Terms of Business | Cookie Policy | Privacy Policy | ZPG Modern Slavery Statement
Designed by the Expert Agent Design Department
