Why is my property/applicant matching to too many applicants/properties?
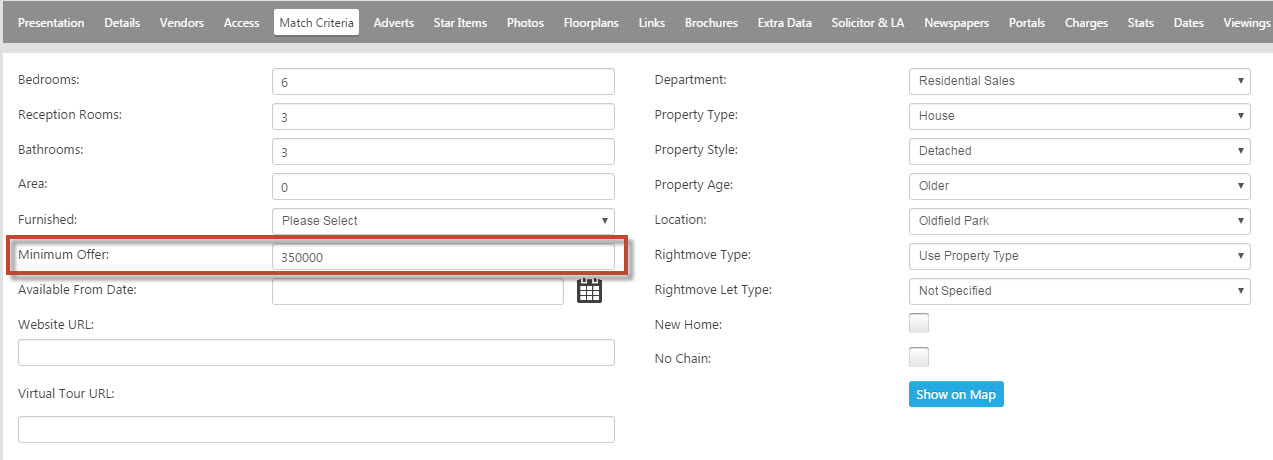
If you have run a match on a property or an applicant and it has bought back more matches than expected, it is worth checking the Lowest Acceptable Offer on the Property record first. If this is set to zero and the property is on at £350,000 this will match to all applicants that are looking up to £350,000 regardless of their bottom price range.
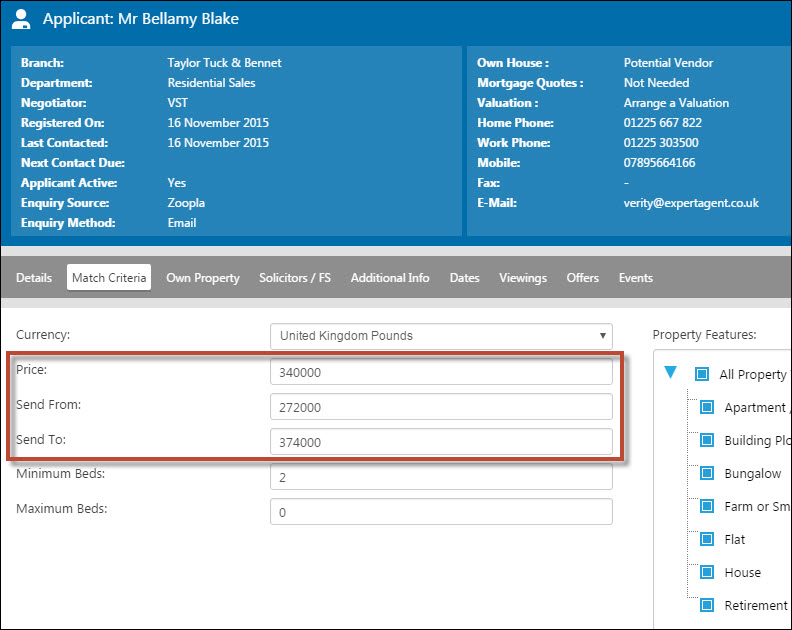
If this is set then you will need to check the applicant price range. If this is set to £0 to £0 it will match to ALL properties, the assumption being that they are not looking for "nothing" they are looking for "everything".
Tenant Portal Configuration
Tenant Portal allows you to interact with your tenants via a login that you give them when they either apply for a tenancy or move in to a property.
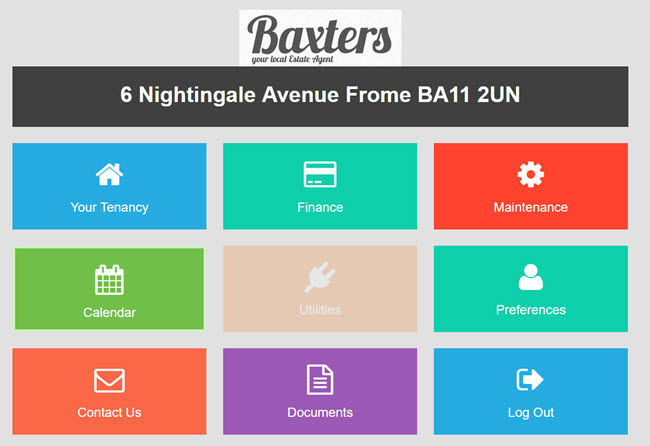
It provides them with information relevant to their tenancy - particularly key dates and their financial statements and it can form the basis of an automated application form.
We launched Tenant Portal (Beta) in June 2016 but have great plans for it. Please help us to develop it!
Log a bug / Enhancement Request
What is Tenant Portal?
Watch the Tenant Portal Video
Using Tenant Portal
To get started with Tenant Portal, we recommend you set up a dummy property, create a tenancy and add a fake tenant with your email address. In the Tenancy record, right click and choose Manage Application Process (1) and confirm that you want the invitation email sending by ticking the required tenants (2) clicking the paper plane button (3)
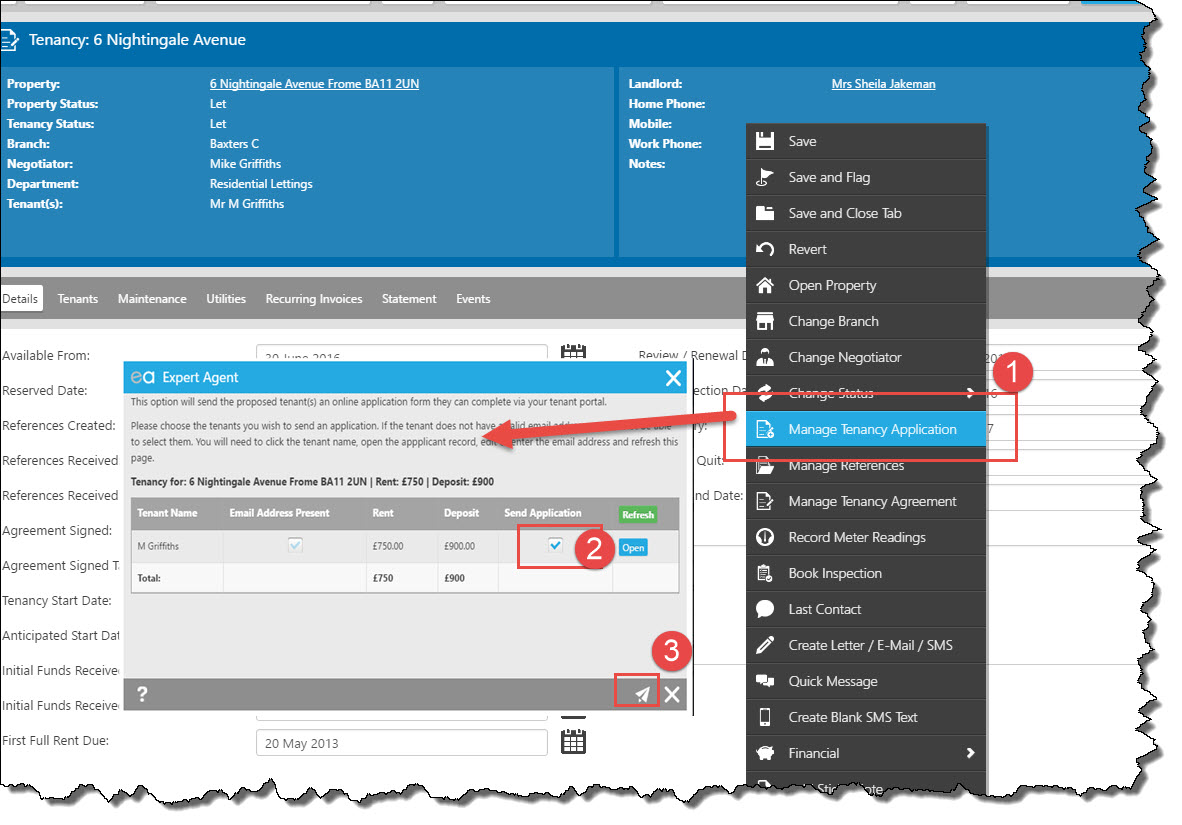
The tenant is sent the Tenant Portal Application Email (read how to configure this in the Configuring section below). Follow the link in the email and Log into Tenant Portal.
Once the pending tenancy is a lice tenancy, the Manage Tenancy Application option changes to be Manage Tenant Portal (note 01.07.16 - this wasn't working - the label stays the same). The functionality is the same as above but it is the Tenant Portal Email rather than the Tenant Portal Application Email that gets sent.
You can also trigger the email and see the original user name in the tenant portal tab on an applicant record. Whichever approach you take, any password changes made by the tenant are replaced with a new (complicated) password.
On receipt of the invitation email, log in to tenant portal and have a play around! You can change lots of settings - as explained in the next section.
Configuring Tenant Portal
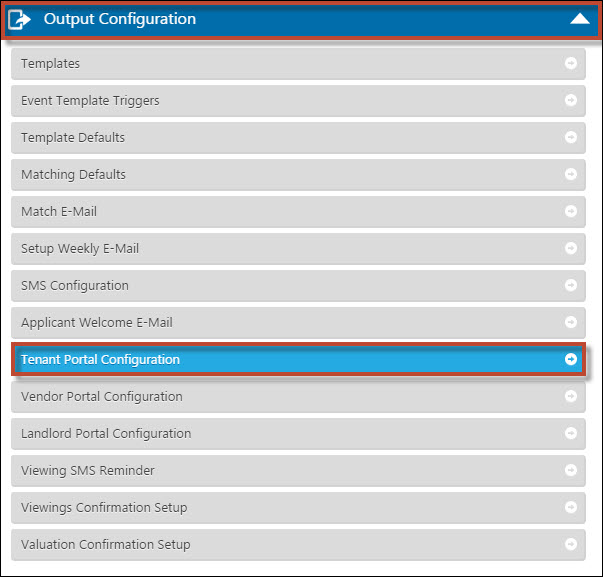
The Tenant Portal Configuration is located under the Output Configuration Option.
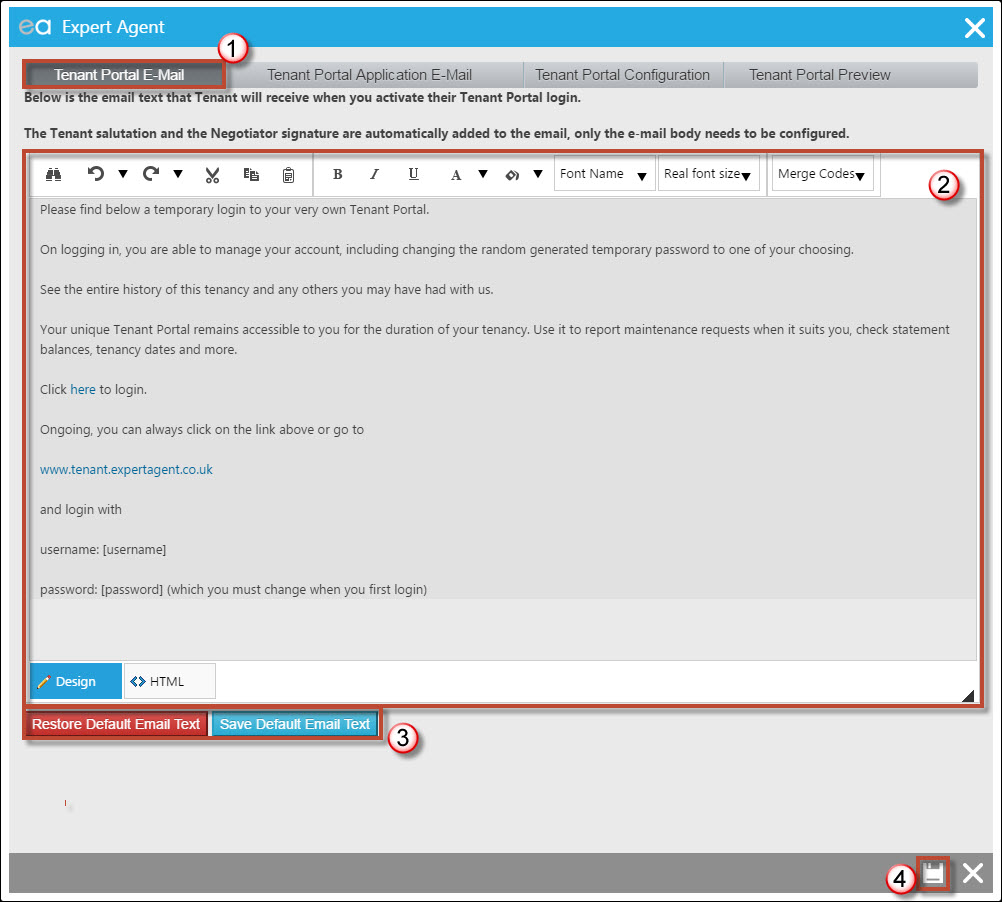
1) The Tenant Portal E-Mail tab
2) This will allow you to change the default body of the email that is sent to a Tenant in a live Tenancy. The usual HTML design aspects are all here, you can change the default font and size, add images if necessary. The link to the Tenant Portal Login is in the text and this will create a Username and temporary password for the Tenant.
3) This can be saved as Default Email Text or you can restore to our default if needed.
4) Press Save.
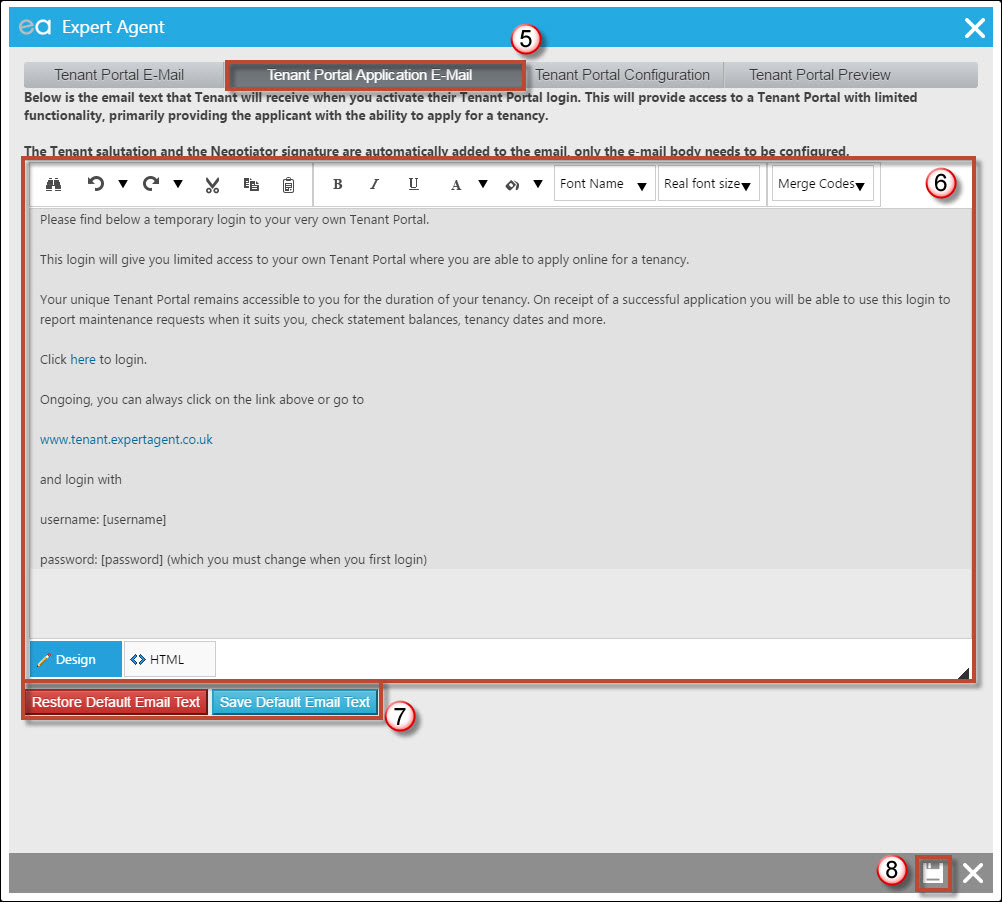
5) The Tenant Portal Applicant E-Mail tab
6) This is the default text for the email sent to a Tenancy added to a Pending Tenancy. The Applicant has to be added to the Pending Tenancy for the email to be sent.
7) Again you can save as the default email text or restore our default text.
8) Press Save.
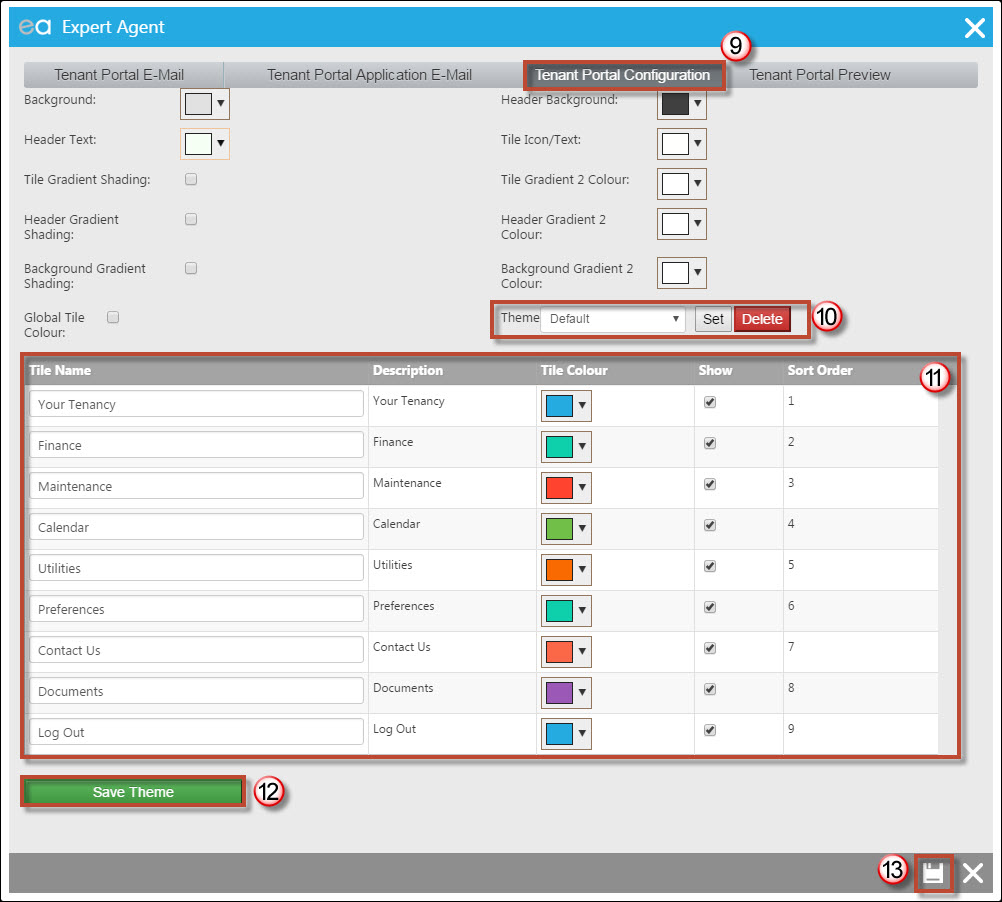
9) The Tenant Portal Configuration tab
10) You can change all of these colours to be in line with our own branding. The Default Theme is one we have created for you but you can create your own and Set it.
11) These are the boxes that will appear on the Tenant Portal once the Tenant has logged in. You can remove them if not needed or change the name of them, and the colour of the tiles. You can also move them around as well by clicking on the name and dragging it up or down.
12) Here is where you can Save your own Theme.
13) Press Save.
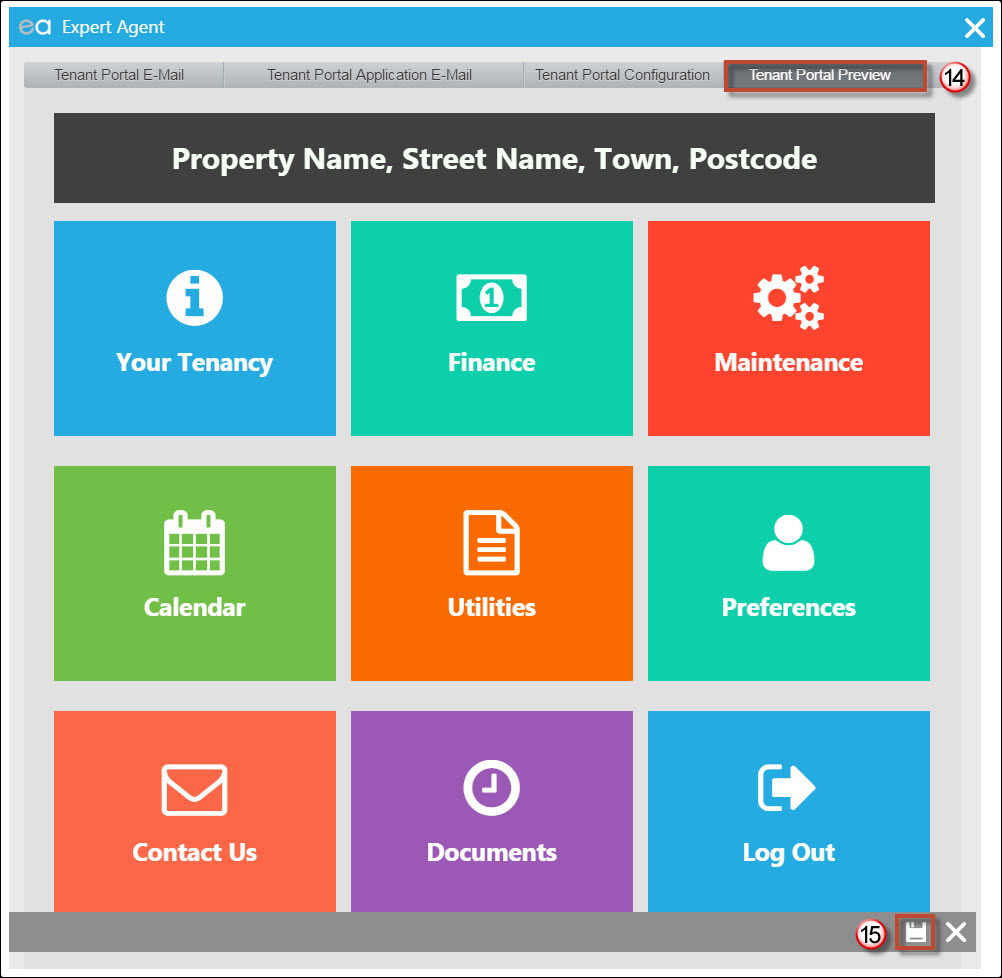
14) The Tenant Portal Preview tab
This is a preview of what your own portal will look like for the Tenant once they have logged in. If they are in a Pending Tenancy they will not see as many options here, if they are in a Let Tenancy they will see all the options that you have ticked on the previous tab.
15) Press Save.
Extra Data Examples
If you are unsure of what to use Extra Data for, or even if you need to use Extra Data, the best thing to do is to add a few example properties in, work your way through the property form and see what questions and date fields are there already.
If there is anything you need to add you can add it in as Extra Data. Below are a few examples of what you may be using Extra Data for.
Example One
Lets go with an example that you want ask the Vendor Status when you add in a property.
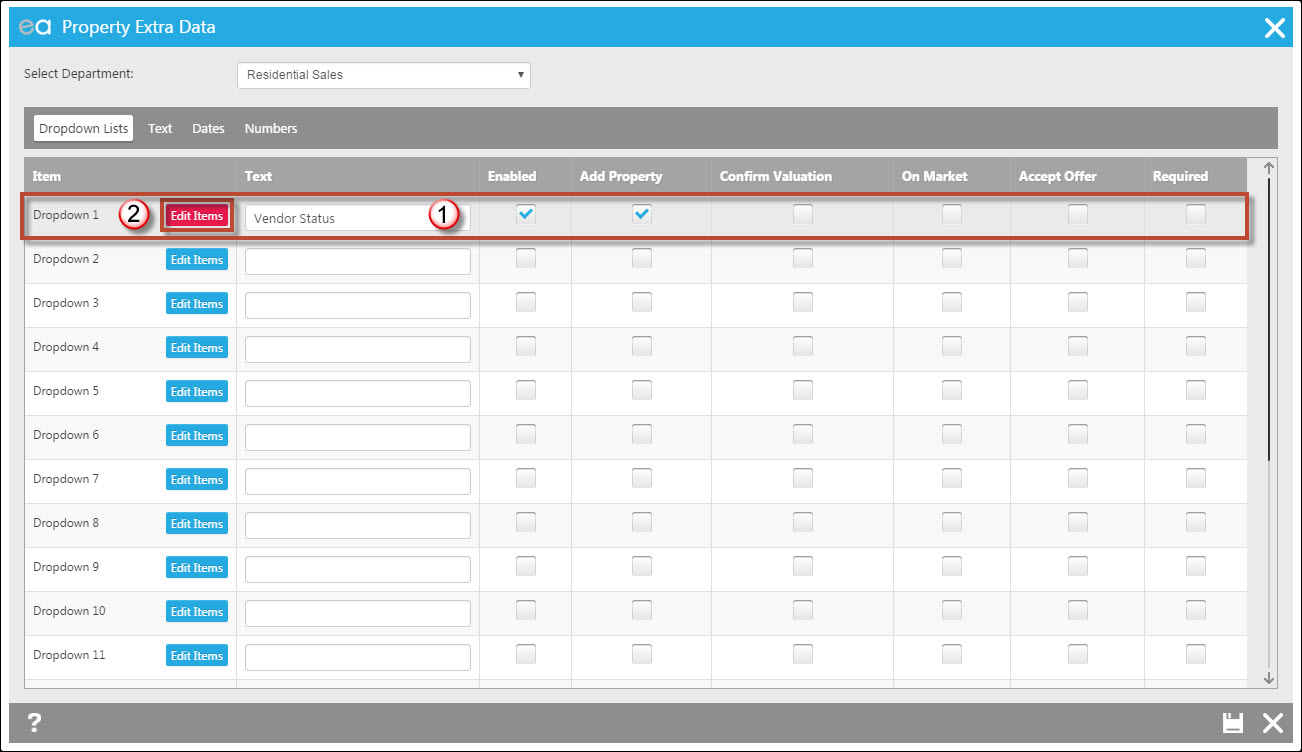
1) Type “Vendor Status” into the Text Column of Dropdown One. I have also ticked that it is “Enabled” and “Add Property”. This means it will ask everyone this question when they add in the property onto Expert Agent.
2) Click on the Edit Items links.
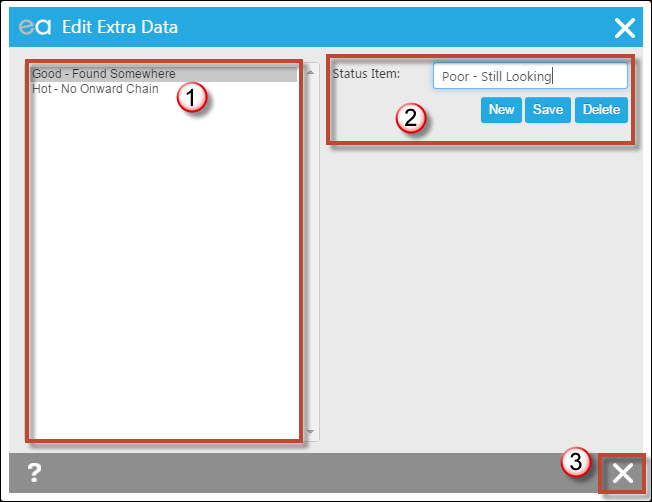
1) I have entered the status items into the box on the Left. I can filter on these at a later date from the Property grid, so I can find all of my Vendors with a status of Hot – No Onward Chain.
2) Each item you add in you need to press Save and then New.
3) Once you have finished select Close.
These items will now be available when you add a property into the system.

You can also see it on the Property Form -> Extra Data tab.
Example Two
Example two is of a text box. Lets say your business does Sales and Lettings, when you mark a Property as Available To Let, a text box will pop up asking for the Sales information.
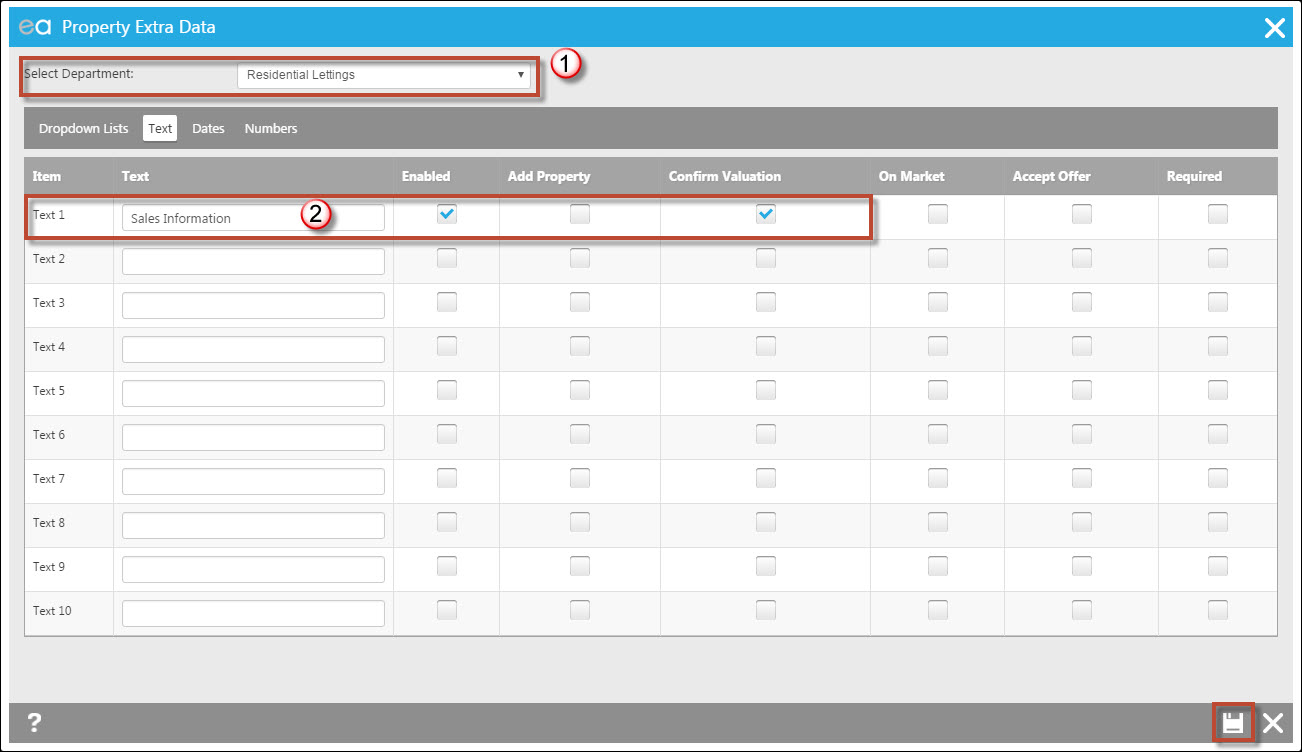
1) Change the Department Drop Down at the top to the relevant Department.
2) I have typed in "Sales Information" into the text box and select "Enabled" and "Confirm Valuation".
For example, on a Sales property worth £350,000 you might think that it is worth £1000 per calendar month. You can have this information pulling through onto certain letters if you want them.
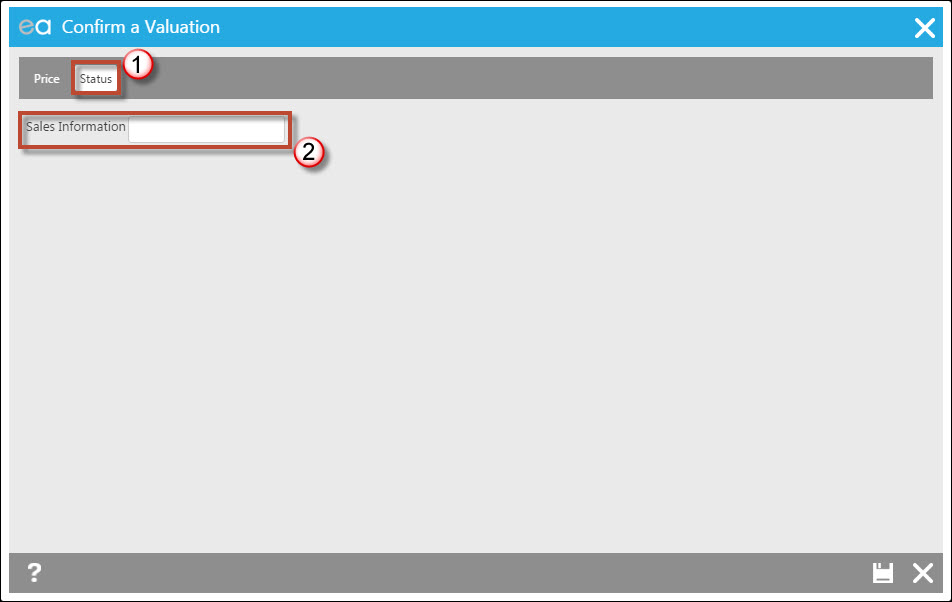
1) This will then appear on the Confirm a Valuation popup on a Lettings Property, on the Status Tab.
2) Fill the information into the Text Box. This can be merged onto Valuation Follow Up Letters.
Example Three
Example three is of a Date field. So lets say you wanted to make a note of the EPC expiry date. You might have this being asked when you put the property on the Market.
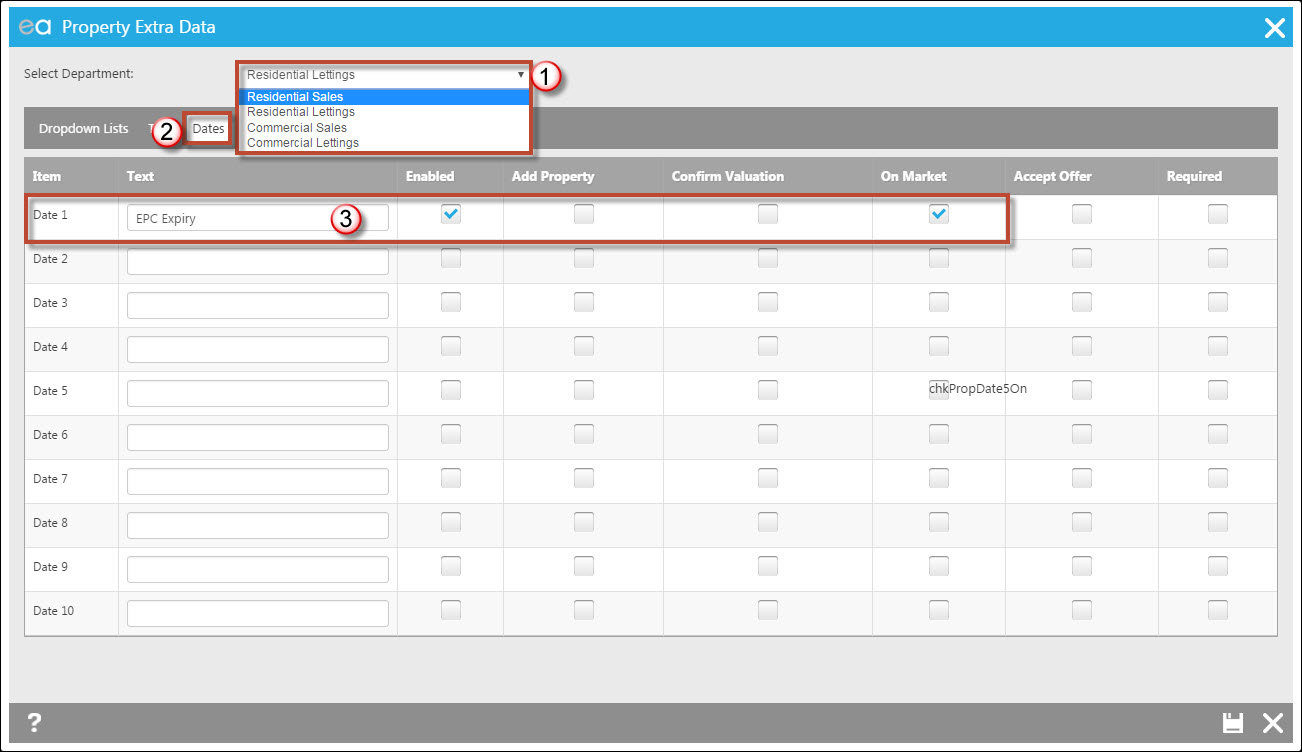
1) This example could be for both departments, if that is the case you would need to do this process twice by choosing the Department Drop Down.
2) Click into the Dates tab.
3) Write the name of the date field into the text box and choose when that appears.
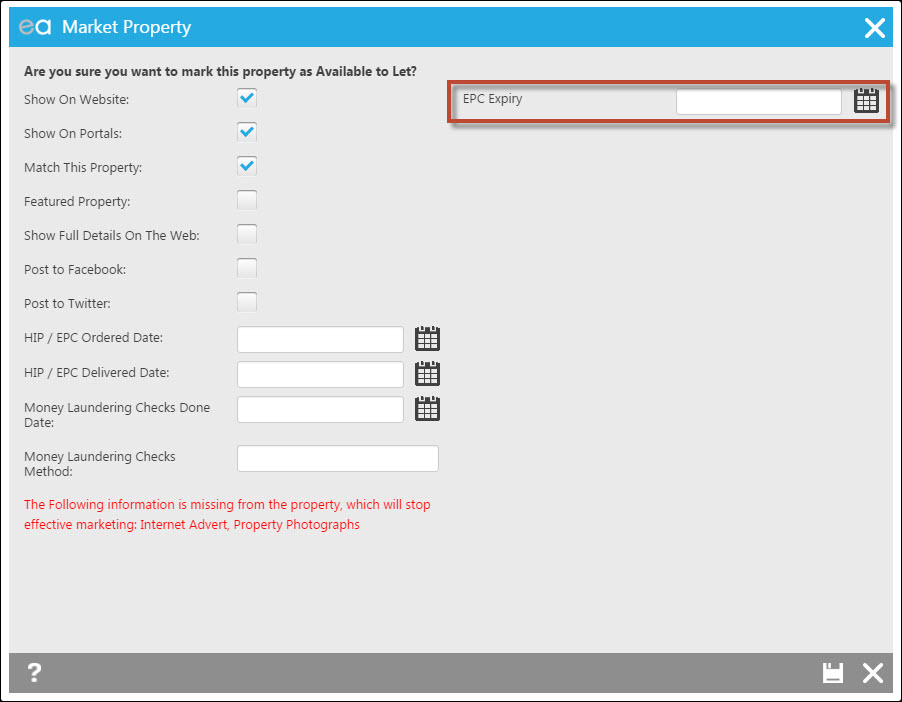
This will then appear on the right hand side of the "On Market" pop up.
Example Four
Example four is of a Number field. This is an example for Lettings and Sales perhaps. If there is a property that has Service Charge, you can have this question being asked when you add the property into the system.
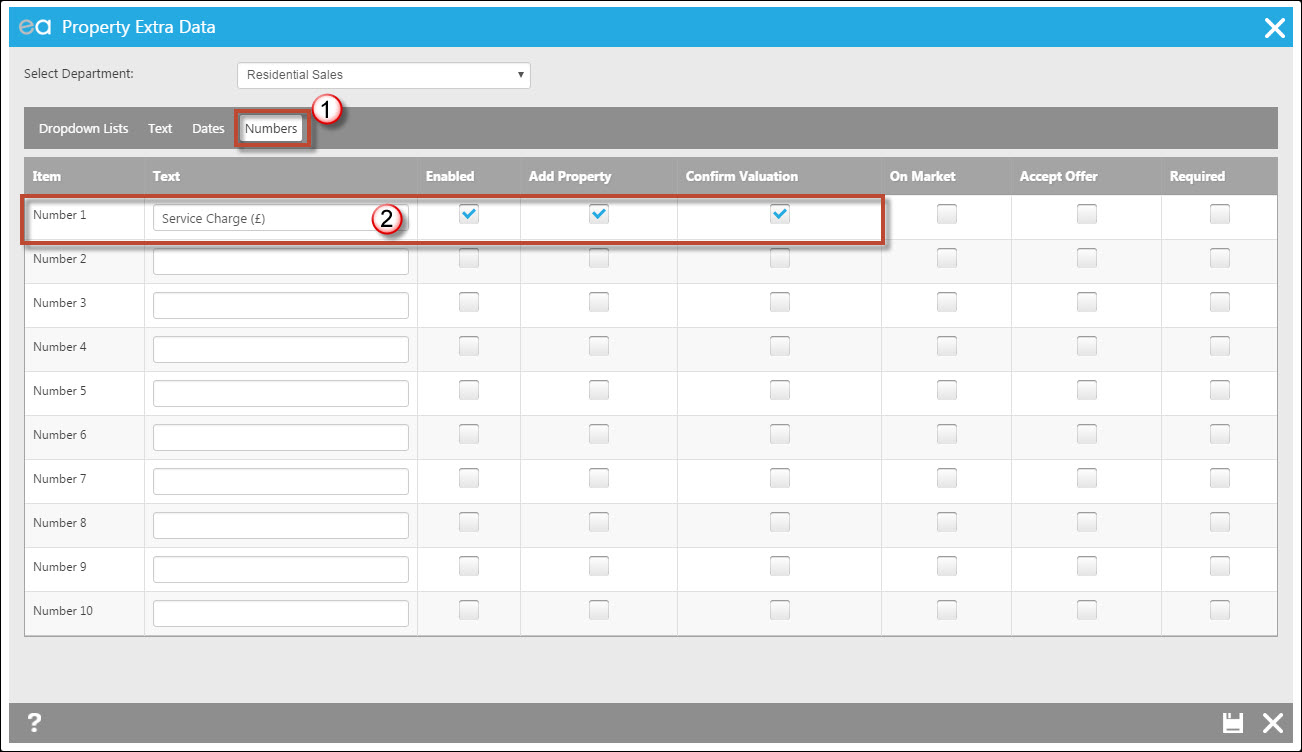
1) Click onto the Numbers tab
2) Type the name of your number field into the text box. I have added (£) into the Text field because the number field will only pick up numbers.
With all of these examples you can keep track of them from the Extra Data tab on the Property form.
Expert Agent Mobile
Mobile Expert Agent Mobile was launched in June 2016.
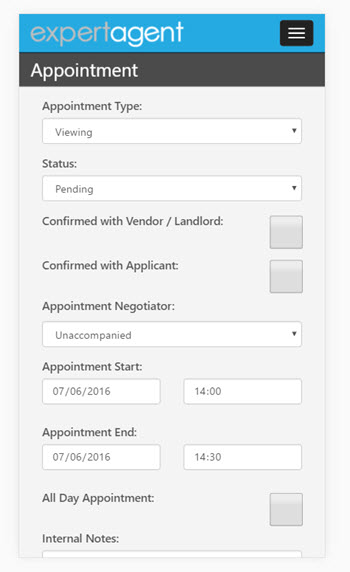
It is designed to get you out of trouble whilst out of the office by giving you access to important data. You can check your appointments and your tasks. You can look up vendor or applicant details and you can log file notes, send emails and texts. It isn't designed to let you run your businesses on it. If you are serious about working remotely, you need to use a laptop or tablet.
To access Expert Agent Mobile, just point your mobile's Google Chrome browser at:
http://mobile.expertagent.co.uk
Use your normal Expert Agent Login and Password
More Info:
Expert Agent Mobile Intro Video
Expert Agent Mobile Intro Video
Browser Choice
You should use Google Chrome - it will probably work in Apple's Safari but we've not tested it. We have tested it on Windows Mobile which won't run Chrome. The Windows Mobile Edge/Internet Explorer browser seems fine with EA Mobile.
User Names and Logins
Logging into Expert Agent mobile kicks you out of Expert Agent itself so take care!. When you log in, it checks for the total number of subscriptions in use - if you have 5 subscriptions, 5 of you are logged in at the office you won't be able to get into Expert Agent Mobile whilst out and about.
Enhancements and Bugs
To Log an Enhancement or Bug Fix Request on Expert Agent mobile, please click here and fill in the details requested

 Login
Login


