 Login
Login


September 2015
Our September 2015 release focuses mainly on Lettings Financial. It is the biggest Financials upgrade we've every carried out and massively improves Expert Agent's Lettings Financial capability.
If you've been waiting patiently for the right time to swap from your old lettings accounts package, now's the time! Over 80% of Expert Agent's 2200 member branches use our Lettings functionality and 60% of those branches now use Lettings Financial.
As usual, we've released the latest version early on our Guinea Pig (GP) servers. The September Release is available on http://gp.expertagent.co.uk from 9th September 2105 and, assuming no major snags are reported, on our main servers from 16th September.
We really need you to test the new version for us. We've carried out our usual end-to-end testing on PCs and iPads (always in Google Chrome) but we don't use the product the way you do. Expert Agent is too mature to have simple bugs. What we're left with are "conditional bugs" - ones that only appear when a particular sequence of events is carried out. So, please give it a good test!
The main new feature that we are incredibly excited about is the Fixflo integration. This is something we have been talking about for a while and are pleased to be able to roll this out to you now. There are also a lot of new enhancements to our Lettings Financials as well - including a complete reworking of the Landlord Payments.
Article Contents:
New Comparables Properties Search
Lots of Lettings Finance Enhancements
Fixflo Integration
One of the main new features this release is the integration with Fixflo. 
Fixflo is the system that Tenants can use to log their maintenance issues and this can now be seamlessly integrated with Expert Agent.
If you haven't seen it in action, go to www.fixflo.com - their video explains everything then give them a call for a demo.
Your new maintenance jobs will be imported into Expert Agent as a Maintenance Job and one nominated Negotiator will get the alerts. There is also a QuickLink created to see these new jobs as they come in.
We have not only created a video tutorial that explains how to get this set up and what happens when a Tenant logs a job but there are intro and configuration pagse in our lovely manual as well.
Sticky Notes Dashboard
Remember back in May the great excitement we had over Sticky Notes? Well now they have their own Dashboard where you can paste those little coloured squares to your hearts content.
The Sticky Notes Dashboard will contain the notes you want no one else to see, they are not public notes on the records within Expert Agent, rather private reminders.
This is now covered in the Introductory Training module 1. - see Dashboards, Grids and Forms
New Comparable Properties Search
On the Property Page you now that the ability to show your own Comparable Properties. You did have this before but now you can filter much more, not only just on the Postcode like before, but also on price range, number of bedrooms etc. Its now also available on the Action Menu as well. See the Preparing comparables chapter
Lots of Lettings Financials Enhancements
A lot of work has gone into the Financial side of Expert Agent so much in fact that we have even recorded a handy video to show you the new enhancements! The most important being the rewrite of Landlord Payments. As part of the rewrite of payments, all transactions are now assigned to a property. You will have noticed that in the last month you have had to assign a property when creating a sales or purchase invoice so that this was able to be incorporated when doing the new Payment processes.
There are also a number of enhancements that impact on how users may have been recording information on Expert Agent previously. Please check the list below to ensure that you are aware of things that may happen or take the required action to ensure that EA still works for you!
- In the near future we will be removing the Amount to Retain field from the Financial Details tab on the Landlord form. This is now located on the Property form in the Financial Details Tab. Please move the amounts over so that you do not lose your data. The new landlord payment area does not look at the Amount to Retain field in the landlord form and therefore this would need to be done before any landlord payments to ensure that landlords are not over paid.
- We have also now removed the Transaction tab on a property record. This tab never clearly indicated the balance of finances on the property. However now the landlord payment area will show you.
- The first contractor remittance advice will contain a large number of invoices – We are aware of this happening for the first contractor payment run for all of your contractors. The contractor payments section was rewritten in order for remittance advices to be possible as previously, funds would be allocated against invoices on landlord's record but once that happened, the funds were no longer linked to the invoice within the contractor's section but rather just funds in a "pot". This is why invoices on the contractor's statement would always show the paid date as the date it was paid on the landlord's statement and not when you paid the contractor. Within the new version, the funds allocated against the invoice will remain linked to the invoice so that when the contractor payment is made, you can now see which invoices made up the payment. The reason for a number of invoices appearing in the first contractor remittance is to clear the "pot" so that moving forward, the funds on account relate to the invoices.. Subsequent remittance advices will only show the invoices actually included in the payment.
- After cancelling a sales invoice, the invoice number that had been assigned to that invoice will now be assigned to the next invoice created. Please make sure that all are aware of this when looking at the Review Invoices & Credit Notes report as it may explain why an invoice number which was originally assigned to an invoice dated in June and subsequently cancelled is now assigned to a September invoice.
- VERY IMPORTANT: When choosing to use the “by transaction” option for the first time when creating statements, you will need to select the last transaction that appears on your last created statement for each record. Please watch the Lettings Financial Enhancement Training video which shows you how to set it up.
- You may come across transactions in your cancelled transactions screen called 'fix landlord allocations' - these relate to the September software release that is due this week. Because landlord payments will now be by property rather than by landlord we have had to re-allocate some transactions on your behalf that were currently not assigned to any property to avoid any issues arising. These will not change or effect any figures in your landlord statement they are simply behind the scenes transactions carried out by us. The name you are seeing in the cancel transactions is the name of the staff member that originally posted the transaction that has had to be re-allocated.
- The new remittance advice document which has been introduced to Landlord Payments will only be able to be created for landlord payments made after the release. The function will not work on retrospective payments.
- Bank reconciliation has now been renamed to Imported Statement Reconciliation. The process has not changed - just the name on the menu!
New Exciting Features:
Paying Landlords - Landlord payments are now sorted by property! This is a massive change to how Expert Agent used to process the payments and the screen looks completely different. Please visit the Paying Landlords page in the manual that explains the new process or watch the financial enhancement video that shows you the new look!
Re-Allocate Balances - we have now added the ability to move funds from one property to another that is owned by the same landlord. Please visit the Re-Allocate Balances page in the manual that explains this.
Remittance Advices - we have added to the Expert Agent Default letters a Remittance Advice template. You are able to make a Remittance Advice for any payment to a landlord or contractor that you process on the new upgrade of Expert Agent. Please visit the Remittance Advice page in the Manual that explains how.
Landlord Statement based on last transaction - as well as the ability to create a statement based on a given date range, the ability to create a statement based on a given transaction has been added. This means if you are worried that you have back dated a transaction which the landlord may not have seen on previous statements sent when processing a landlord payment, if you select that payment as the last transaction any transactions posted subsequently will be listed on the new statement. Please visit the Landlord Statement page in the Manual that explains how.
Other Enhancements
Applicant Details
Enhancement: Additional Quicklinks
My Applicants with Viewings to Chase, My Booked Viewings to Chase and My Applicants with Offers to Chase, have been added to the quick-link options.
Enhancement: Default Salutation
When adding a record, you are able to use a default salutation in order for it to not be missed when entering data.
Configuration
Enhancement: Enquiry Source - Viewings and Offers Grid
On the Viewings and Offers Grid, there is now an Enquiry Source column available.
Enhancement: My Profile - Permissions
Staff Permissions have been reorganised to make finding each permission simpler. There is now a Permissions button within My Profile and tabs grouping types of permissions together.
Enhancement: Property Notes Field as Merge Code
There is now a merge code for Internal Property Notes so that you can include these in templates.
Enhancement: Leaderboards - multiplier for part time staff.
To accommodate part time staff in the Leaderboards you can now set an individual multiplier of staff targets which will pro rata the targets.
Contact Selection
Enhancement: Branch Column on Contacts Grid
A branch column is now available on the Contacts grid in order to allow filtering.
Enhancement: Contact Saved Selection
You can now create a saved selection from the contacts grid.
Diary
Enhancement: Duplicate Appointment Flag
When adding an appointment there is now a check availability button that can be clicked to show if the time you are booking the appointment in for, does not clash with any other appointment for that staff member.
Enhancement: Viewings Confirmation Edit Option
When you confirm an appointment you now have the option to make a one-off edit before sending.
Financials
Enhancement: Click-through on Invoice Review
When reviewing your Purchase Invoices or your Sales Invoices from Finance -> Review, you can now click through to the related records directly from the screen.
Enhancement: Landlord/Contractor remittance advice
Now possible to create a remittance advice for each Landlord or Contractor payment made however, N.B. this is only for payments that have been made since the September 2015 release.
Enhancement: Contractor statement tab
There is now an expand option alongside each contractor payment which will show you a breakdown of what invoices were paid.
Enhancement: Deposits Passed to Landlord
On the landlord's statement, it will now display the tenants name and tenancy the deposit relates to.
Enhancement: Finance - Manage Deposits
The ability to export the Manage Deposit data to CSV has been added for each status of deposit.
Enhancement: Finance - Partial write off of rent
Rather than only being able to write off the outstanding amount of a rent demand, you are now able to enter the amount that you wish to write off.
Enhancement: Finance - Posting an Opening Balance
When posting an opening balance of a landlord or tenant which represent funds "in-hand" you will now be asked to choose which bank account the funds are being held in.
Enhancement: Finance - Restoring archived deposits
A new button has been added to the Archived Deposit table within the Manage Deposit area. This enables agents, who may have accidentally archived a deposit during the process, to restore the deposit back to the "Deposits Paid into Scheme or Refunded" table.
Enhancement: Finance Tenancy - Rent Amount
If the rent amount is amended on the details tab of a tenancy form a pop up window now appears reminding you to amend the amount of rent that each tenant pays within the tenant tab.
Enhancement: Notes field on tenant refund
There is now a notes field on the Issue a Refund screen from the Finance option on the Tenancy Action menu. The notes appear on the tenancy statement.
Enhancement: Payments to Make - Tenant and Deposit payments tab
We have now added some new tabs onto the Payments to Make report - a Tenant Payment tab and Deposit Payment tab. The tenant tab will indicate any payments that are due to tenants after a refund has been processed on the tenancy record. The deposit payment tab indicates any deposits that need to be paid over to a deposit scheme having been processed in the Deposit Management area.
Enhancement: Property record - Removed transaction tab and financial functions
The Accounts menu has been removed from the property record as well as the transactions tab. All finance should be processed via the landlord or tenancy records.
Enhancement: Rent arrears: Include Last Contacted
It is now possible to sort Rent arrears by Last Contacted date. The last contact date is update manually either through the record or via Add a note on the Rent arrears report.
Enhancement: Review Sales Invoices - ability to see cancelled invoices
We have now added the ability to see "Cancelled Invoices" on the Review Sales Inv report via the top Finance drop down menu. Also if a sales invoice is cancelled then the sales invoice number is made available for the next sales invoice that you create on Expert Agent. This is only applicable for invoices cancelled after the September 2015 release.
General
Enhancement: Sticky Notes Board
There is now a dedicated sticky notes board where you can place sticky notes for general day-to-day things. Any sticky notes that may have been, or are placed elsewhere on Expert Agent will not show here.
Enhancement: Stop Duplications
When clicking the save button, it will disappear to stop duplication from clicking it multiple times.
Landlords
Enhancement: Landlords - Payment Day Column to allow for Saved Selection
The Payment Day is now available as a column in the Landlord Grid to allow for Saved Selections.
Letters / Templates
Enhancement: Merge code for Vendor Initial
There is a new merge code that will pull through the initial of the vendor's name.
Enhancement: Tenants Merge code for all E-Mail Addresses
When creating a letter, you can now include email addresses for all of the active tenants in a tenancy.
Matching
Enhancement: Enquiry Method on Matches Screen
There are two new columns on the matches screen for Enquiry Source and Enquiry Method.
Offer Details
Enhancement: Applicant Negotiator listed in Offers Grid
The Purchaser negotiator is displayed as a column on the Offers Grid.
Enhancement: Property Negotiator listed in Offers Grid
The Property Negotiator is now displayed as a column on the Offers Grid.
Properties
Enhancement: Last Viewing on Property Grid
There is now a Last Viewing Column available on the Property grid to allow for filtering.
Enhancement: Photo Upload
There is now a progress graphic when saving on the photo upload to display progress.
Property Selection
Enhancement: New Property Grid Columns
The number of Reception rooms and Bathrooms have been added
Enhancement: Occupier Details on Grid
The occupier details are now as separate columns on the Property Grid.
Quicklinks
Enhancement: New Quick Link
There is a new quick link for On Market (Not Marketed) Properties with No Brochure.
Enhancement: Quck link - No Floorplans
There is now a quick link available to filter the grid for any properties that have no floor plans assigned.
Enhancement: Quick Link - Properties with Outstanding Charges
There is now a quick link available to filter the grid for any properties that have Outstanding Charges.
Tasks
Enhancement: Events - Edit Note - Save
When editing notes on an Event you are now prompted to Save before leaving the Event.
Viewing Details
Enhancement: Applicant Enquiry Source on Viewings Grid
There is now a column available on the Viewings Grid for Applicant Enquiry Source.
Enhancement: SMS Reminder for Negotiator
When sending the SMS Reminder for Viewings it will go to the negotiator attending the appointment rather than the negotiator that booked the appointment.
Enhancement: Appointment day merge field
There is a now an "Appointment Day" merge field to be used on appointment letters, not just Date and Time.
Website & Powering
Enhancement: Multi-listed Properties to be included in XML
Multi-listed properties can now be included in the XML Feed.
Enhancement: Sense-check on powering 3 registrations
When an applicant registers via a powering 3 website, the system will perform a check to see if they are already registered.
Bug Fixes
Configuration
Bug Fix: Default Lettings Department
You can now set the Lettings Department as the Default Department without it deleting the department options.
Diary
Bug Fix: Diary advanced tool tip
Turning off the Diary advanced tool-tip, will now turn it off for all diary views.
Bug Fix: Some SMS Reminders not being sent
The Development Team have run diagnostics to locate the issue, which has been resolved.
Bug Fix: Cancelled appointments showing in printed diary
The cancelled appointments were showing in the printed diary, they now no longer show.
Bug Fix: Event - Uploaded files - duplicate filename
Previously if you uploaded two files of the same name to an Event, the 2nd file would overwrite the first. Now, the 2nd file is renamed by EA with a (2) and each item is visible on the Event in it's own right.
Bug Fix: Grid - Send Email - HTML ONLY
When presented with the list of templates, it will default to HTML format and this cannot be altered.
Financials
Bug Fix: Commission
No longer creates transaction at 0%
Bug Fix: Deposits Passed to Landlord
Deposits will now be passed on to landlords in full.
Bug Fix: Finance - Rounding up of any deposit charge
This is now fixed as was related to a rounding issue
Bug Fix: Landlord Payments Loading Time
The Landlord Payments screen has been optimised to allow for faster loading times.
Bug Fix: Rent Arrears Letters
If sending letters via the Rent Arrears report letters will only be produced if the transaction is listed. Therefore if only showing outstanding rent transactions then a letter will be created for them. If showing all outstanding transactions on the report then letters for all will be created.
General
Bug Fix: Residential Sales Invoice Numbering
When creating an invoice in a property and selecting a template, if another member of staff is ahead of you and assigns the number you wanted to use, it will notify you and ask you if you wish to move on to the next number.
Bug Fix: Tabs not saving between sessions
When logging out of Expert Agent, your tabs will now be saved so that when you log back in you can continue to work with the records you had open previously.
Bug Fix: Tenancies attached to Internal Messages
When attaching a Tenancy to an internal message, it will now open when clicked.
Letters / Templates
Bug Fix: Adding New Labels
Functionality to add new Labels from the output screen, has been reinstated.
Matching
Bug Fix: International Currencies
When matching with international currencies, it would use the currency of the property rather than the applicant. This has been corrected.
Offer Details
Bug Fix: Offers Grid - Offer with no records attached
When a record wasn't attached to an offer it would cause the grid to not load. This has been rectified.
Bug Fix: Chain Details - Vendor details locked
When adding or editing an external chain element, the vendor details boxes were locked and could not be typed into. This is now fixed.
Bug Fix: Renaming Chains
When renaming the chain, the edited name did not show, this is now fixed.
Properties
Bug Fix: Advertising - Event Type
When logging a property advert through the advertising section it now logs the event under "Advert Placed".
Bug Fix: Completion dates
Although completion dates were logged in the database, they were not displaying on the property record. This has been rectified.
Bug Fix: Properties - Add New Property Wizard
The property wizard originally opened with the wrong graphic. This has been corrected.
Bug Fix: Property Enquiry Method & Source Defaults
When adding a property it will now use the defaults set in configuration.
Bug Fix: Property Presentation - Auto Scroll
The bug where you couldn't use your mouse and the auto-scroll feature has now been rectified.
Bug Fix: PVAs - Accepted tab - Open record
It is now possible to open a record via the PVA tab by clicking on the entry.
Bug Fix: Visual Photo re-ordering - iPad
It is now possible to use the Visual photo reordering feature on the iPad, dragging and moving the photos into the required order.
Tasks
Bug Fix: Tasks - Saved Selections
When adding Saved Selections from the Tasks grid, you can now access these via the right-hand toolbar.
The Chain Grid
The Chain grid is an area of Expert Agent where you can see all of the sales chains that have been inputted into the system. Like many of the grids in Expert Agent, you can see the information for each grid split into different columns and you can search for records using either the chain name or how many element are in the chain itself (unlike the other grids though you cannot change the order of columns, or create a report etc as there is no Right Click Action Menu). From here, you will also be able to see information on the status of the offers and whether or not they are completed (you will also be able to mark them as complete from here).
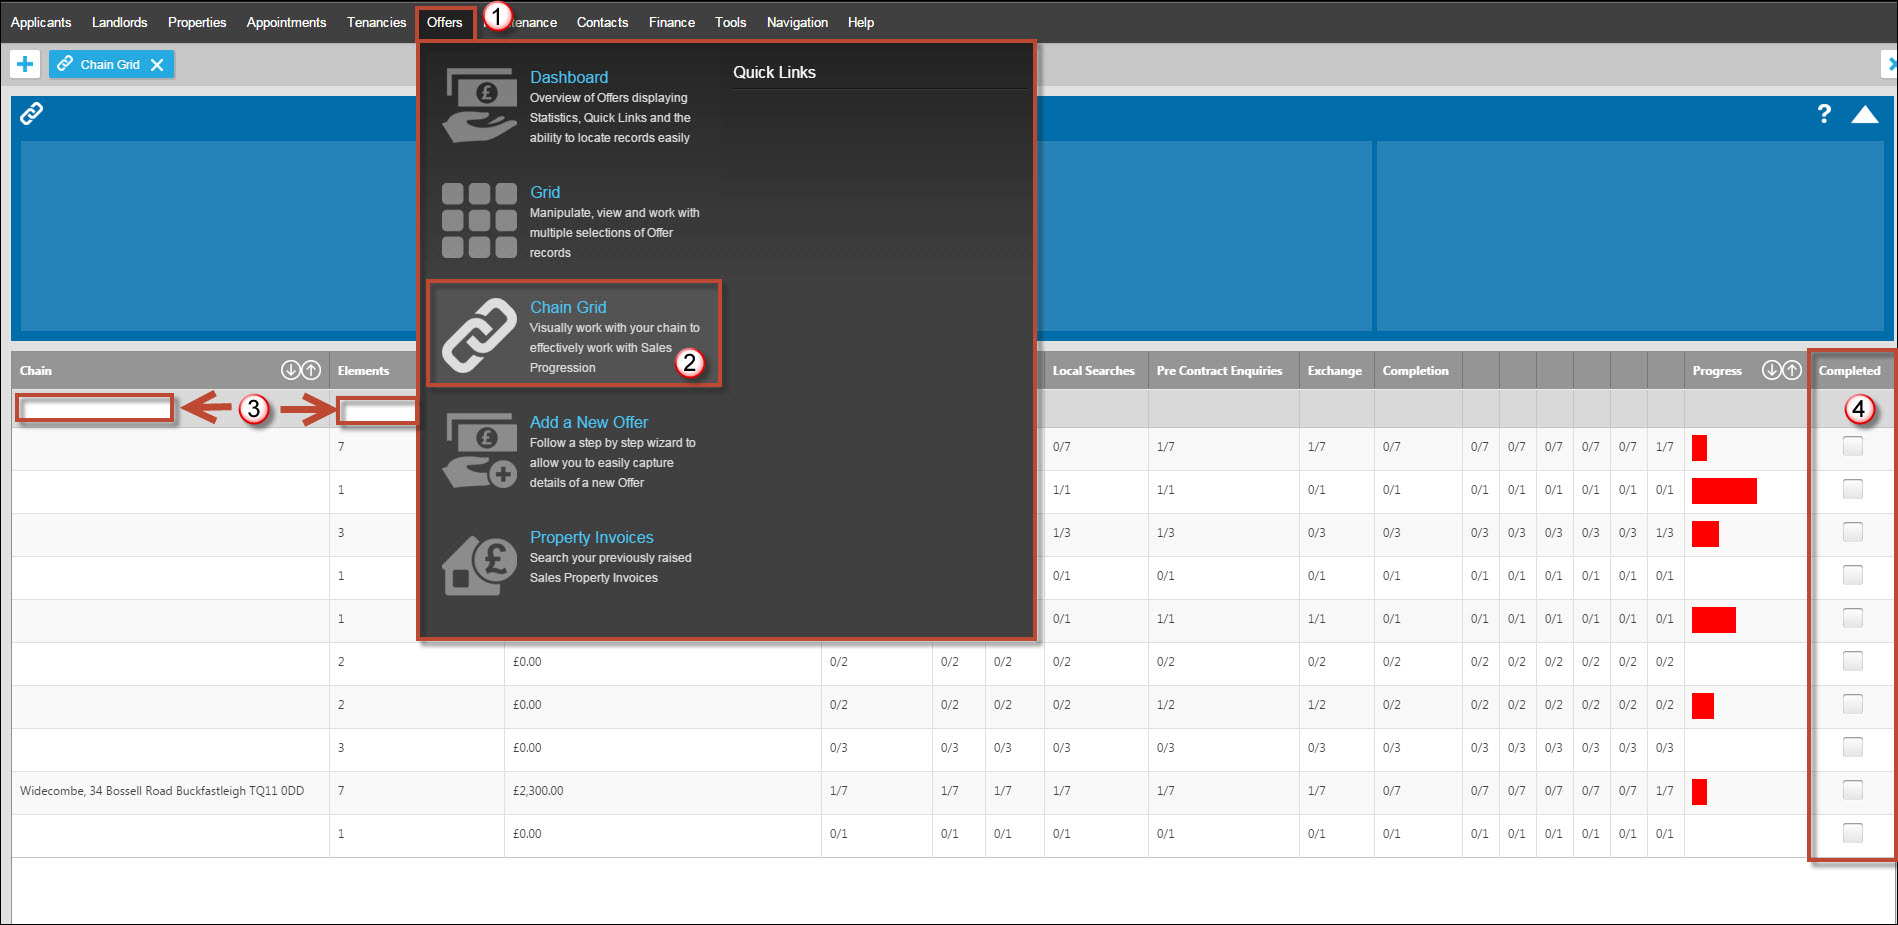
1. To access the Chain Grid, firstly click on offers
2. Select Chain Grid from the dropdown menu
3. Searchable fields in this grid are 'Chain' and 'Elements'
4. See which offers are marked as complete or mark them as complete from the tickbox in this column.
Our Policy on Unpaid Subscription Direct Debits
We've always tried to be very sympathetic when Direct Debits bounce. There can often be simple logistical explanations - members might be moving bank accounts, members might not have got a direct debit mandate in place in time etc. Of course, it could be that members don't enough funds in their accounts.
Whatever the reason for a members' failed DD, we don't mind, we won't judge, these things happen. We decided to avoid the approach that mobile phone providers and subscription software providers like Microsoft 365, MailChimp and Xero take - they just cut their subscribers off until a payment has been made.
Every time a direct debit fails, we get a bill from the bank and the agency that processes the direct debits. The Account Managers then spend time looking into the reasons and triggering the appropriate response.
Our process is to send our standard notifications to the bill payer or nominated contact by email, SMS and through Expert Agent’s internal messaging system. The email includes a link to allow a new direct debit mandate to be completed online if necessary. If a payment hasn't been received within three days, we'll restrict the account to just one user and if we get to seven days without payment we'll suspend the account. If you have an Expert Agent website this will also come down.
Payment can be made by card over the phone or directly to our bank account using the information supplied in our initial email.
If you’d like to discuss payment options if you’re having difficulty please contact our Account Managers on 01225 303 500 option 2 or This email address is being protected from spambots. You need JavaScript enabled to view it.
Direct Debit FAQs
Do you offer any other payment methods other than Direct Debit?
Yes - you can pay us annually in advance by BACS.
How do I sign up for Direct Debit Payments?
Click Here for our online Direct Debit Sign Up page.
What's the cut-off date for new Direct Debits?
You need to get signed up by the 15th of each month so that we can ask for payment on the 1st of the following month. If you know your Direct Debit isn't in place, call us and we can arrange a credit card payment.
You've tried to take money from an old, replaced Direct Debit. Why?
We're very diligent to ensure that if you replace your Direct Debit with a new one that we only bill the new one. However, we're not infallible and if you can find and send us the confirmation email you received from Direct Debit when you set up your new mandate.
We told you that we were changed bank accounts - why didn't you action it?
We can't. There's nothing we can do from our end - you need to complete the online Direct Debit.
How to Win an ESTAS award for your business
The ESTAS Awards, held in April each year at the Park Lane Hilton, Central London, is the most important estate agency awards event. We have been lucky enough to win Supplier of the Year in 2013 and 2014 and this has been great for our business.
We’d like Expert Agent's members to dominate the ESTAS 2016.
An ESTAS award is a fantastic accolade that sets agents apart from their competitors.
We've got a plan to help you win one.
There are lots of categories - you are certain to be eligible for at least one.
Unlike other awards, there’s no judging panel and no need for presentations. You just need to get votes from customers. That's where we come in! We can help you with this by using our technology, our marketing team and a bit of an incentive - we're going to enter every voter into a draw to win an iPad Air.
WHAT DO WE HAVE TO DO?
Not very much! Just enter online - click here for the application form.
The cost is just £210 - but you'll make this back many times over even if you just get shortlisted.
If you get shortlisted, you’ll need to attend the event (hosted by Phil Spencer in recent years). We’ll have seats on our tables and will allocate these on a first come, first served basis to shortlisted members. You'll probably want your own table, though - bring the whole team, your partners, big clients etc - it is a great event!
Once you’ve applied and paid, you’ll be sent a voting link by the organisers. All you need to do is send this to This email address is being protected from spambots. You need JavaScript enabled to view it. and we’ll start getting you some votes. The sooner you register, the more votes you will get.
WHAT WILL EXPERT AGENT DO?
We’ll send a timely email on your behalf to every vendor, landlord and, if appropriate, tenant and purchaser throughout the coming year, encouraging them to fill in the required online questionnaire. The ESTAS' organisers have confirmed that we can back-date this to include clients from 1st January 2014.
We’ll send chase-up reminders until we see that they’ve voted.
Click here to see a draft of the email we would send to your contacts.
When voting closes, we'll do the draw, send out thank-you emails and post out some iPads to the lucky winners.
We really hope you'll give this a go. If you need any further information please call us.
Tel: 01225 303500 | Email: account.managers@webskyltd.com
Terms of Business | Cookie Policy | Privacy Policy | ZPG Modern Slavery Statement
Designed by the Expert Agent Design Department
