 Login
Login


Staff Salary Survey
We've been running an Estate Agency Salary Survey, to help the bosses in the many businesses we deal with assess their own salary rates.
With over 16,000 bosses, negotiators and administrators using ExpertAgent in 2,289 branches across the country, we've got extraordinary reach into the depths of the industry.
The Questions
they were really simple:
- What's your job role?
- Full Time or Part Time?
- Sales, Lettings or Both?
- Age?
- Location?
- How much did you Earn?
- How much was Commission/Divided/Profit Share?
- Company Car? If so, what type?
The Results
Thank you to everyone that took part. We had over 700 respondents from negotiators, administrators, managers and bosses from all over the country.
Administrators
Administrators are, on average, fairly mature. Only 20% are under 26. 28% are over 51.
72% work full time so we've based the following on full time work.
30% earn under £14,000.
40% earn £15-17,000
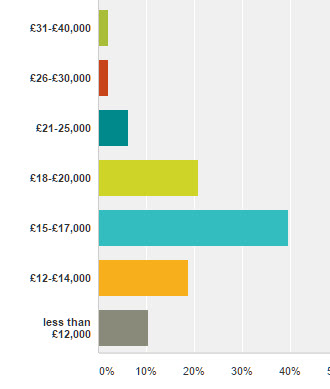
only 10% earned more than £21,000
Almost all are paid a flat salary and none have a company car
Sales Negotiators:
These guys are generally quite young. 44% are under 25, and nearly 30% are 26 to 39.
35% of them classify themselves as Lettings Negotiators too.
Over 95% work full time.
A surprising 25% earned less that £12,000. 31% earned between £15 and £21,000. 11% earned more than £25,000.
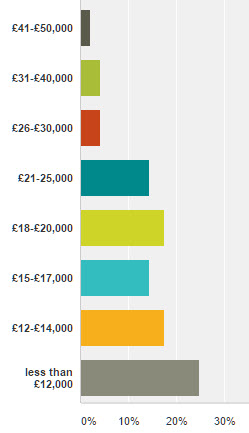
Over 55% of respondents earn less than 10% of their earnings in commission. However, 20% of respondents get over a third of their earnings in commission.
90% have to use their own cars. 7% have a small trendy company car (a Mini, Fiat 500, Citroen DS3 etc). One respondent has a big executive company car!
Lettings Negotiators:
Nearly 60% of these guys classify themselves as Sales Negotiators, too.
They are even younger. 53% are under 25 and a further 28% are under 39.
23% earn less than £12,000. 37% earned between £15,000 and £21,000. 8% earned more than £25,000.
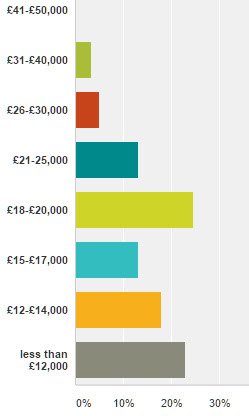
Half earned basic salary only. 10% got 31-40% of their salary in commission.
A few more had company cars - 14%. Again, most had a small trendy one
Senior Sales Negotiators:
As to be expected, these guys are older. 45% are over 40. Almost 100% work full time.
Just 35% do lettings as well as sales.
They nearly all earned less than £50,000. Over 50% earned over £21,000. 23% earned £18-£20,000. Two respondents claimed to earn over £71,000.
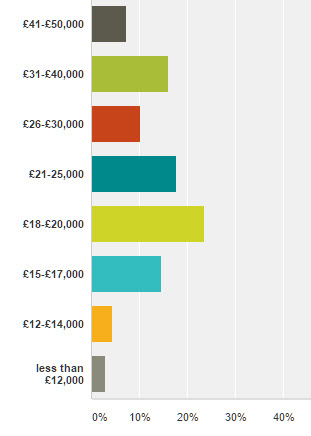
Again, a high percentage (33%) get all of their income as basic salary. Over a quarter got over 20% of their income in commission. 10% earned half their income in commission.
80% use their own car. 10% have a sensible family company car - presumably reflecting their greater age.
Senior Lettings Negotiators:
Overall
| Job Role | Earnings | Commission | Car? | ||||
| Administrators | |||||||
Bug Fixes
Applicant Details
Bug Fix: Applicant - Currency
It is now possible to alter the currency on an applicants record once initially saved.
Bug Fix: Applicant - Due off date
It is now possible to save an applicant records without the Due off date field populated.
Bug Fix: Applicant - Last contact
Previously the Last Contact field would not refresh until the record was saved or the tab closed and reopened. The Last contact field on Dates tab now refreshes immediately when updated.
Bug Fix: Applicant - no due off date
It is now possible to save a new applicant without the due off date field populated.
Bug Fix: Applicant - Wizard - Salutation
The salutation field now auto-populates when adding an applicant to the system using the Wizard and tabbing into the salutation field.
Bug Fix: Applicant Wizard - Required From and To dates not saving
When adding a new lettings applicants and entering Required From and To dates, the dates weren't saved to the new applicant - this has now been resolved.
Bug Fix: Applicants - Dates - Last Viewing date
Last viewing date now updates as expected when saving a new viewing appointment.
Bug Fix: Diary - new applicant via an appointment - welcome emails
Previously, if an applicant was added to the system via an appointment, the user was not prompted to send the Welcome Email - this has now been resolved.
Applicant Selection
Bug Fix: Property Age on the Applicant Grid
This has been removed from the Applicant Grid.
Configuration
Bug Fix: Sales Pipeline - Total Commission
In Sales Pipeline the Total Commission Fee has been reinstated.
Contact Details
Bug Fix: Contact - financial - reference
It is now possible to save a reference to the Financial tab on a Contact.
Diary
Bug Fix: Diary - re-occurring appointment
There was an issue when setting up re-occurring appointments which have now been resolved. On editing a re-occurring appointment the settings previously saved are displayed rather than the default.
Bug Fix: Next Contact - No Date
Previously when a date was not entered, it would cause a server error to appear and would not save. This has now been corrected and will save with no-date, if one is not selected.
Bug Fix: Email Scanner - HTML in Folder Configuration
When previously mapping folders into the system, it would pull through HTML in the folder names, which was causing a few issues when the process tried to run. This has now been corrected.
Bug Fix: Error when trying to send to an invalid email
Previously when trying to send an email to an invalid email address, you were presented with a Server Error. You are now presented with a understandable prompt to let you know that the email address is invalid.
Financials
Bug Fix: Amounts with £0.00 showing in payments
This is now fixed as was related to a rounding issue.
Bug Fix: Finance - Landlord opening balances
When entering an opening balance for a landlord, the description entered will now be correctly displayed on the statement rather than defaulting to Opening Balance for Landlord.
Bug Fix: Finance - Unallocated funds tenancies
When allocating funds and saving within the 'Unallocated funds tenancies' report, the popup now closes as expected.
Bug Fix: Purchase invoices entered on property passed to Landlord
Purchase invoices entered on a property can now be assigned to a Landlord
General
Bug Fix: Applicant - Create Letter/Email/SMS
On entering an Additional mobile number to an SMS message, the message now sends successfully and appears as last text sent in Tools > Configuration > SMS Configuration.
Bug Fix: Configuration - Profile permission
Previously if the statistics permission were unticked in a user profile they were still available to be selected under the Tools menu. This has been resolved.
Bug Fix: Log Tasks
It is now possible to close/mark as complete Log tasks.
Bug Fix: Messages
When sending an internal message you are now prompted to select at least one recipient.
Bug Fix: Messages - delete
It is now possible to delete a message when selecting 'Delete Message' from within the message itself.
Bug Fix: Messages - Deleted
It is now possible to load Deleted messages from within the Messages window.
Bug Fix: Properties - Brochures - Rooms
The size text, when entering room details into the system, now displays correctly with feet and inch symbols.
Bug Fix: Properties - Marketing error
There was an issue with new agents not being able to market properties without an error message. This has now been resolved.
Bug Fix: Properties - wizard - Send emails
On adding a property via the wizard, once an email address is entered, the Send Email tick box is automatically ticked.
Bug Fix: Support - saving as status Open
The ticket reply pop up now closes as expected when changing the ticket status to Open and clicking on Save.
Homepage
Bug Fix: Home page - Offers pod
Options on Offers pod on Home page have been altered to reflect what is being displayed.
Landlords
Bug Fix: Properties - wizard - Landlord search
When adding a new property, it is now possible to search for an existing landlord when creating a Lettings property.
Letters / Templates
Bug Fix: Edit Work Template - Hidden Buttons
The form has been re-sized in order to show the buttons that were previously hidden and required the user to scroll down.
Bug Fix: HTML Letters on Smaller Resolution
When previously opening up the HTML editor on a smaller than suggested resolution, the Editor would truncate the page, leaving lots of white space. This will now display correctly on smaller resolutions.
Bug Fix: Merge codes - Negotiator
Previously, the Negotiator merge code used to pull through initials only. This has been resolved and is now live.
Bug Fix: Templates - cloning
When you clone a template, all details are copied across including notes and follow up task information.
Bug Fix: Word Brochure - Pound sign
There was an issue with the pound sign displaying as HTML code when creating a brochure. This has been resolved.
Lettings
Bug Fix: Property - Landlords - Add new landlord
There was an issue adding a Landlord to a property via the Add new landlord button - this has now been resolved and is live.
Matching
Bug Fix: Match - Update Last Contact
Update Last Contact has been reinstated within Match Events.
Bug Fix: Matching - Available From date
There was an issue where the Available From date of a property was not taken into consideration during the matching process when matching for an applicant who is looking for a property available within a certain range. This has been resolved and is now live.
Offer Details
Bug Fix: Offers - Update Last Contact
There was an issue when updating Last Contact from an offer and the Event type defaulting to 'Advert Placed'. This has been resolved and is now live.
Portals
Bug Fix: Fee notes - £ symbols appearing incorrectly on Rightmove.
There is now a Portal Fee Information field on the Details tab of the property which allows for HTML.
Bug Fix: Properties - Details - Portal Fee Info
Portal Fee Information field now allows HTML to cater for symbols going to Rightmove.
Properties
Bug Fix: Add property wizard - tenure
If Tenure is not selected at the point of adding a new property it is now saved to the system as 'Please Select' to ensure that the field is completed knowingly.
Bug Fix: Invoice - Reprint - Duplication issue
There was an issue when printing an invoice and the system duplicating the invoice in the list of invoices to reprint. This has been resolved and is now live.
Bug Fix: Map and Streetview - foreign properties
There were a number of issues regarding setting up foreign properties, as follows: 1) Country not saving when adding a new property. - This has been resolved. 2) When adding a property from a Landlord, details are not pre-populated. - This has been resolved. 3) If there is no lat long, have to get the lat long from an external site. - we have changed streetview set-up so that if there is no lat-long it takes a best guess for the starting point based on the address. 4) Cannot see map location from property details page. - This is available on presentation page and match criteria tab, so when you first go into a property you are on the right tab, and with the change to streetview you will no longer need to go to the details tab to enter a lat-long. 5) Show on Map not working from match criteria tab. - This is now resolved. Powering 2 1) if there is no postcode, the map is not displayed, even if there is lat long. - This has not been resolved as the demand for this functionality is small.
Bug Fix: MarketPlace
When selecting items via Marketplace you now only have the option to click on the right click menu to reveal 'Place order', 'Save and close' etc...prompting the user to Place Order rather than only Save and Close.
Bug Fix: Properties - spell check
The system now detects if there are spelling errors when editing Advert text etc..
Bug Fix: Properties - wizard - duplicate entry
The system now prompts you if you are adding a duplicate property.
Bug Fix: Property - Wizard - Advice to Client Notes
When adding Advice to Client notes on creating a new property record, the notes were being saved to the incorrect field. This has now been resolved.
Bug Fix: Room Images Incorrectly Assigned
There was a small issue with property images being assigned to Rooms that they were not selected to be assigned to. This has now been fixed.
SMS
Bug Fix: Offers - Send SMS - Events
When sending an SMS from an offer record, an event is now logged with details of the SMS.
Tasks
Bug Fix: Tasks - error opening old tasks
There has been an issue opening older tasks. This has now been resolved and is live on TOUCH.
Tenancies
Bug Fix: Tenancy - Review/Renew
On renewing a tenancy, the review/renewal now updates accordingly, as with the expiry date.
Bug Fix: Tenancy - statements
There was an issue when printing statements from the Tenancy > Statement tab - this has now been resolved.
Viewing Details
Bug Fix: New appointment - Applicant tab
Layout of Applicant tab on New appointment logging window has been corrected to display Department/Branch etc.. text.
Viewing Selection
Bug Fix: Appointments - Dashboard - Quick Statistics
In the Appointments dashboard the 'Total Viewings This Month' now reflects the correct data when selecting 'Show Office Statistics'.
Thanks for your enquiry!
Many thanks for your enquiry.
click here for our hidden "thank you for your enquiry" webpage
What Charity is Expert Agent supporting?
We're supporting a small charity called the Turing Trust which helps to educate in Ghana - partly through the donation of used computer equipment. We'd like you to help us.
Turing Trust was founded by James Turing the great nephew of Alan Turing, founder of modern computing, hero of Bletchley Park Enigma codebreaking, and the subject of the recent film "The Imitation Game"


James Turing comments
'Of all the things afflicting those in the developing world, a lack of opportunity does the most to ensure that people do not break free from the cyclical nature of poverty. This became abundantly clear to us when we first travelled to Ghana in 2009 and saw first-hand the desperation in which so many live every day. Above all, we were shocked at how a local school managed to operate, let alone deliver an effective education, with only a single textbook to instruct over 50 students. Searching for a way to help the school provide a chance for its students to break free from poverty, we had only look to one of the founders’ great-uncle for inspiration, Alan Turing, father of computer science, who once said that “We can only see a short distance ahead, but we can see plenty there that needs to be done”.'
The Optional £1 per month donation - how it works and how to remove it
We add an optional £1+VAT per month donation on every direct debit payment. We've got nearly 1500 direct debits at present and we'd like to think we'll raise at least £500 per month for them
If you donate £1, we'll send you a press release that you can use to explain how you are helping.
So, as well as feeling good, you'll get some practical benefit.
HMRC's rules regarding charity collection are strict. As we and you will derive some benefit from the donation (in terms of promotion or marketing), we have to levy VAT.
If you don't want to pay the £1+VAT donation, it is very easy to remove it from your direct debit.
Any super-user can follow the steps below:
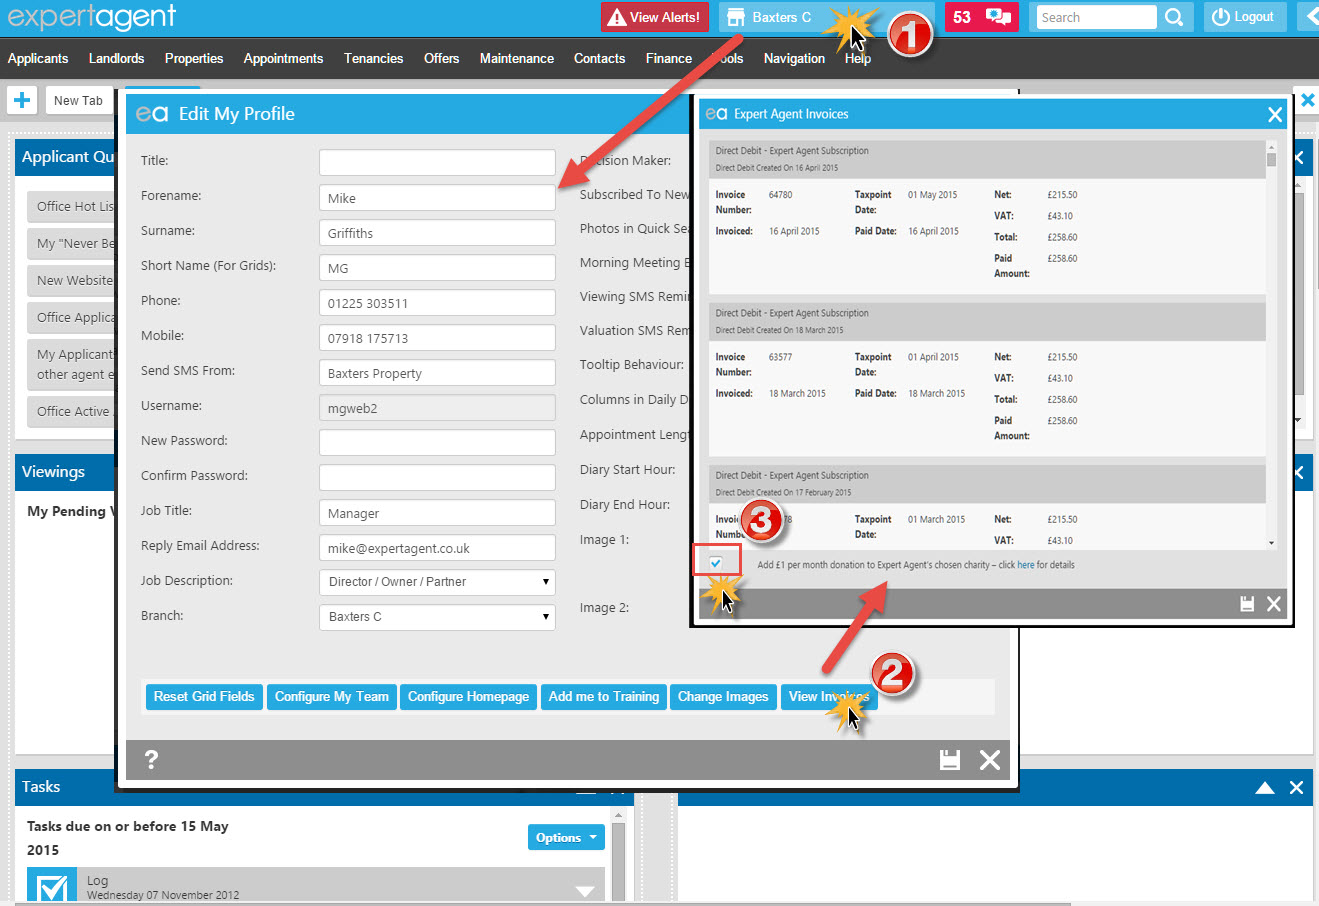
1. Click the button to open your Expert Agent profile
2. Click View Invoices in the bottom right hand corner
3. Remove the tick in add £1 per month donation to Expert Agent's Chosen Charity.
You'll get a confirmation and you'll be able to click into your latest bill and reprint it without the donation either from the invoice list or from the billing notification email - both link to a "live" copy of the invoice. Once you've removed the tick, you won't need to do this again.
If you would prefer us to do it, please log a support ticket or email This email address is being protected from spambots. You need JavaScript enabled to view it.. However, we'd be really grateful if you would please have a go at doing it yourself - it will take less time than typing a ticket or email.
Tel: 01225 303500 | Email: account.managers@webskyltd.com
Terms of Business | Cookie Policy | Privacy Policy | ZPG Modern Slavery Statement
Designed by the Expert Agent Design Department
